# SSH Usage
Connect to remote devices over SSH and send terminal commands from the User Console or API.
With **Remote Command**, you can use the Soracom User Console and the Soracom API to send SSH commands to devices that use IoT SIMs and verify their results.
You can use this feature with either a password-based setup or a key-pair setup.
## From the User Console with Password
1. Sign in to the **[User Console](https://console.soracom.io/?coverage_type=g)**. From the **☰ Menu**, open the **SIM Management** screen.
2. From the list of subscribers, click the **☑** for the SIM you want to send a SSH command to.
3. Click the **Actions ▾** menu, then select **Send Command via SSH**.
4. Configure the following settings:
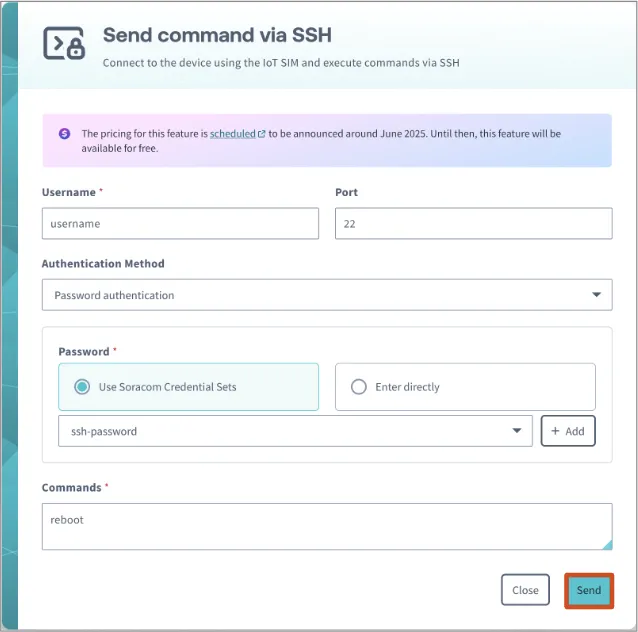
|
Item |
Description |
| - | - |
| Username | Enter the username for SSH login to the device. Example: pi |
| Port | Enter the port number that the device accepts SSH connections on. Example: 22 |
| Authentication Method | If you want to use password authentication to send commands via SSH, select **Password authentication**. |
| Password | Select the password to use for authentication.
- To use a password registered in the [Credential Sets](https://docs.soracom.io/en/services/authentication/credential-sets), select **Use Soracom Credential Sets** and choose the password.
- To newly register and use a password in the [Credential Sets](https://docs.soracom.io/en/services/authentication/credential-sets), click + **Add** to register the password.
- To enter a password directly, select **Enter directly** and input the password. |
| Command | Enter the command to execute on the device. Example: reboot |
5. Click **Send**.
The command will be sent to the device. Once the device finishes executing the command, the result will be displayed.
## From the User Console with SSH Key Authentication
> [!WARNING]
>
> To use this feature, ensure that you've prepared an [SSH key pair](https://docs.soracom.io/en/services/remote-command/ssh/#preparing-an-ssh-key-pair-public-key-authentication-only).
1. Sign in to the **[User Console](https://console.soracom.io/?coverage_type=g)**. From the **☰ Menu**, open the **SIM Management** screen.
2. From the list of subscribers, click the **☑** for the SIM you want to send a SSH command to.
3. Click the **Actions ▾** menu, then select **Send Command via SSH**.
4. Configure the following settings:
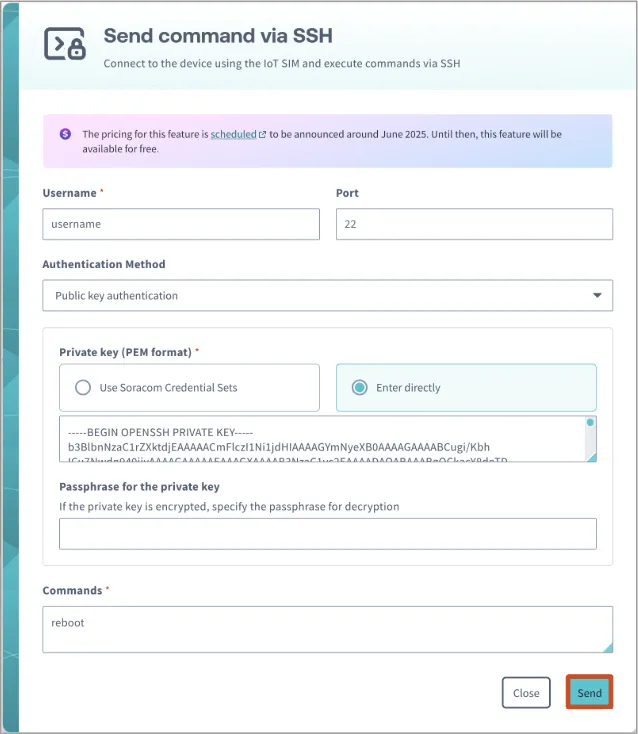
|
Item |
Description |
| - | - |
| Username | Enter the username for SSH login to the device. Example: pi |
| Port | Enter the port number that the device accepts SSH connections on. Example: 22 |
| Authentication Method | If you want to use public key authentication to send commands via SSH, select **Public key authentication**. |
| Private Key (PEM format) | Select the private key to use for authentication.
- To use a private key registered in the [Credential Sets](https://docs.soracom.io/en/services/authentication/credential-sets), select **Use Soracom Credential Sets** and choose the private key.
- To newly register and use a private key in the [Credential Sets](https://docs.soracom.io/en/services/authentication/credential-sets), click + **Add** to register the private key.
- To use a private key saved on your local computer, select **Enter directly** and input the private key. |
| Private Key Passphrase | If the private key is protected with a passphrase, enter the passphrase. |
| Command | Enter the command to execute on the device. Example: echo 'Hello world!'; ls -l |
5. Click **Send**.
The command will be sent to the device. Once the device finishes executing the command, the result will be displayed.
## Programmatic Usage
### Soracom API
To access the Soracom API, first use the [**auth**](https://docs.soracom.io/en/api#!/Auth/auth) API to obtain an API Key and Token. Refer to the [**API Usage Guide**](https://docs.soracom.io/en/developers/soracom-api) for instructions on how to use the API Key and Token in API requests.
Then, use the [sendDownlinkSsh](https://docs.soracom.io/en/api#!/Sim/sendDownlinkSsh) API to send an SSH command to a device that has an IoT SIM:
**Global**
```bash
curl -X POST \
-H 'X-Soracom-API-Key: ' \
-H 'X-Soracom-Token: ' \
-H 'Content-Type: application/json' \
-d '{
"username": "username",
"port": 22,
"authentication": {
"type": "publickey",
"key": "-----BEGIN OPENSSH PRIVATE KEY-----\nb3BlbnNzaC1rZXktdjEAAAAACmFlczI1Ni1jdHIAAAAGYmNyeXB0AAAAGAAAABCugi/Kbh\nICu7Nwdn....",
},
"command": "reboot",
}' \
https://g.api.soracom.io/v1/sims//downlink/ssh
```
**Japan**
```bash
curl -X POST \
-H 'X-Soracom-API-Key: ' \
-H 'X-Soracom-Token: ' \
-H 'Content-Type: application/json' \
-d '{
"username": "username",
"port": 22,
"authentication": {
"type": "publickey",
"key": "-----BEGIN OPENSSH PRIVATE KEY-----\nb3BlbnNzaC1rZXktdjEAAAAACmFlczI1Ni1jdHIAAAAGYmNyeXB0AAAAGAAAABCugi/Kbh\nICu7Nwdn....",
},
"command": "reboot",
}' \
https://jp.api.soracom.io/v1/sims//downlink/ssh
```
### Soracom CLI
To use the Soracom CLI, you must first configure it to authenticate with your account information, authorization key, or SAM user credentials.
Run the following command to send an SSH command to a device that has an IoT SIM:
**Global**
```bash
body='{
"username": "username",
"port": 22,
"authentication": {
"type": "publickey",
"key": "-----BEGIN OPENSSH PRIVATE KEY-----\nb3BlbnNzaC1rZXktdjEAAAAACmFlczI1Ni1jdHIAAAAGYmNyeXB0AAAAGAAAABCugi/Kbh\nICu7Nwdn....",
},
"command": "reboot",
}'
soracom sims downlink-ssh --sim-id --body ${body} --coverage-type g
```
**Japan**
```bash
body='{
"username": "username",
"port": 22,
"authentication": {
"type": "publickey",
"key": "-----BEGIN OPENSSH PRIVATE KEY-----\nb3BlbnNzaC1rZXktdjEAAAAACmFlczI1Ni1jdHIAAAAGYmNyeXB0AAAAGAAAABCugi/Kbh\nICu7Nwdn....",
},
"command": "reboot",
}'
soracom sims downlink-ssh --sim-id --body ${body} --coverage-type jp
```
## Preparing an SSH Key Pair (Public Key Authentication Only)
Before sending SSH commands via Remote Command, you'll need to prepare an SSH key pair:
Here, we will create public and private key pair files to use for SSH login and save them as follows:
- **Public key**, `id_ed25519.pub`: Save it in a designated location on your target device.
- **Private key**, `id_ed25519`: Save it in the authentication information store of the Soracom User Console.
1. Create a public/private key pair on your PC from a Linux environment.
```bash
ssh-keygen
Generating public/private ed25519 key pair...
Enter file in which to save the key (/home/xxxx/.ssh/id_ed25519):
```
Follow the instructions on the screen to create a public key (`id_ed25519.pub`) and private key (`id_ed25519`).
> [!WARNING]
>
> If you set a passphrase, specify it when creating a Soracom authentication.
2. Copy the public key, `id_ed25519.pub`, to your target device.
Copy the public key using any method you like. From now on, the target device, `user name` will be referred to as `${user}`. Example: `pi`
- If you are copying from an environment where you can use Linux `ssh-copy-id`, etc., to the target device that can be accessed by an IP address (e.g., 192.168.xxx.xxx), run the following command:
```bash
ssh-copy-id -i /PATH/TO/PUBLIC_KEY ${user}@192.168.xxx.xxx
```
- If you are copying from an environment where you can use Linux `ssh-copy-id` to a target device that uses an IoT SIM, you can create an on-demand remote access in Napter even if you are in a remote location by executing the following command. For more information about on-demand remote access in Napter, see [Soracom Napter documentation](https://docs.soracom.io/en/services/napter).
Replace `xxxx` and `xxx-xxx-xxx-xxx.napter.soracom.io` with the port number and domain issued by Napter's on-demand remote access.
```bash
ssh-copy-id -i /PATH/TO/PUBLIC_KEY -p xxxx ${user}@xxx-xxx-xxx-xxx.napter.soracom.io
```
- Similarly, use `scp` if you are copying from an environment where Windows is available, run a command like the following:
```bash
scp -P xxxxx /PATH/TO/PUBLIC_KEY ${user}@xxx-xxx-xxx-xxx.napter.soracom.io:/home/${user}/
```
In this case, you will also need to access the target device via ssh and move the contents of `id_ed25519.pub` to the appropriate location.
```bash
ssh -p xxxxx xxx-xxx-xxx-xxx.napter.soracom.io -l ${user}
mkdir -p ~/.ssh
cat ~/id_ed25519.pub >> ~/.ssh/authorized_keys
chmod 600 ~/.ssh/authorized_keys
rm ~/id_ed25519.pub
```
3. Verify that you can log in to the target device using the SSH key pair.
```bash
ssh -p xxxxx xxx-xxx-xxx-xxx.napter.soracom.io -l ${user}
```
If you set a passphrase for your key pair, you can log in by entering the passphrase.
4. Register the private key in the Soracom User Console.
Specifically, register the credentials on the **Register credentials** screen of the Credentials Store as follows. For information on how to display this screen, see [Creating a Credential Set](https://docs.soracom.io/en/services/authentication/credential-sets#creating-a-credential-set).
- **Authentication Information ID**: Enter a name to identify the credentials. For example: `Private-Key`.
- **Type**: Select Private Key (PEM).
- **Private key (PEM)**: Copy the contents of the private key (`id_ed25519`).