# Using Soracom Beam to Send Data to Google Pub/Sub
Forward device data to Google Pub/Sub.
Use Beam to send data to Google Cloud Pub/Sub.
Beam eliminates the need to install Google Cloud credentials (service account key) and the Google Cloud SDK on your IoT devices. This guide walks through the steps to create a Google Pub/Sub service, to configure the Soracom platform, and to run a quick test that confirms messages are flowing between your IoT device and your Google Cloud Pub/Sub topic via Soracom Beam.
For example this call on your device will invoke Beam to send a data payload of `Hello Google Cloud Pub/Sub!`:
```bash
curl -v -X POST http://beam.soracom.io:8888/ \
-H "Content-Type: application/json" \
-d '{
"messages": [
{
"data": "SGVsbG8gR29vZ2xlIENsb3VkIFB1Yi9TdWIh"
}
]
}'
```
> [!WARNING]
>
> `data` specifies Base64-encoded data to be sent. `SGVsbG8gR29vZ2xlIENsb3VkIFB1Yi9TdWIh` in the above example command is Base64 encoded data for `Hello Google Cloud Pub/Sub!`
## Step 1: Configure Google Cloud Pub/Sub
### Create a Project
Create a project and activate the Google Cloud Pub/Sub API.
1. Go to the [Google Cloud Console](https://console.cloud.google.com/project?hl=ja) and click **+ CREATE PROJECT**.

2. Enter a **Project name** and click **CREATE**.
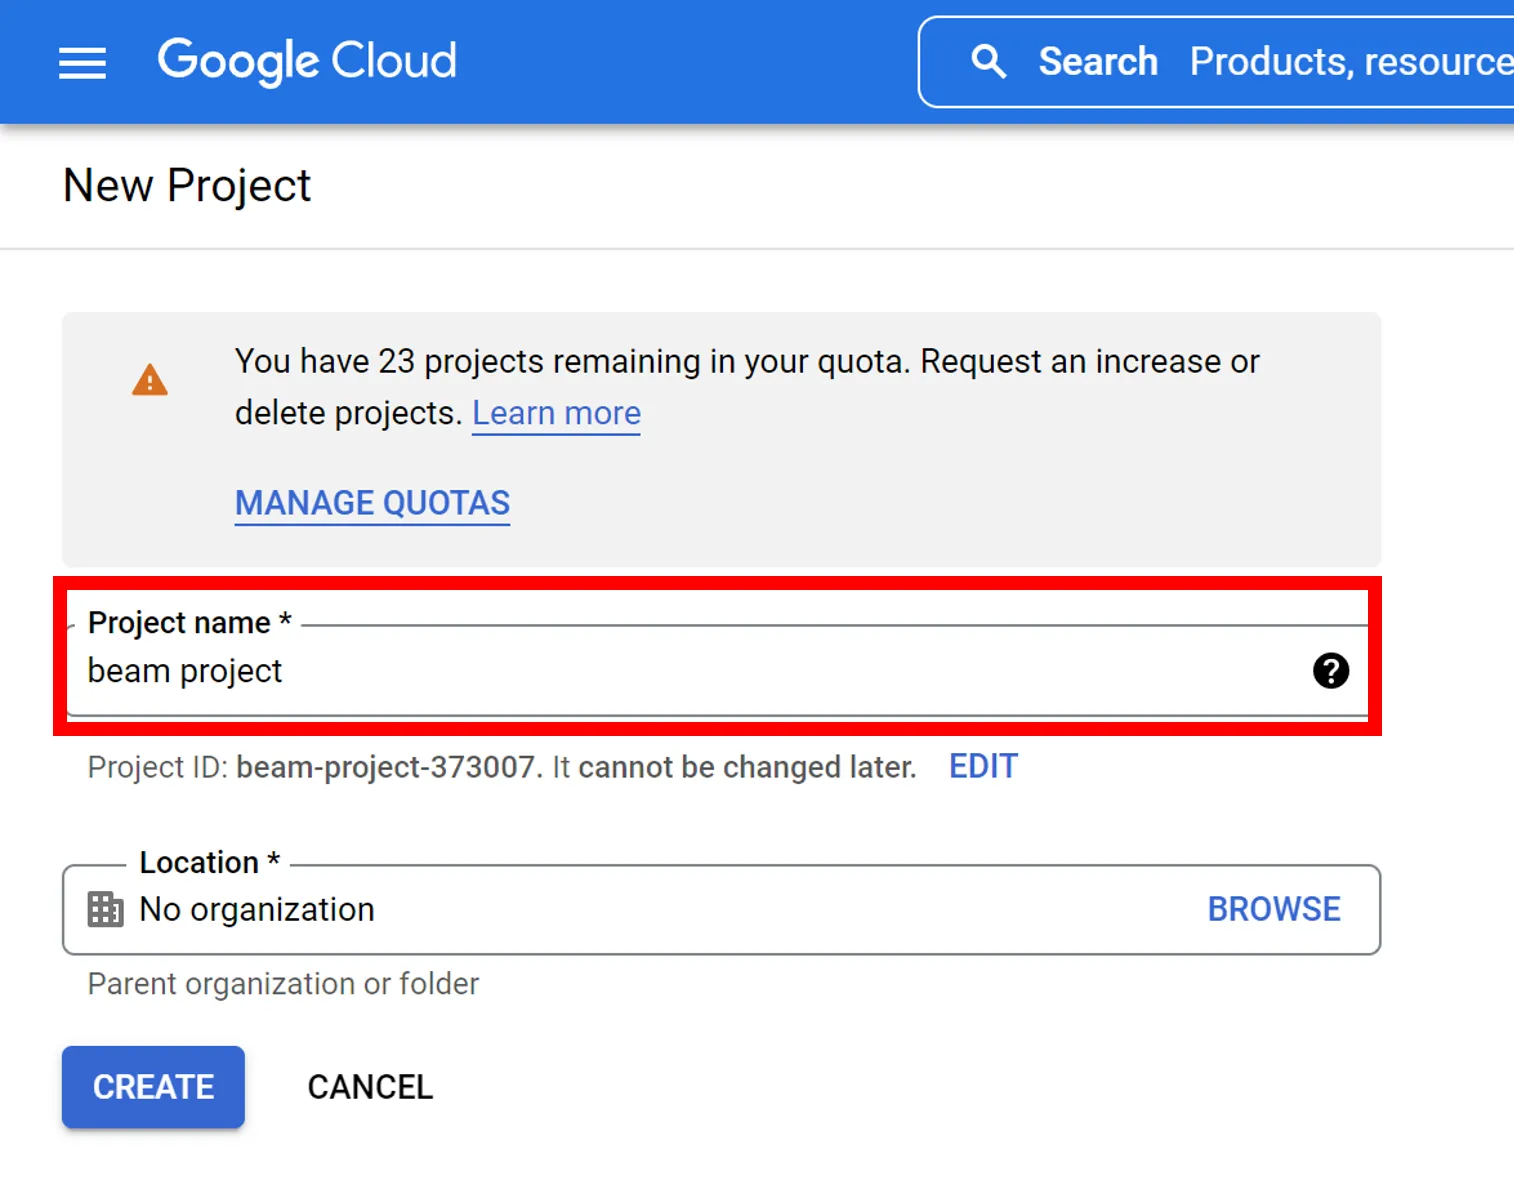
Continue to activate the Pub/Sub API in the project you have created.
3. In the navigation menu, select **APIs & Services**.
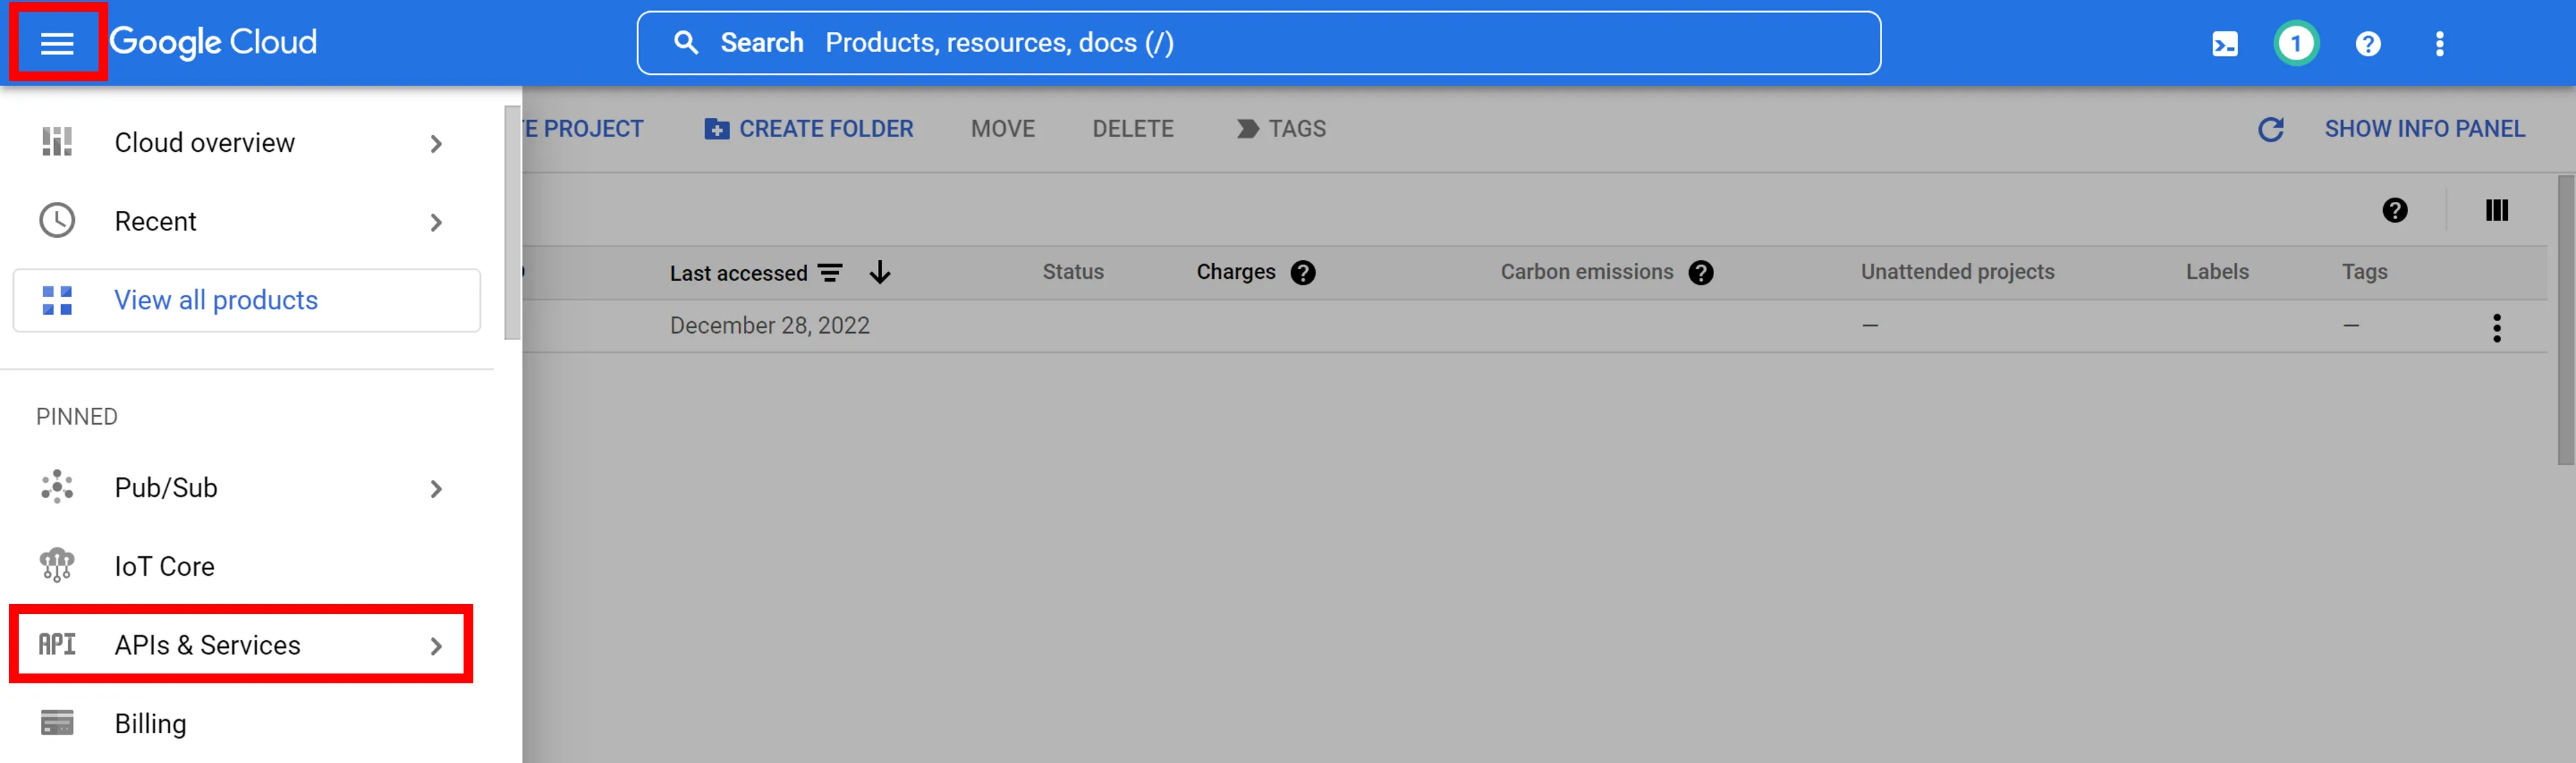
4. Select the project you created and click **+ ENABLE API AND SERVICES**.
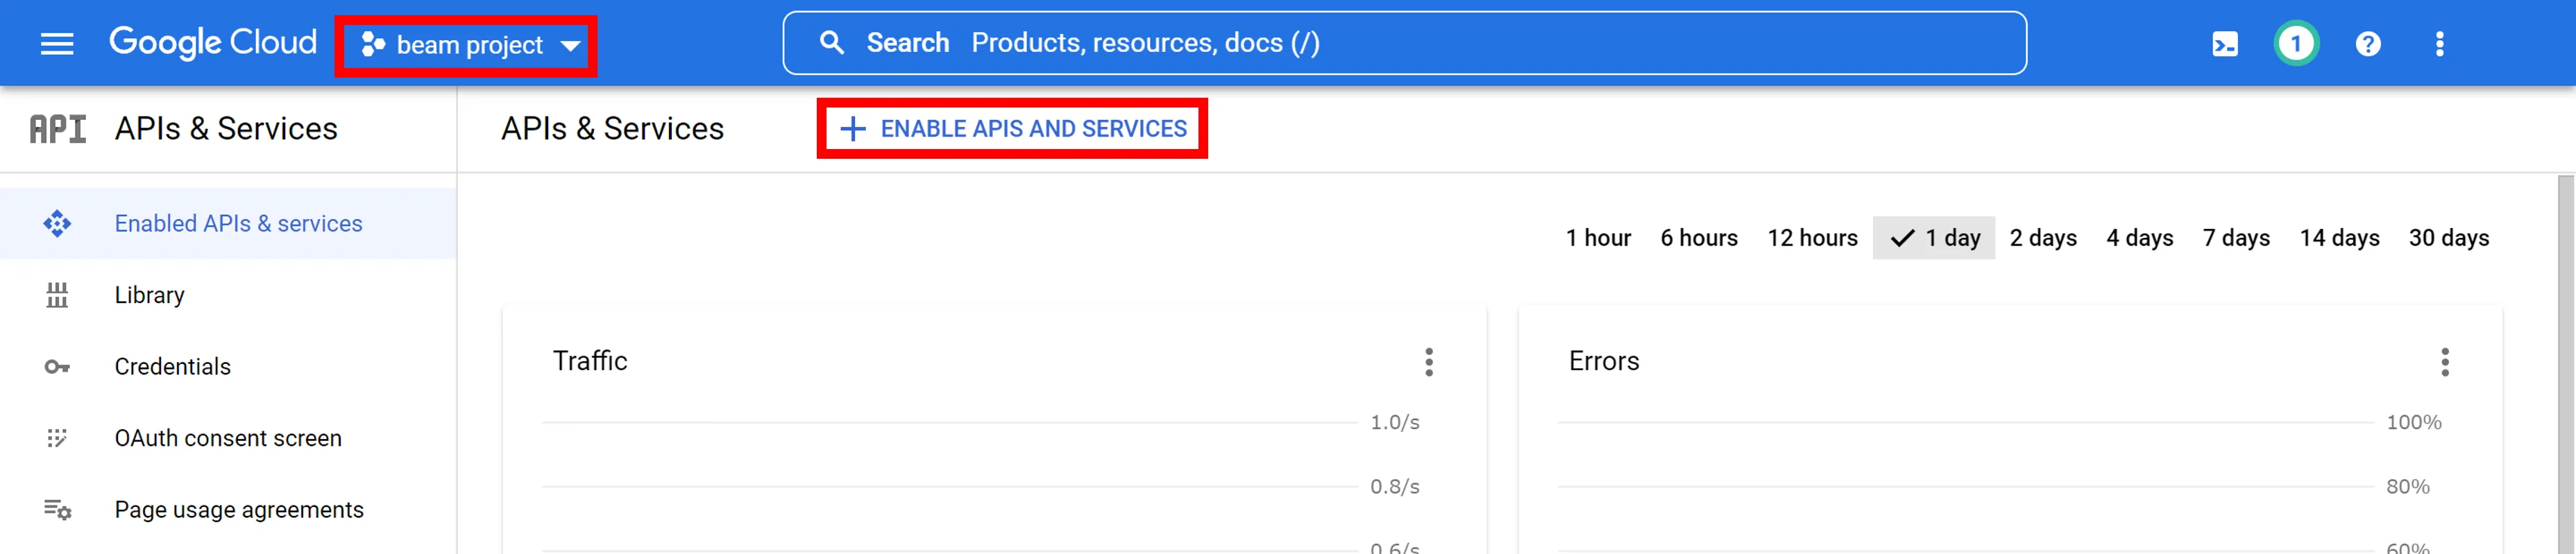
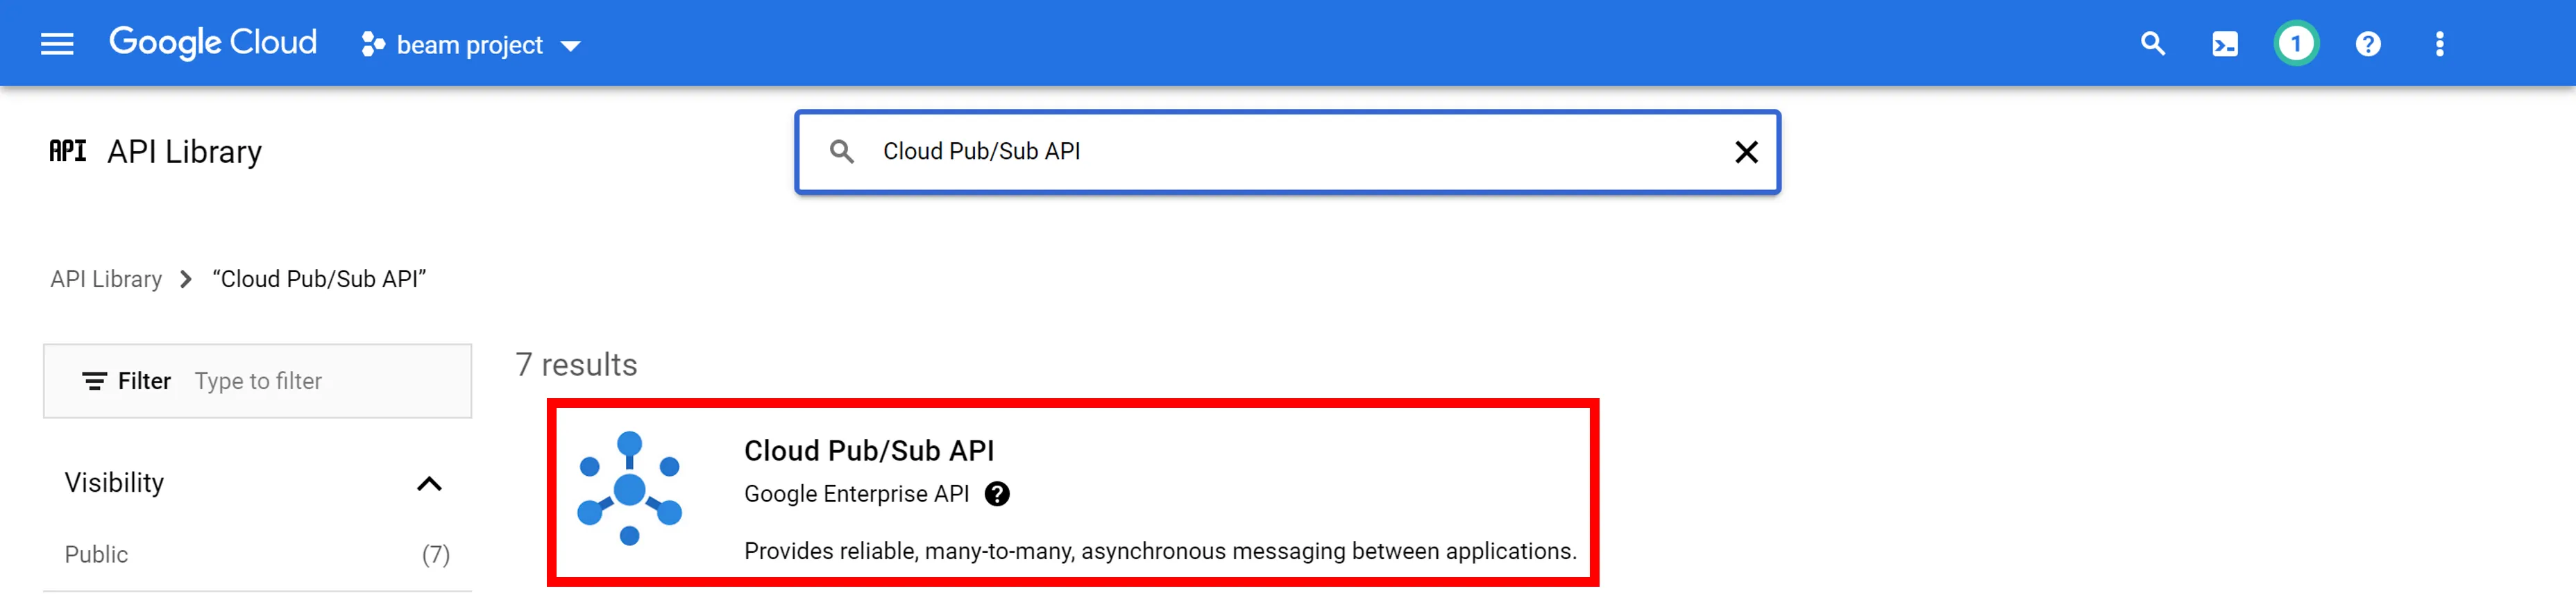
5. Type "Cloud Pub/Sub API" in **Search for APIs & Services** and press Enter.
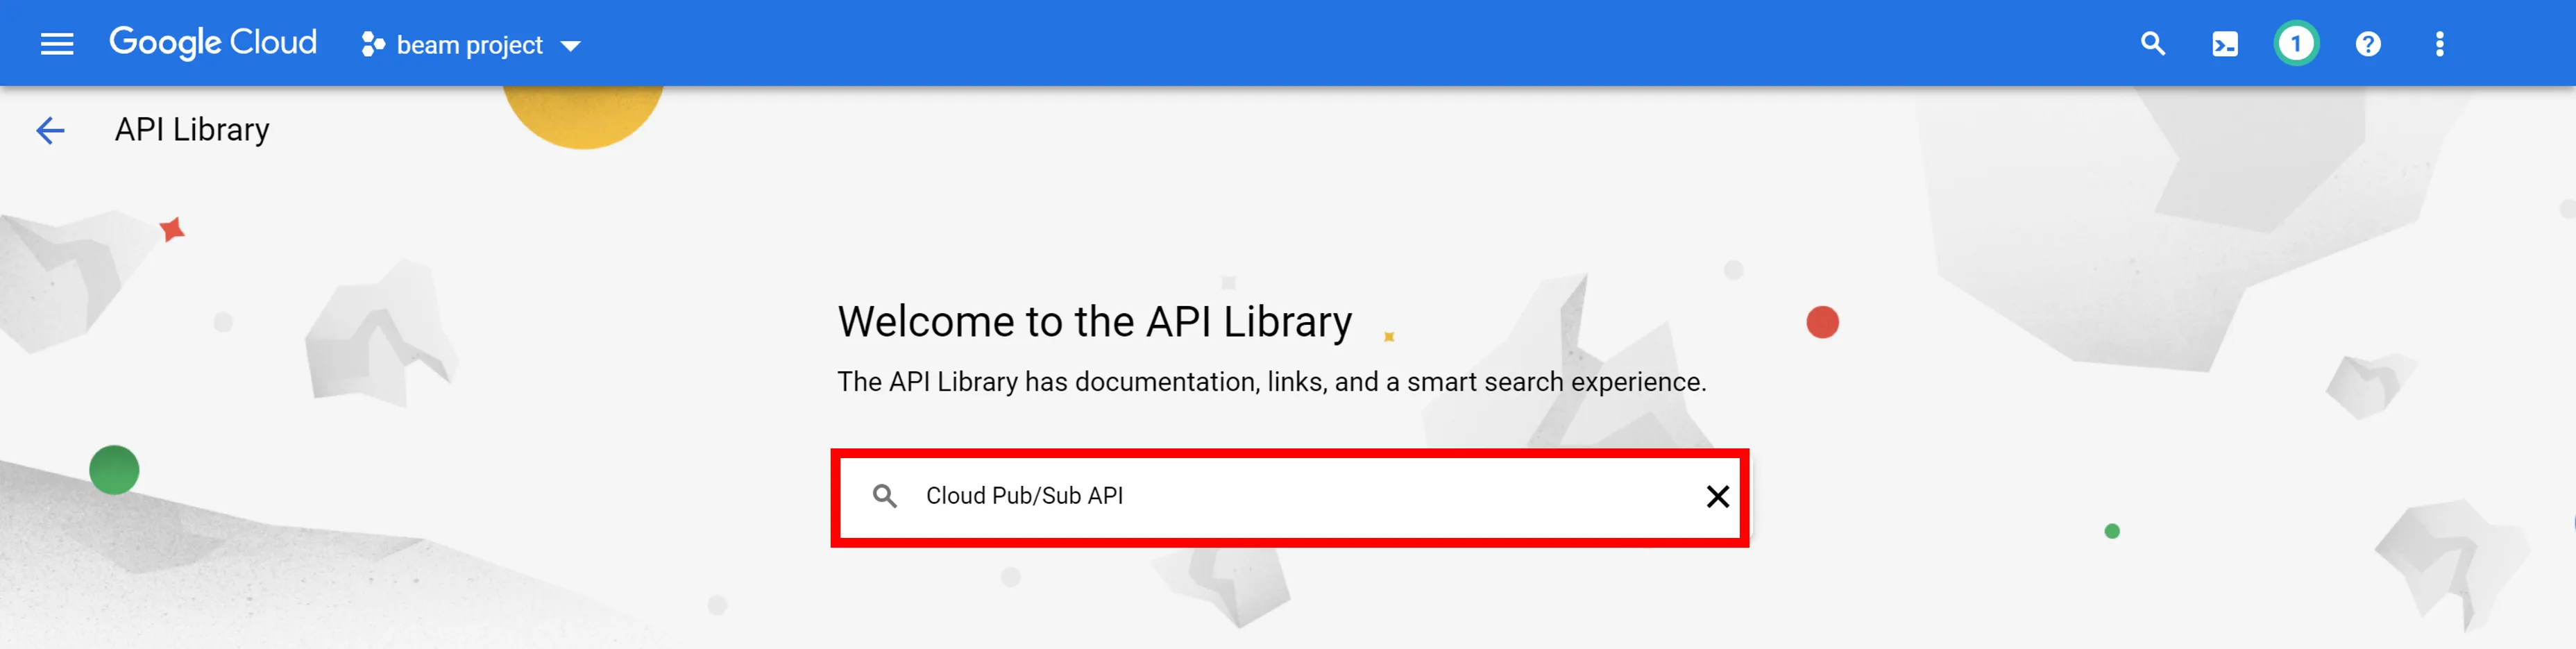
6. Click **Cloud Pub/Sub API**.
7. Click **ENABLE**.
### Create Topics and Pub/Sub Subscriptions
Create a Google Cloud Pub/Sub topic and a Pub/Sub subscription.
1. In the navigation menu, select **MORE PRODUCTS**.
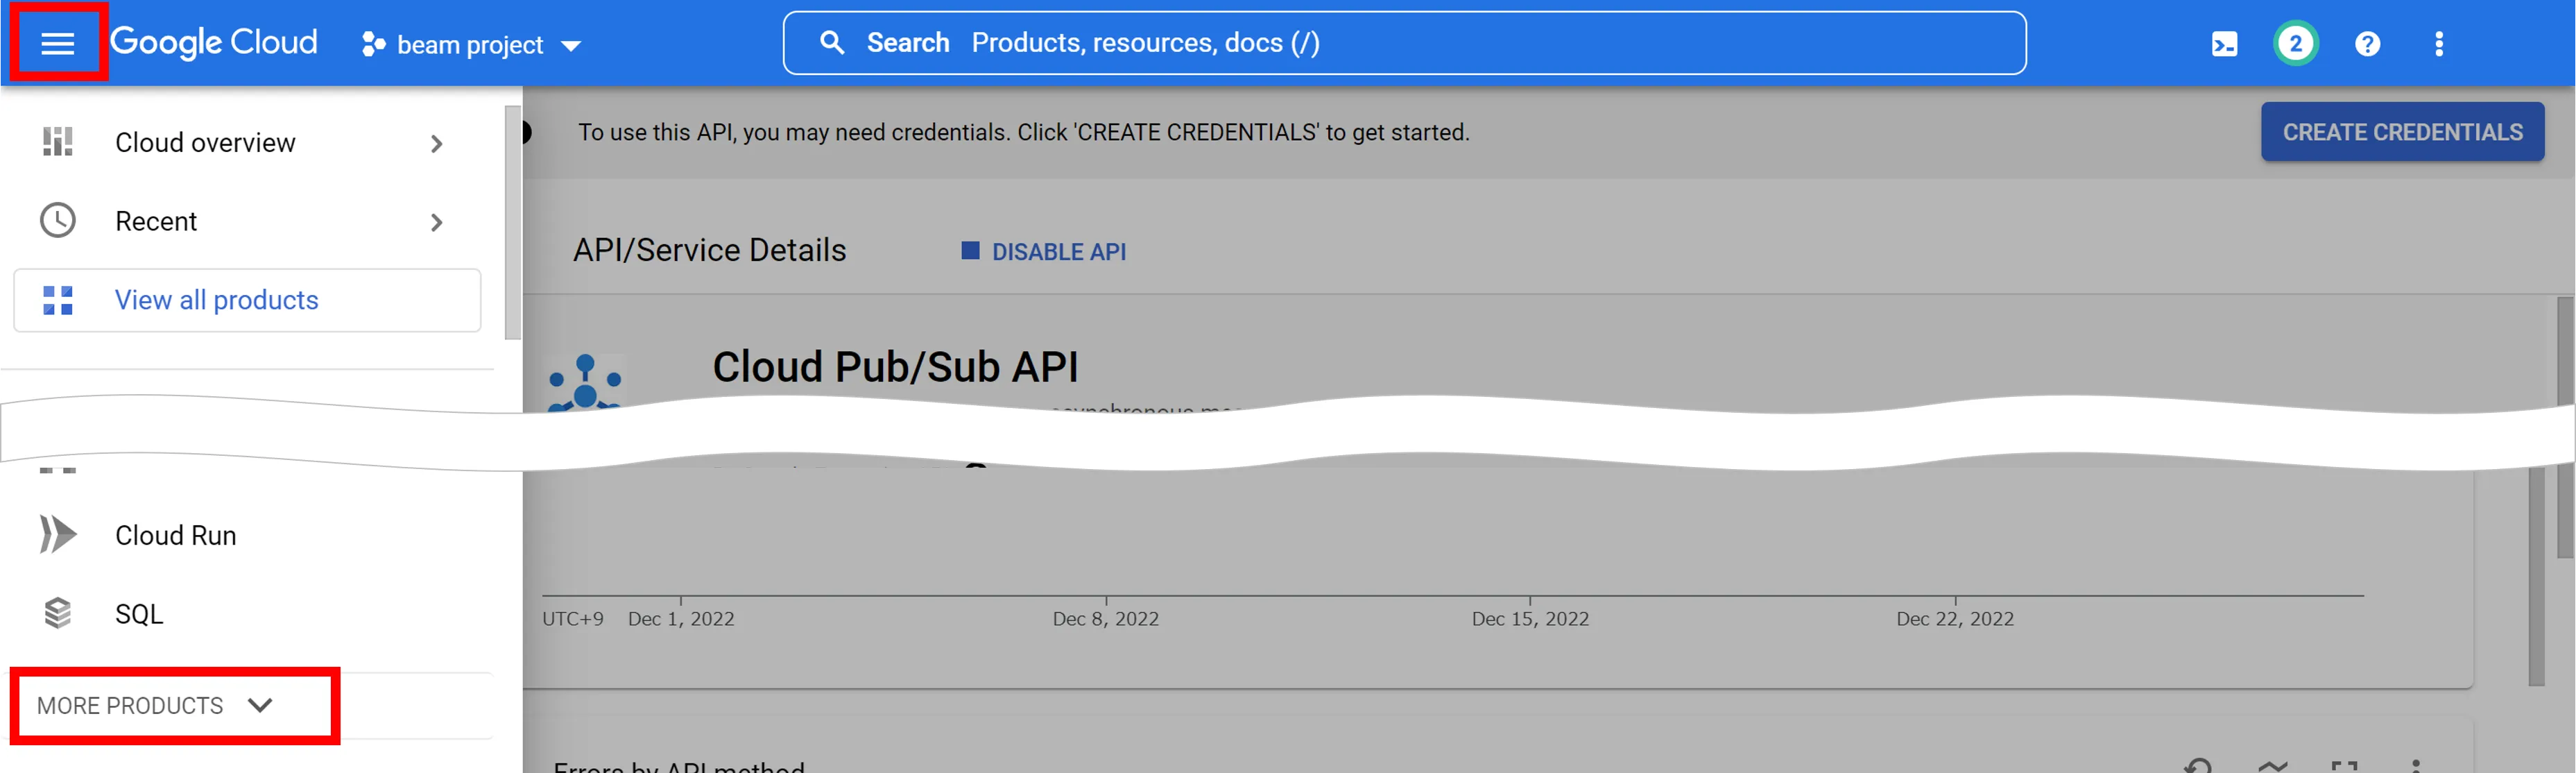
2. Click **Pub/Sub**.

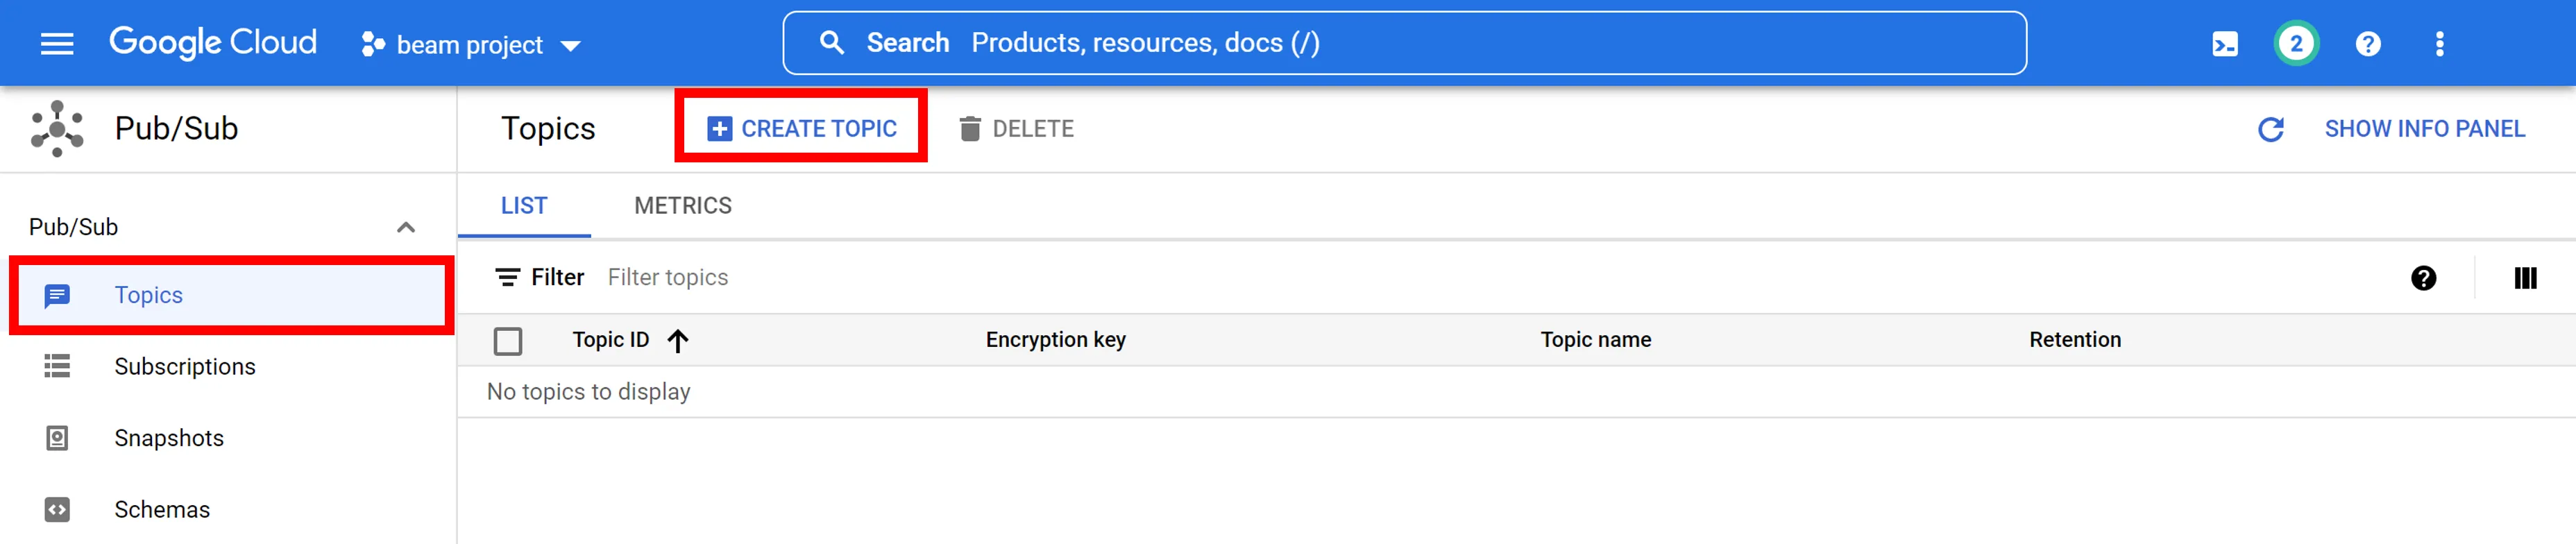
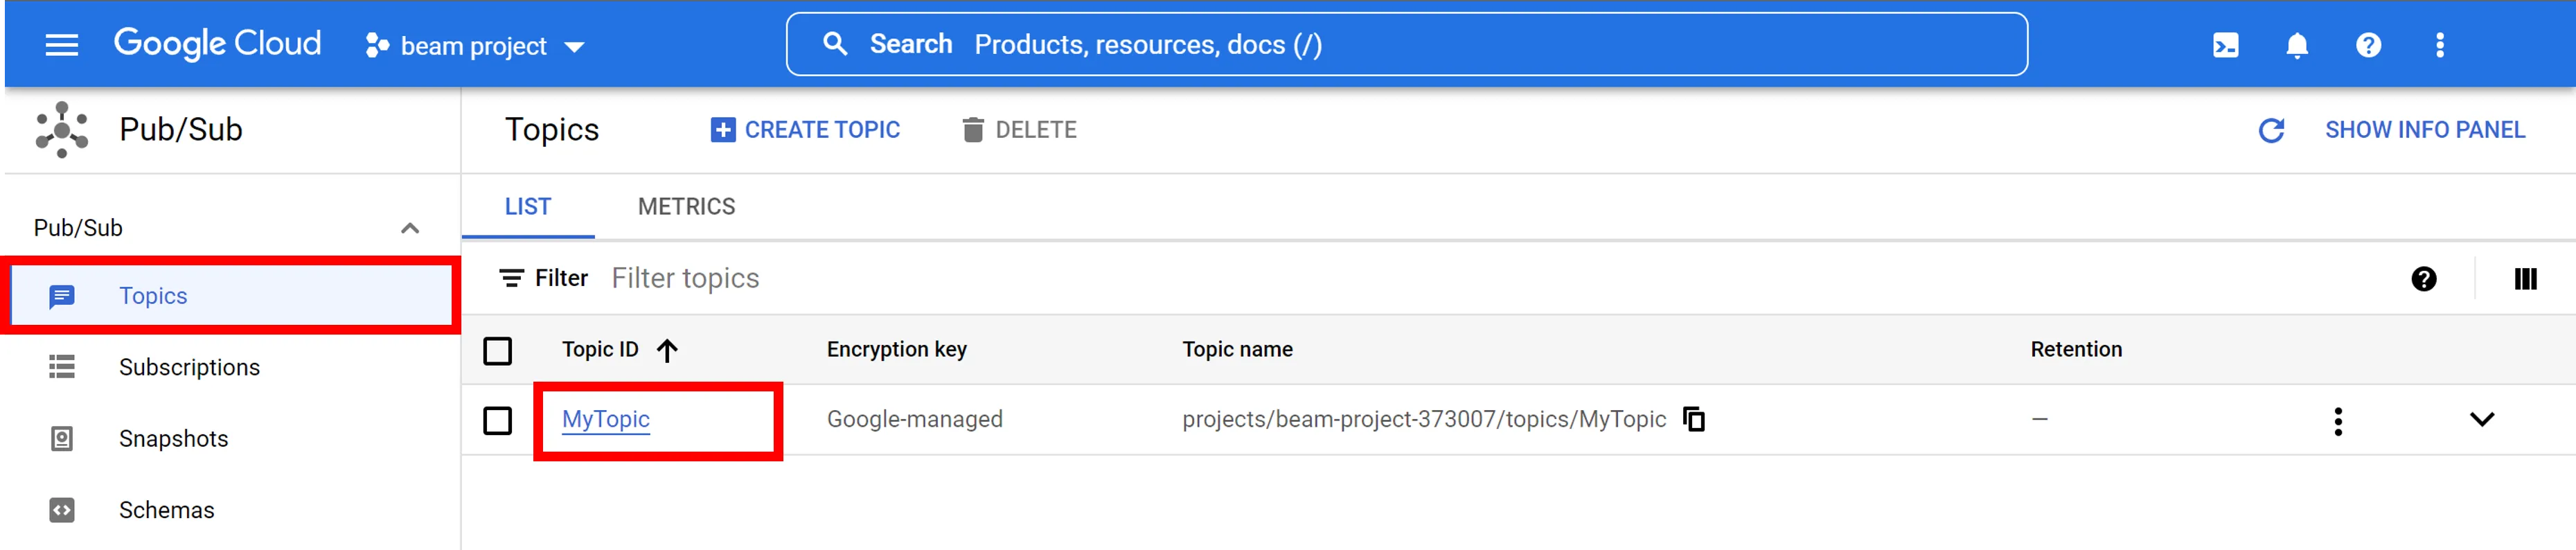
3. Click **Topics** > **+ CREATE TOPIC**.
4. Enter "MyTopic" for the **Topic ID** and click **CREATE TOPIC**.
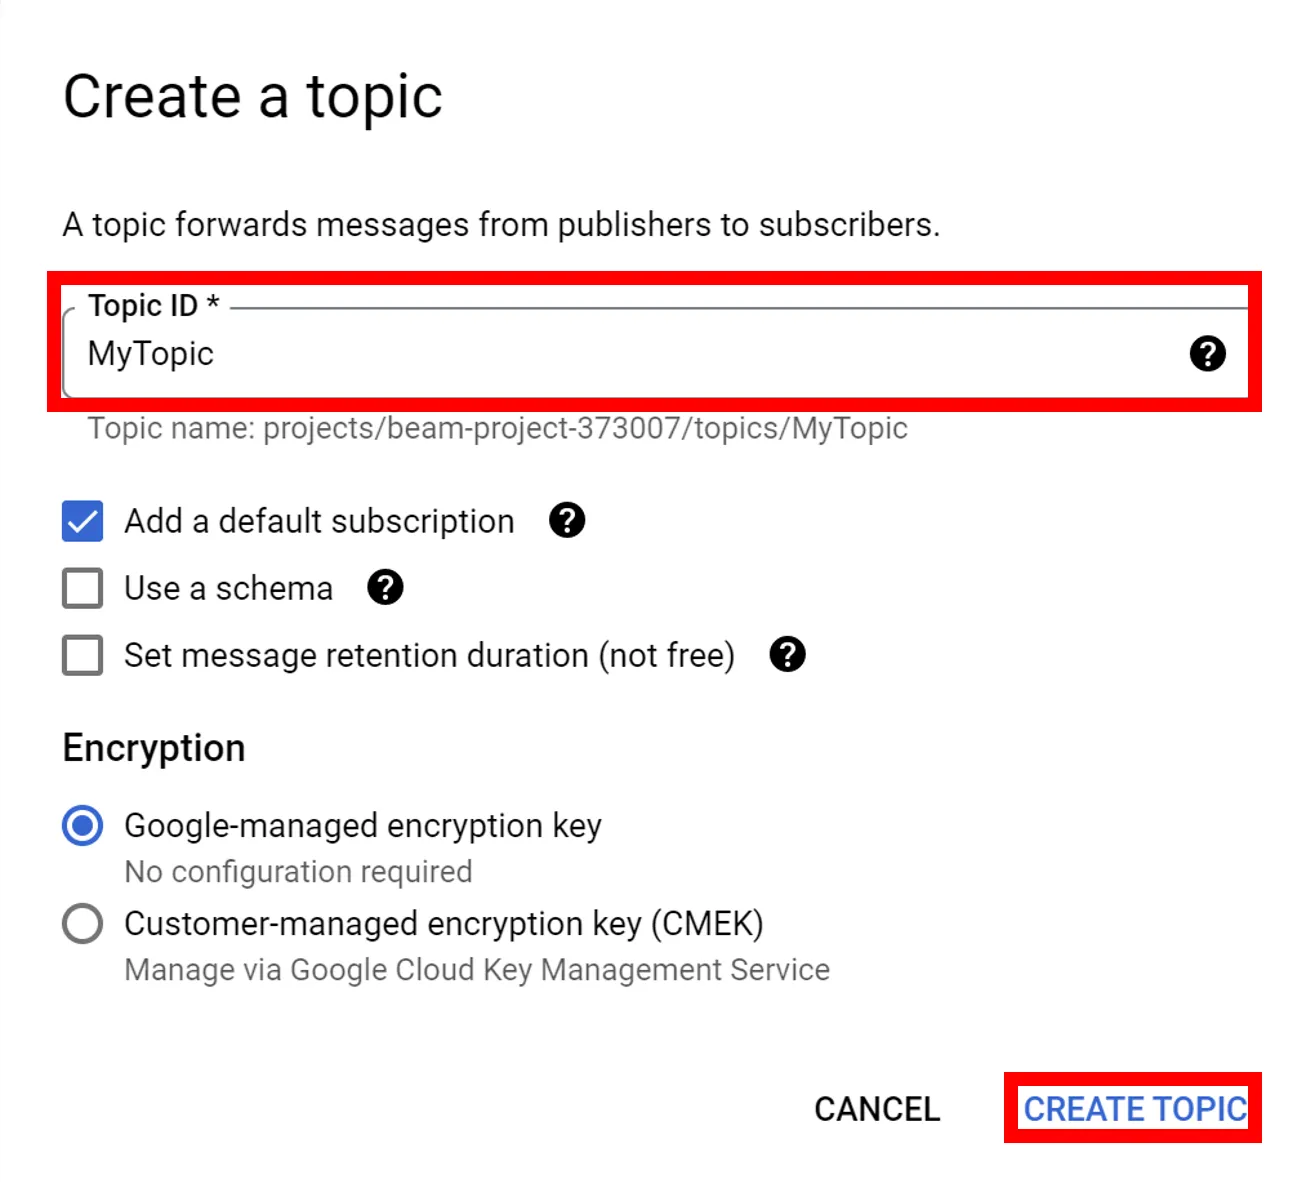
If you check the **Add a default subscription** checkbox, Pub/Sub subscriptions will also be created when you create a topic. The name of the Pub/Sub subscription created at this time is the topic ID plus `-sub` (e.g. `MyTopic-sub`).
### Publish and Subscribe to Messages
Verify that you can publish messages and that you can subscribe to them.
1. Click on **Topics** > **MyTopic** (or your topic name).
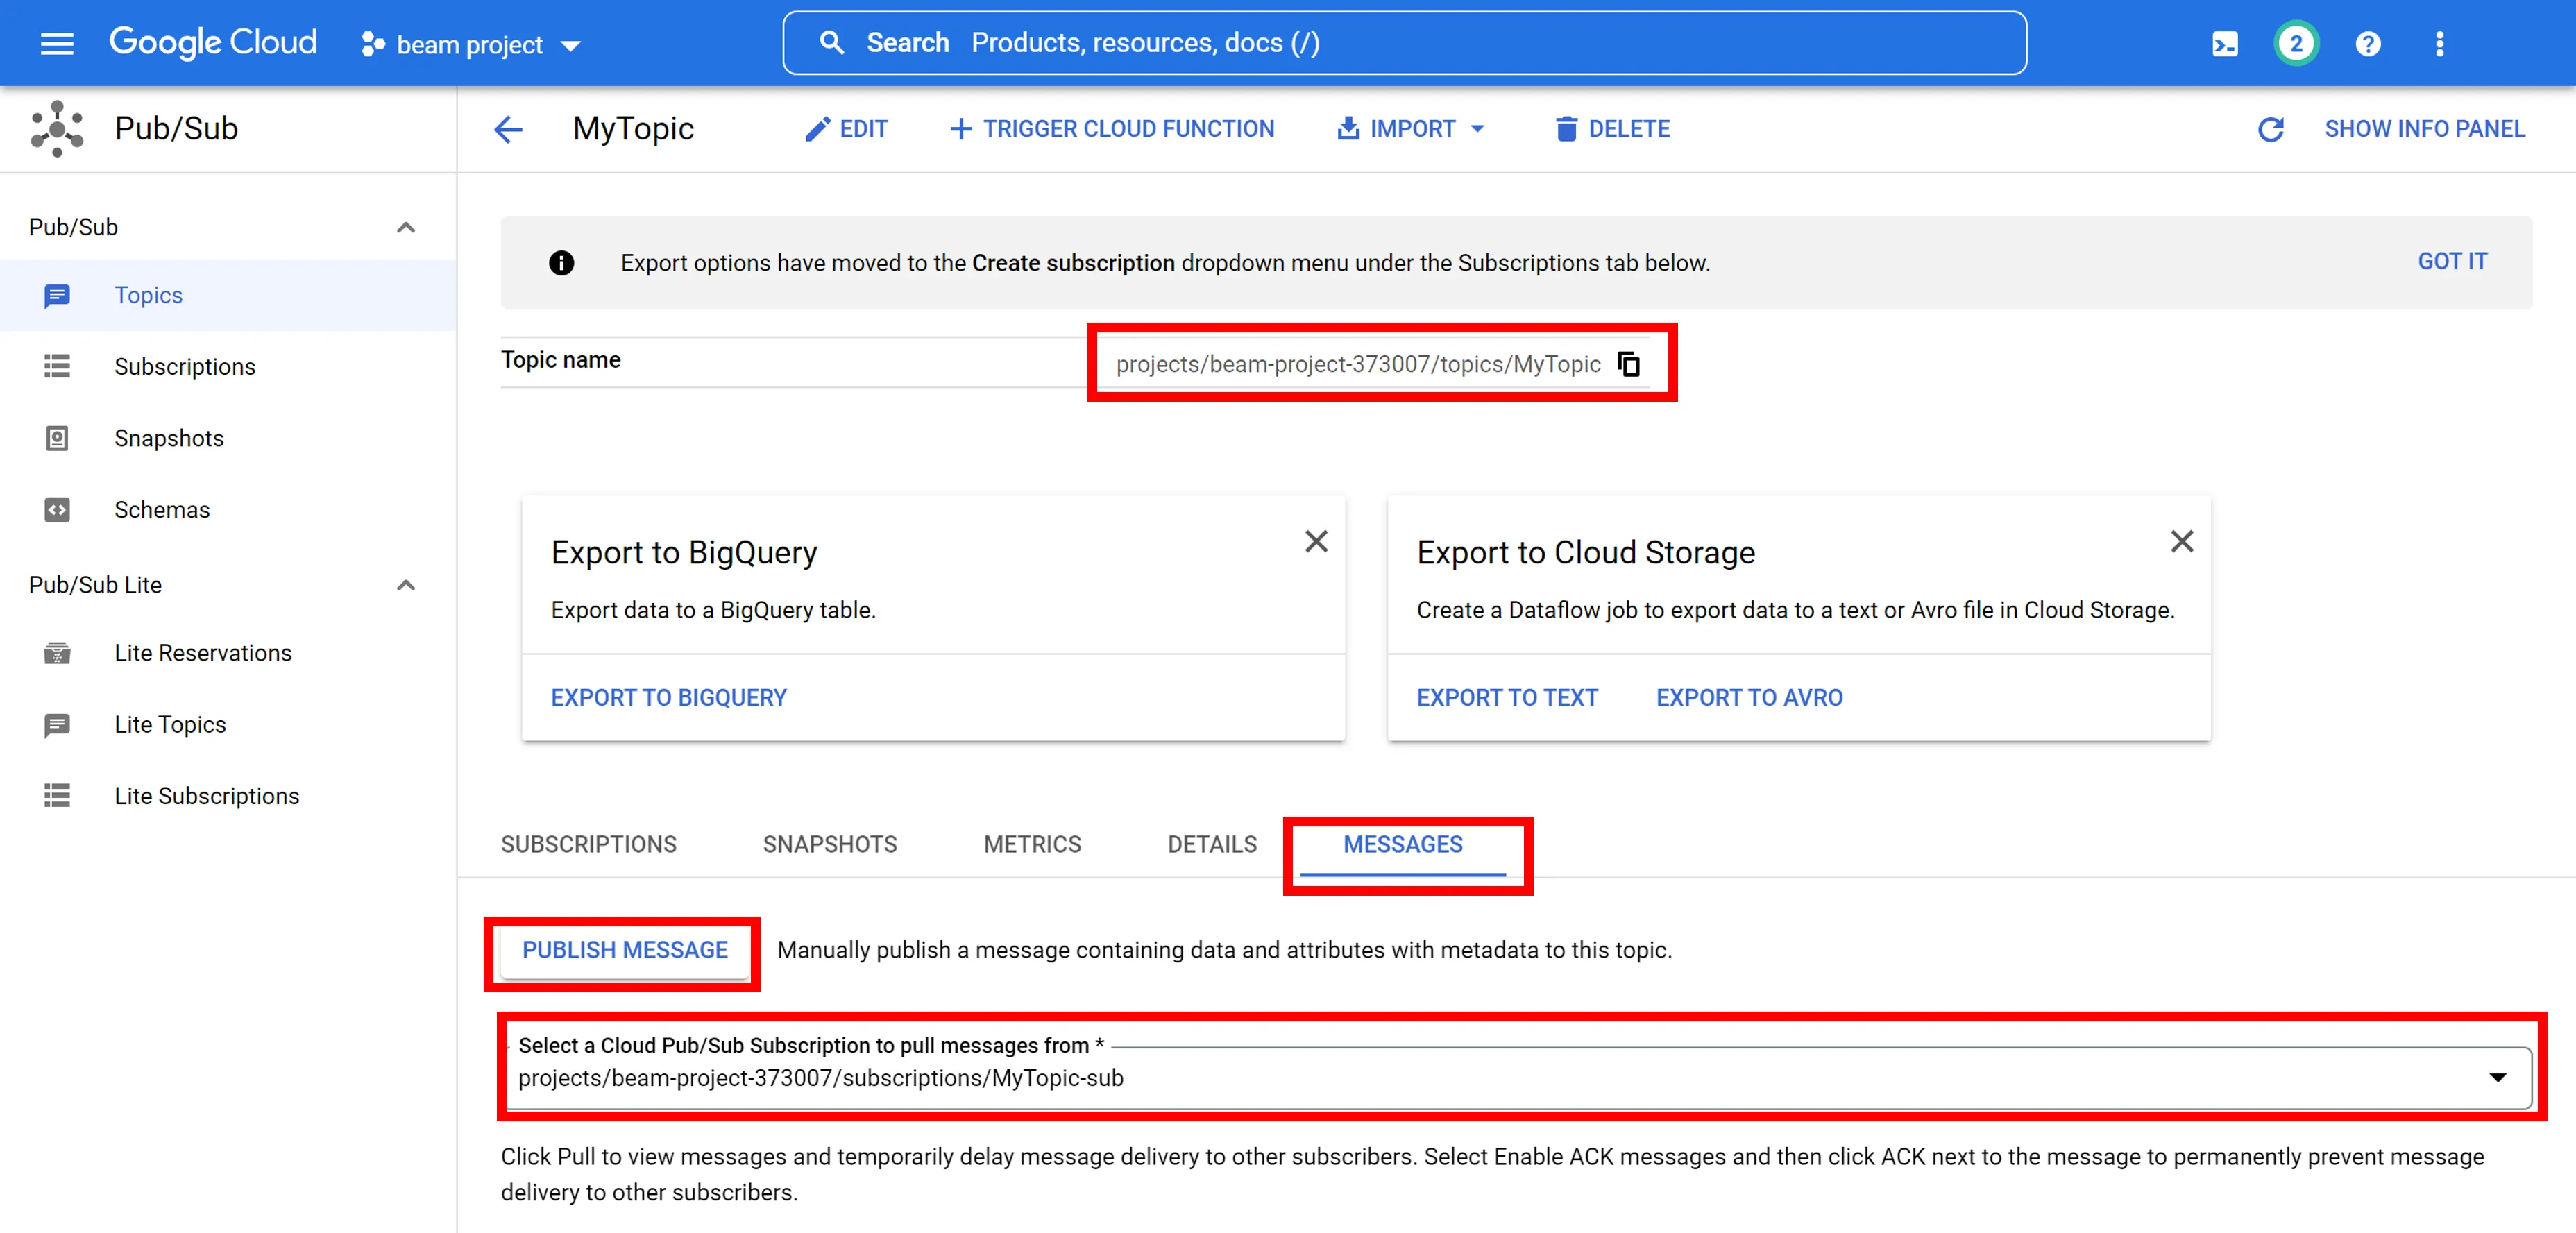
2. Copy the **Topic name**, click **MESSAGES**, select the Cloud Pub/Sub subscription you created in **Select a Cloud Pub/Sub Subscription to pull messages from**, and click **PUBLISH MESSAGE**.
The **Topic name** will henceforth be denoted `${topic_name}`. Example: `projects/beam-project-373007/topics/MyTopic`
3. Type "Hello world from Pub/Sub!" into **Message** and click **PUBLISH**.
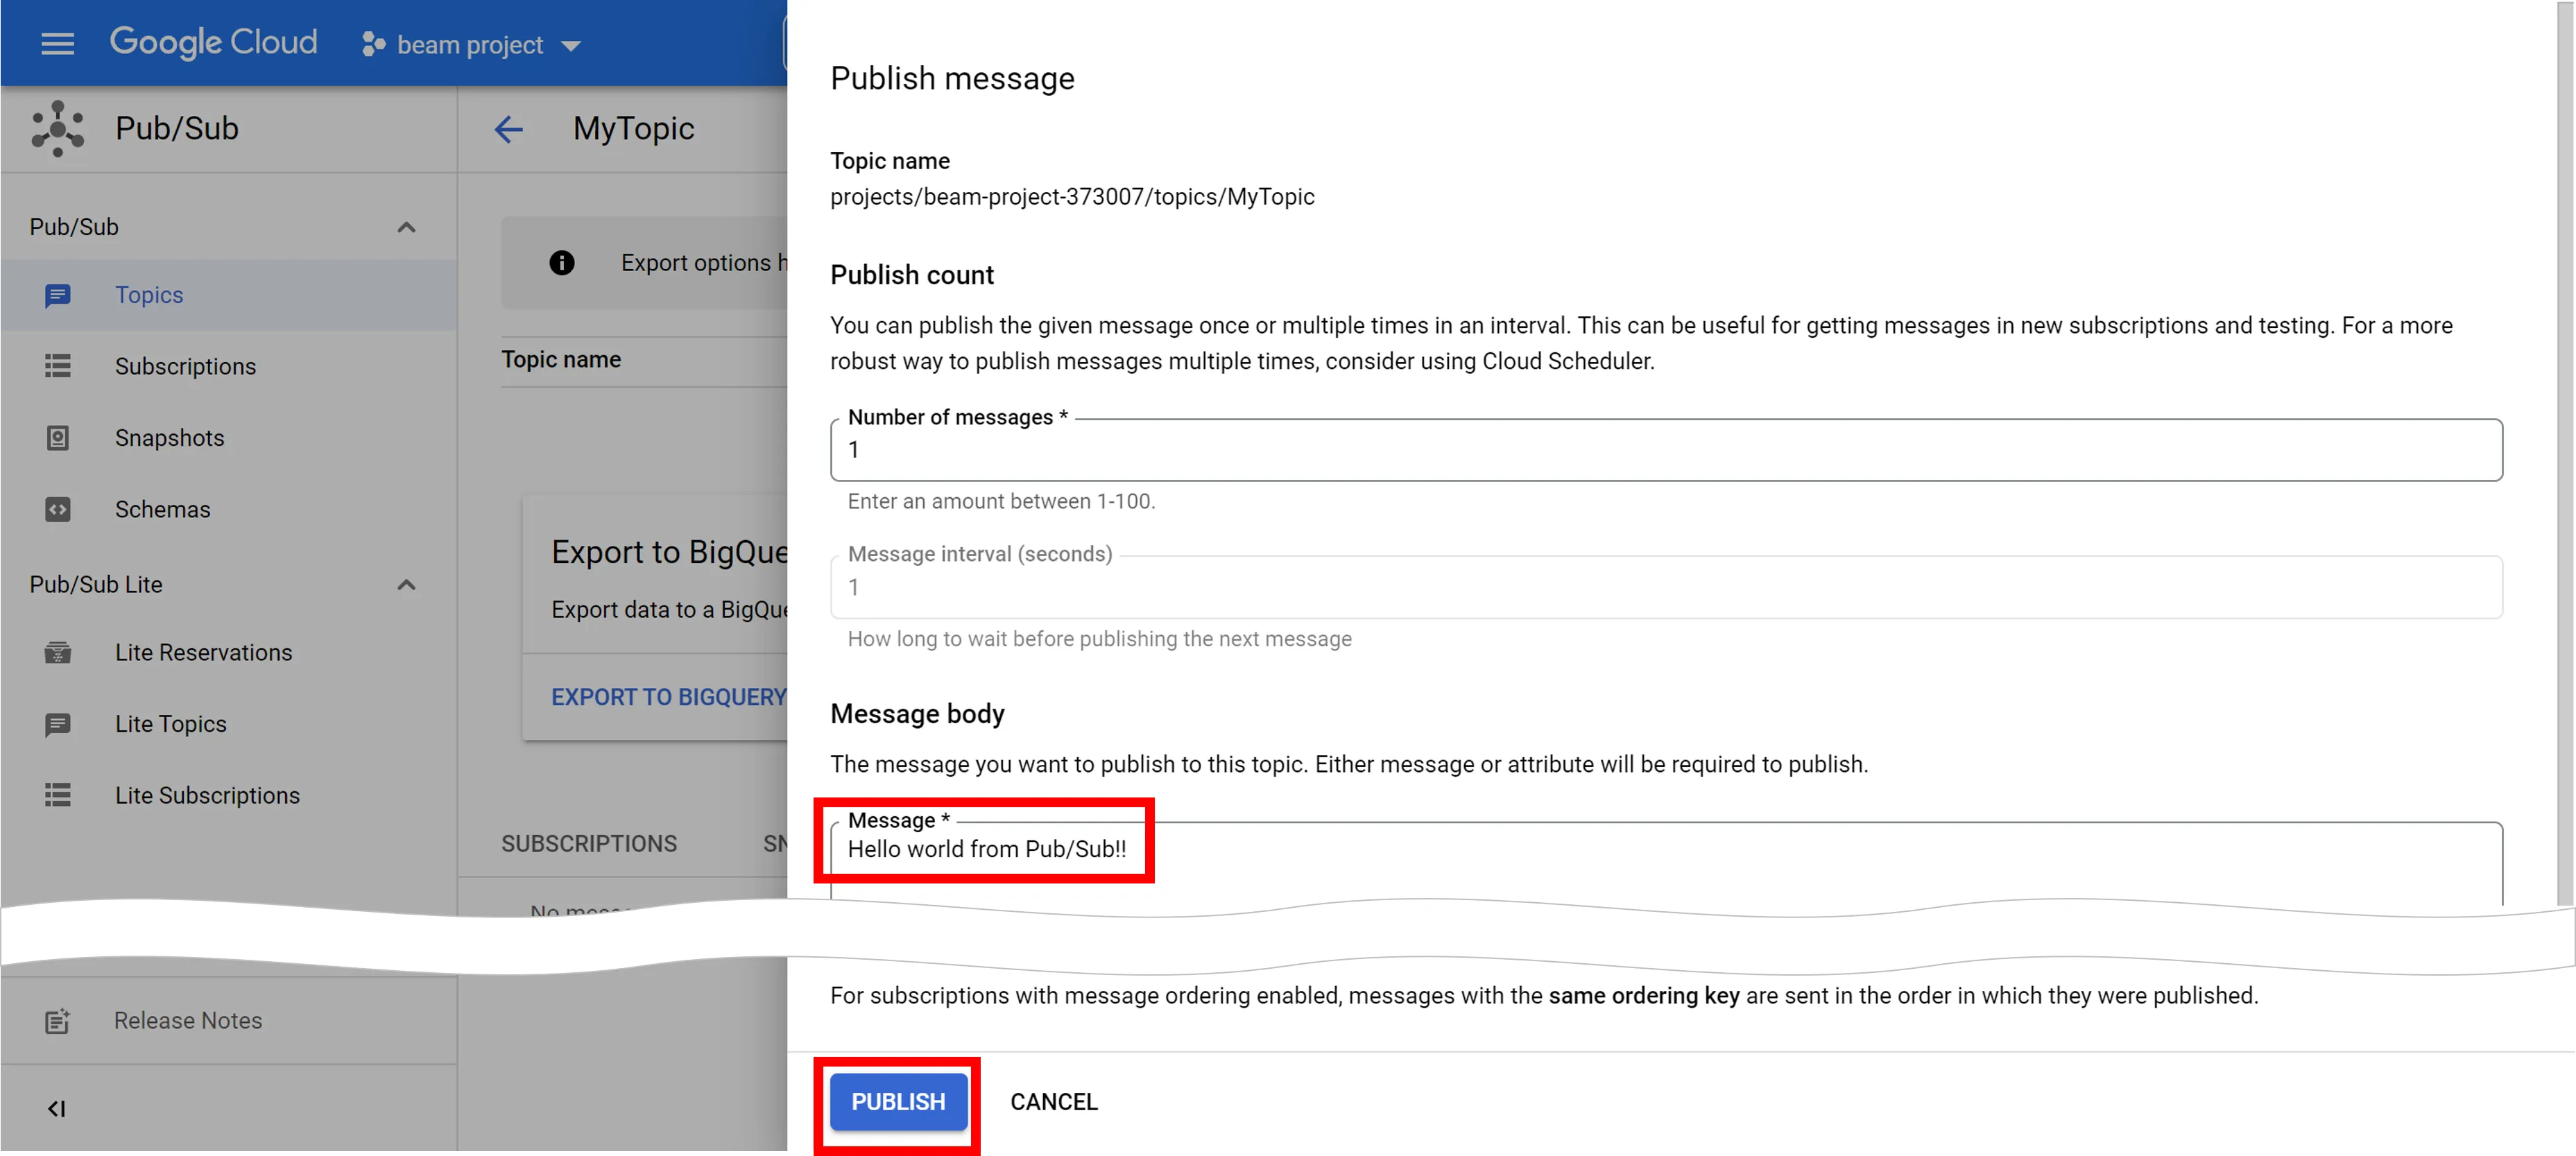
The message will be published. Use the Cloud Shell to check the published message.
4. Click the Cloud Shell icon to activate it.

The Cloud Shell appears.
5. Type the following command and press Enter
```bash
gcloud auth login
```
6. When the Cloud Shell displays a confirmation message, type "N" and press Enter.
7. Type the following command and press Enter
`MyTopic-sub` is the name of the Pub/Sub subscription you created in [Create topics and Pub/Sub subscriptions](https://docs.soracom.io/en/services/beam/google-pub-sub/#create-topics-and-pubsub-subscriptions).
```bash
gcloud pubsub subscriptions pull MyTopic-sub
```
8. When the "Authorize Cloud Shell" pop-up appears, click **AUTHORIZE**.
If the message is published correctly, it will appear as follows
```text
DATA: Hello world from Pub/Sub!!
MESSAGE_ID: 6535341101596617
ORDERING_KEY:
ATTRIBUTES:
DELIVERY_ATTEMPT:
ACK_ID: RVNEUAYWLF1GSFE3GQhoUQ5PXiM_NSAoRRcDCBQFfH1xU151WlQaB1ENGXJ8aXE8XBcBARMBKFVbEQ16bVxtrunxtURfQXNvWRYCBkRSfl5eEgtuXVtdhezZma6lnE5wYSuourn_SH-SgNxwZiA9XxJLLD5-MSpFQV5AEkw6H0RJUytDCypYEU4EISE-MD4
```
> [!NOTE]
>
> If you see "Listed 0 items.", execute the command in \[7] again.
## Step 2: Create a Service Account to Be Used with Beam
Create a service account for use with Beam and assign Pub/Sub publish permissions.
1. In the navigation menu, select **IAM & ADMIN**.
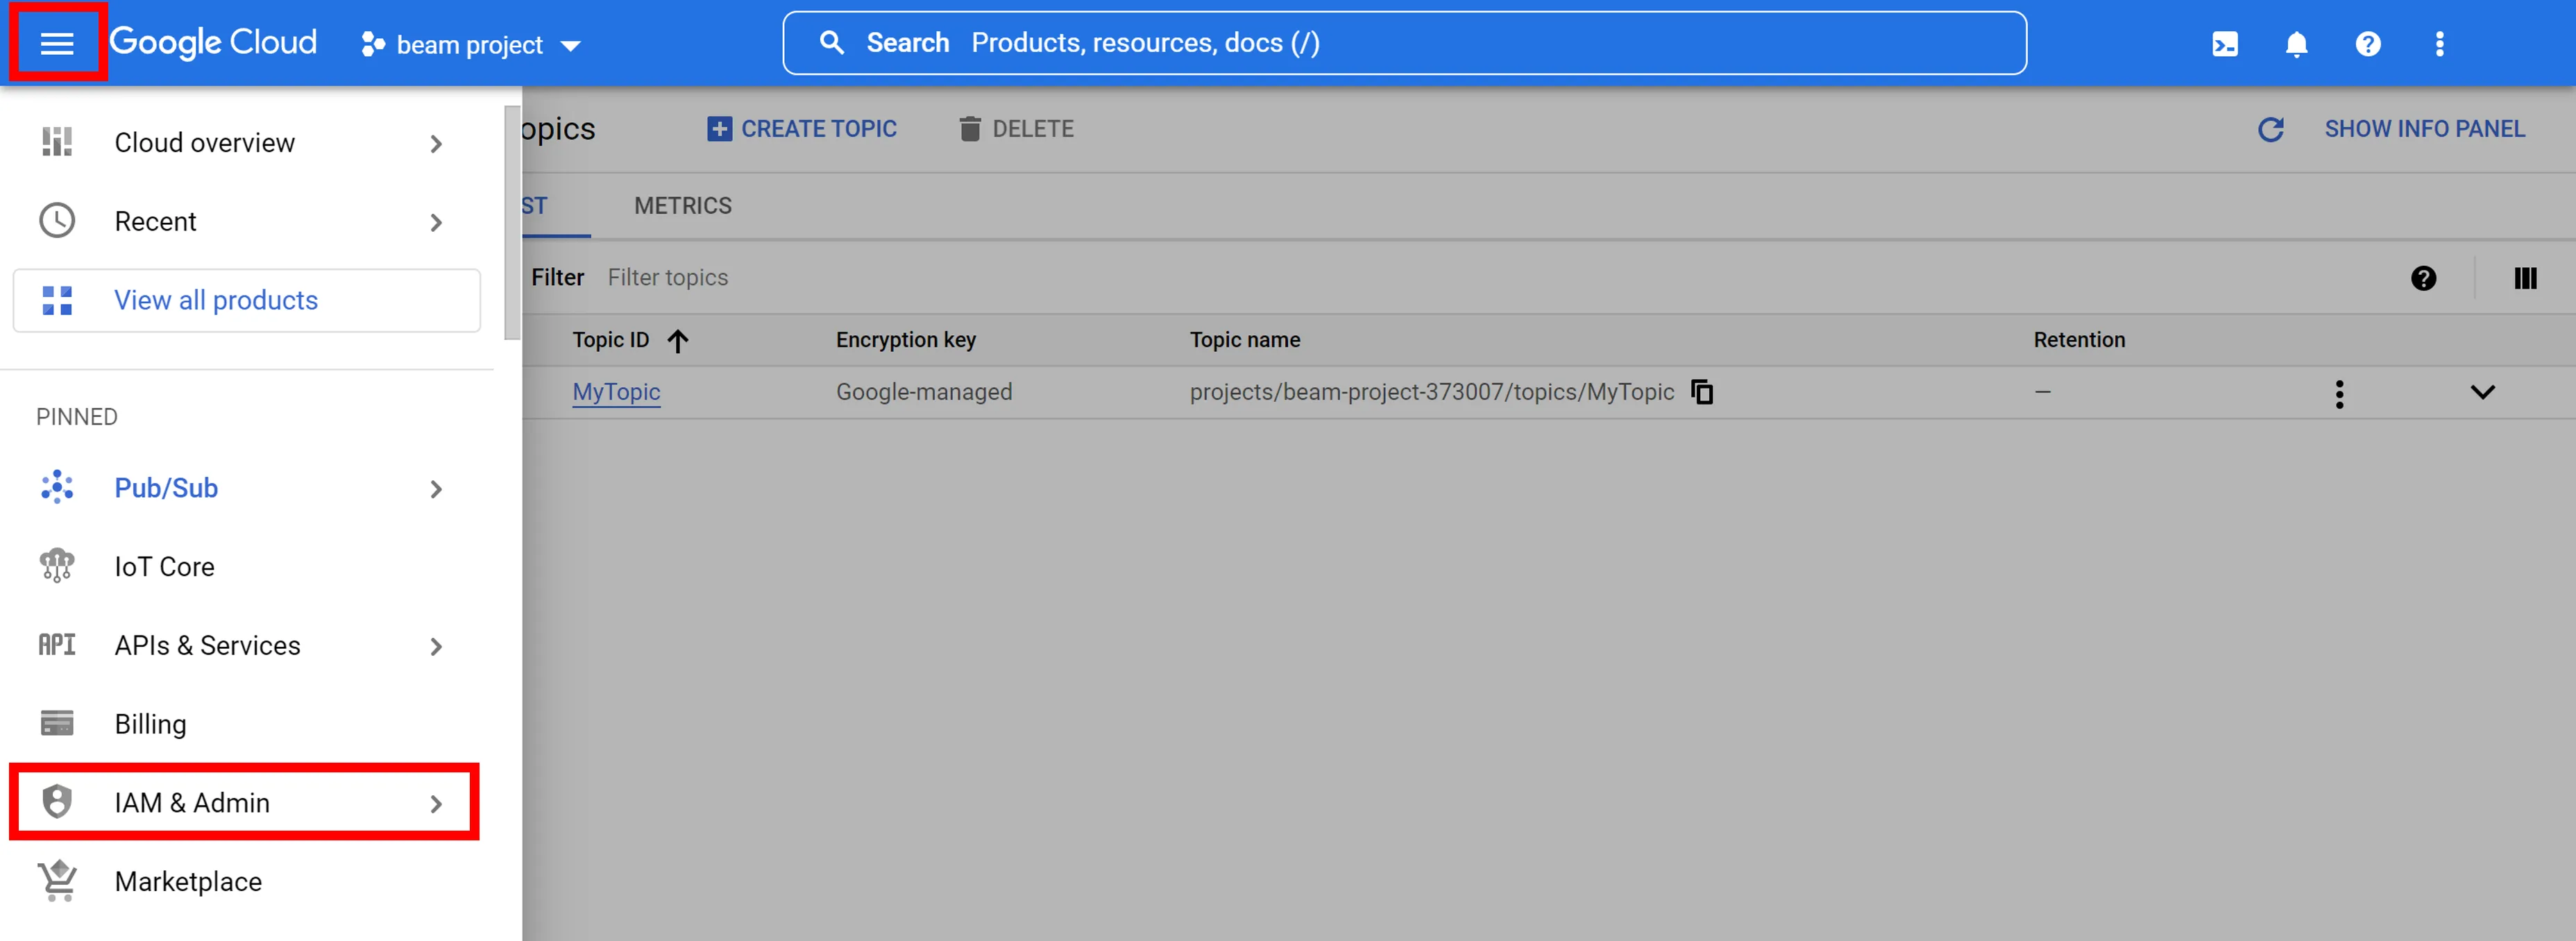
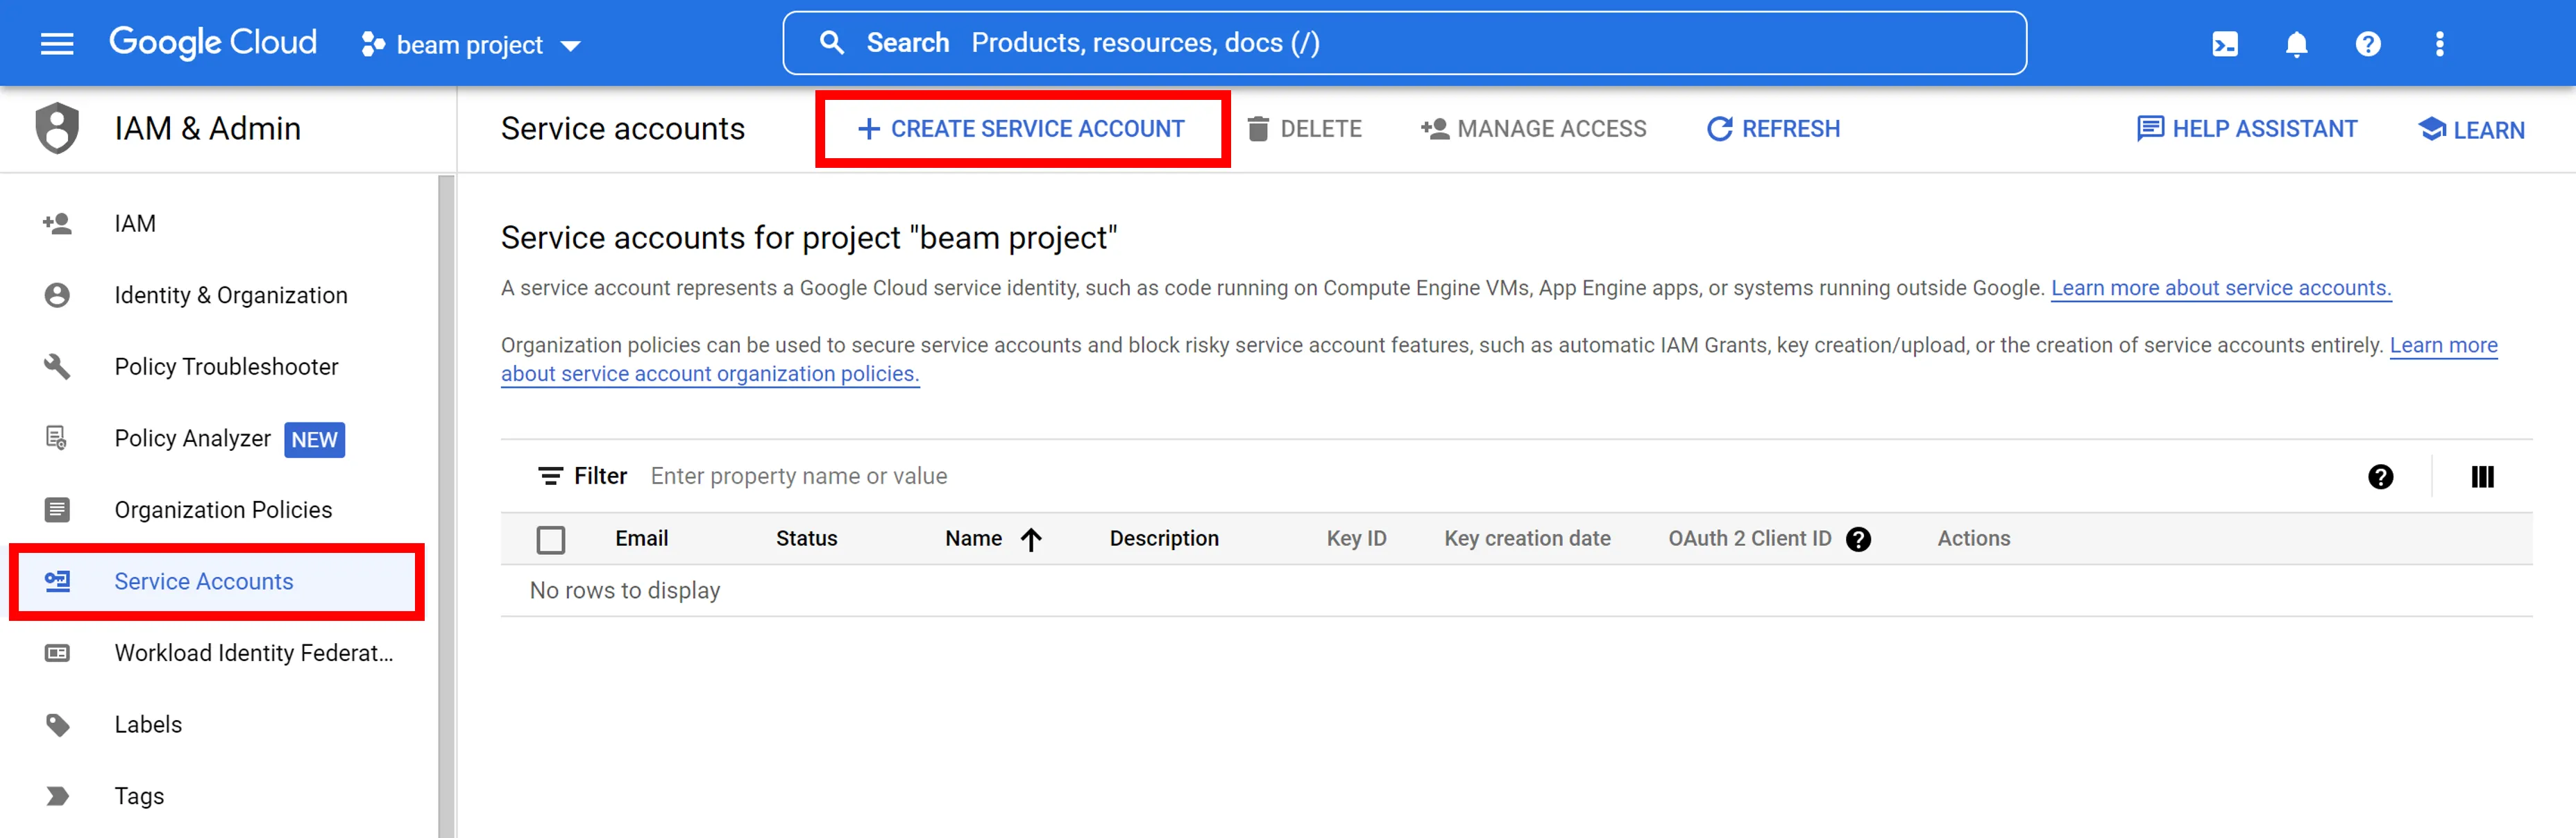
2. Click **Service Accounts** > **+ CREATE SERVICE ACCOUNT**.
3. Enter any service account name (e.g., `soracom-beam`) in **Service account name** and click **CREATE AND CONTINUE**.
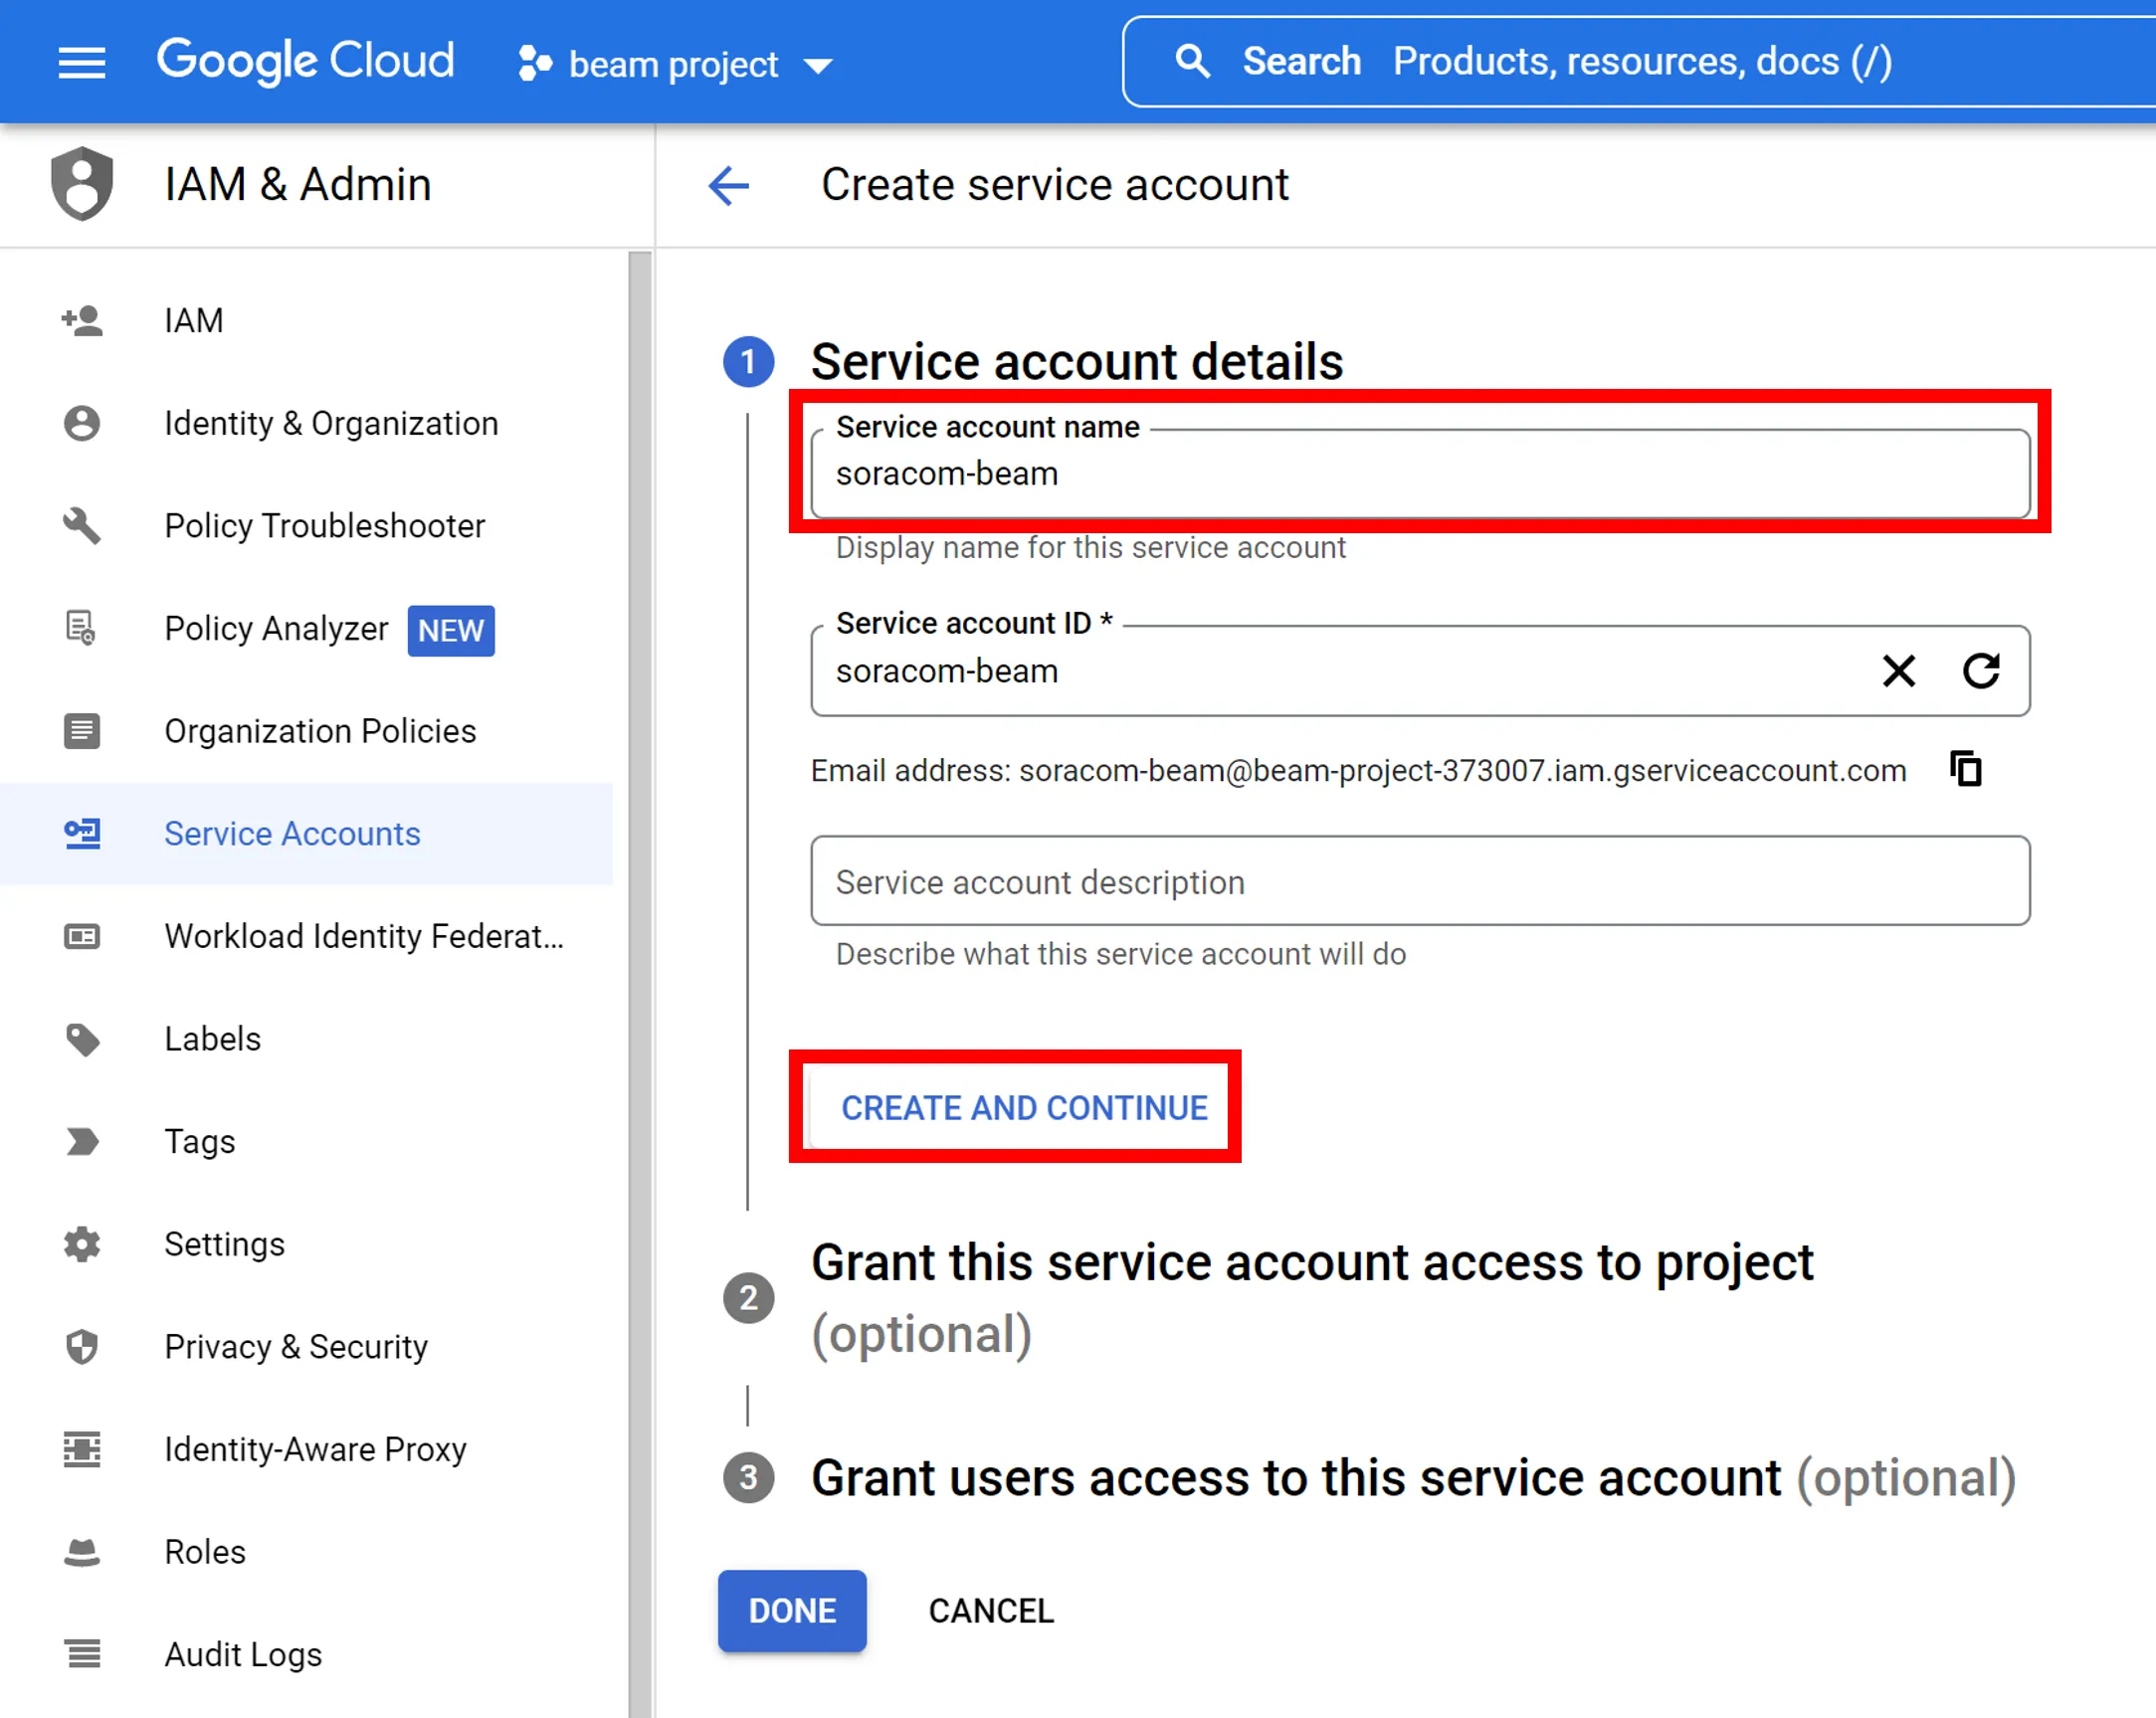
The **Service account ID** is automatically set. No change is required.
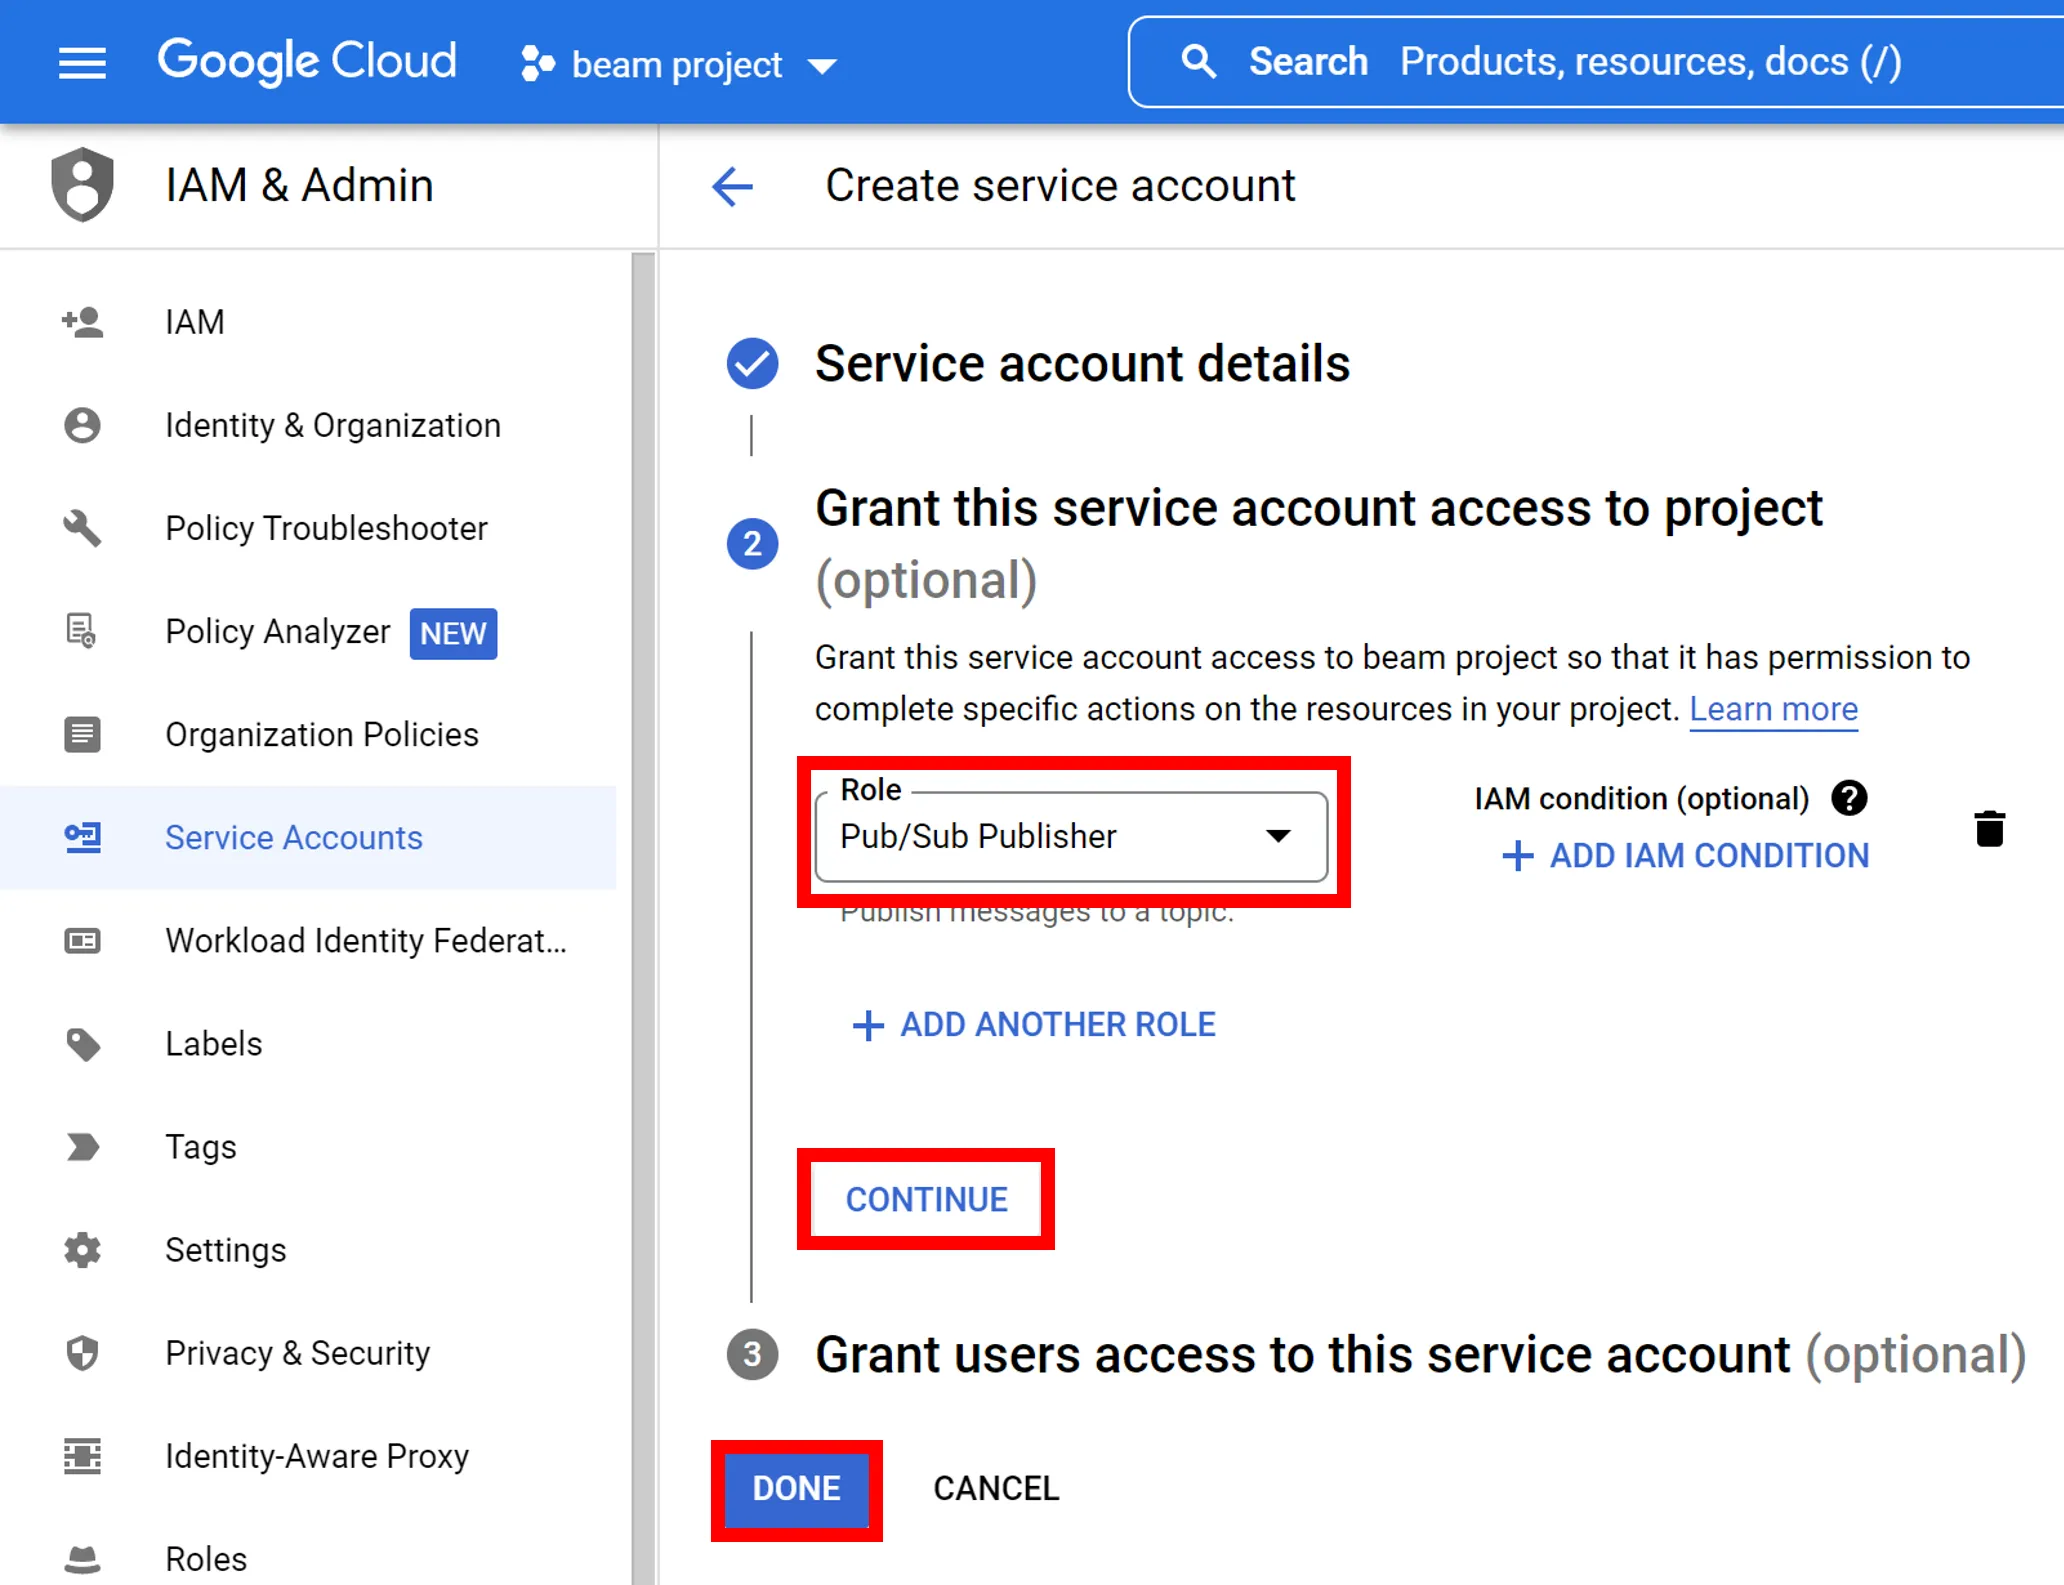
4. Under **Role**, select "Pub/Sub Publisher" and click **CONTINUE** > **DONE**.
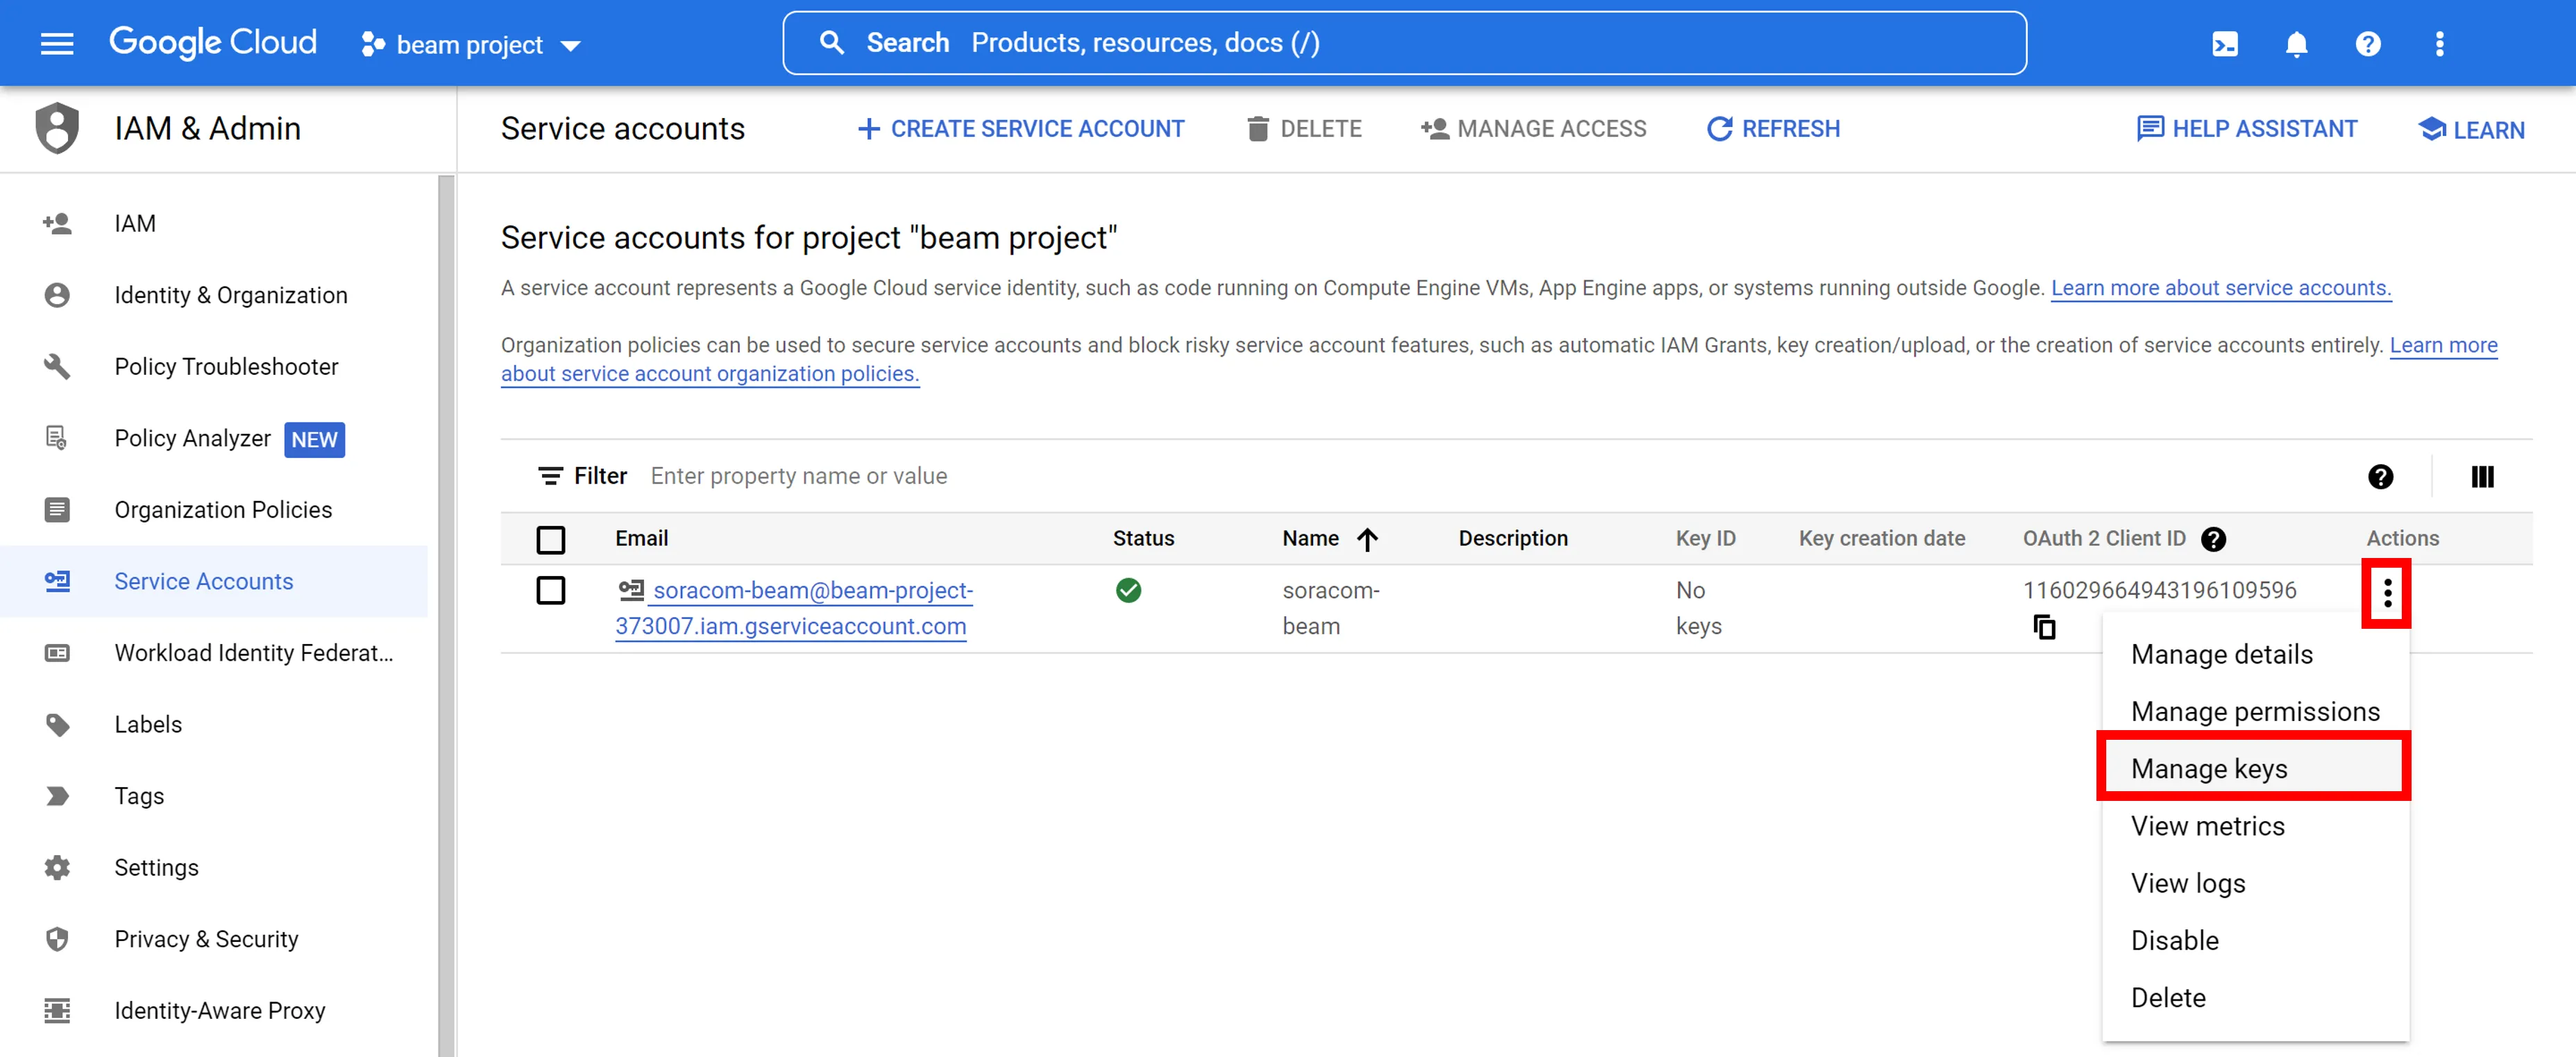
A service account is created. Continue to create a service account key.
5. Confirm the email address of the service account you created and click **Actions** > **Manage keys**.
The email address of the service account will henceforth be denoted as `${service_account_mail_address}`. Example: `soracom-beam@beam-project-373007.iam.gserviceaccount.com`
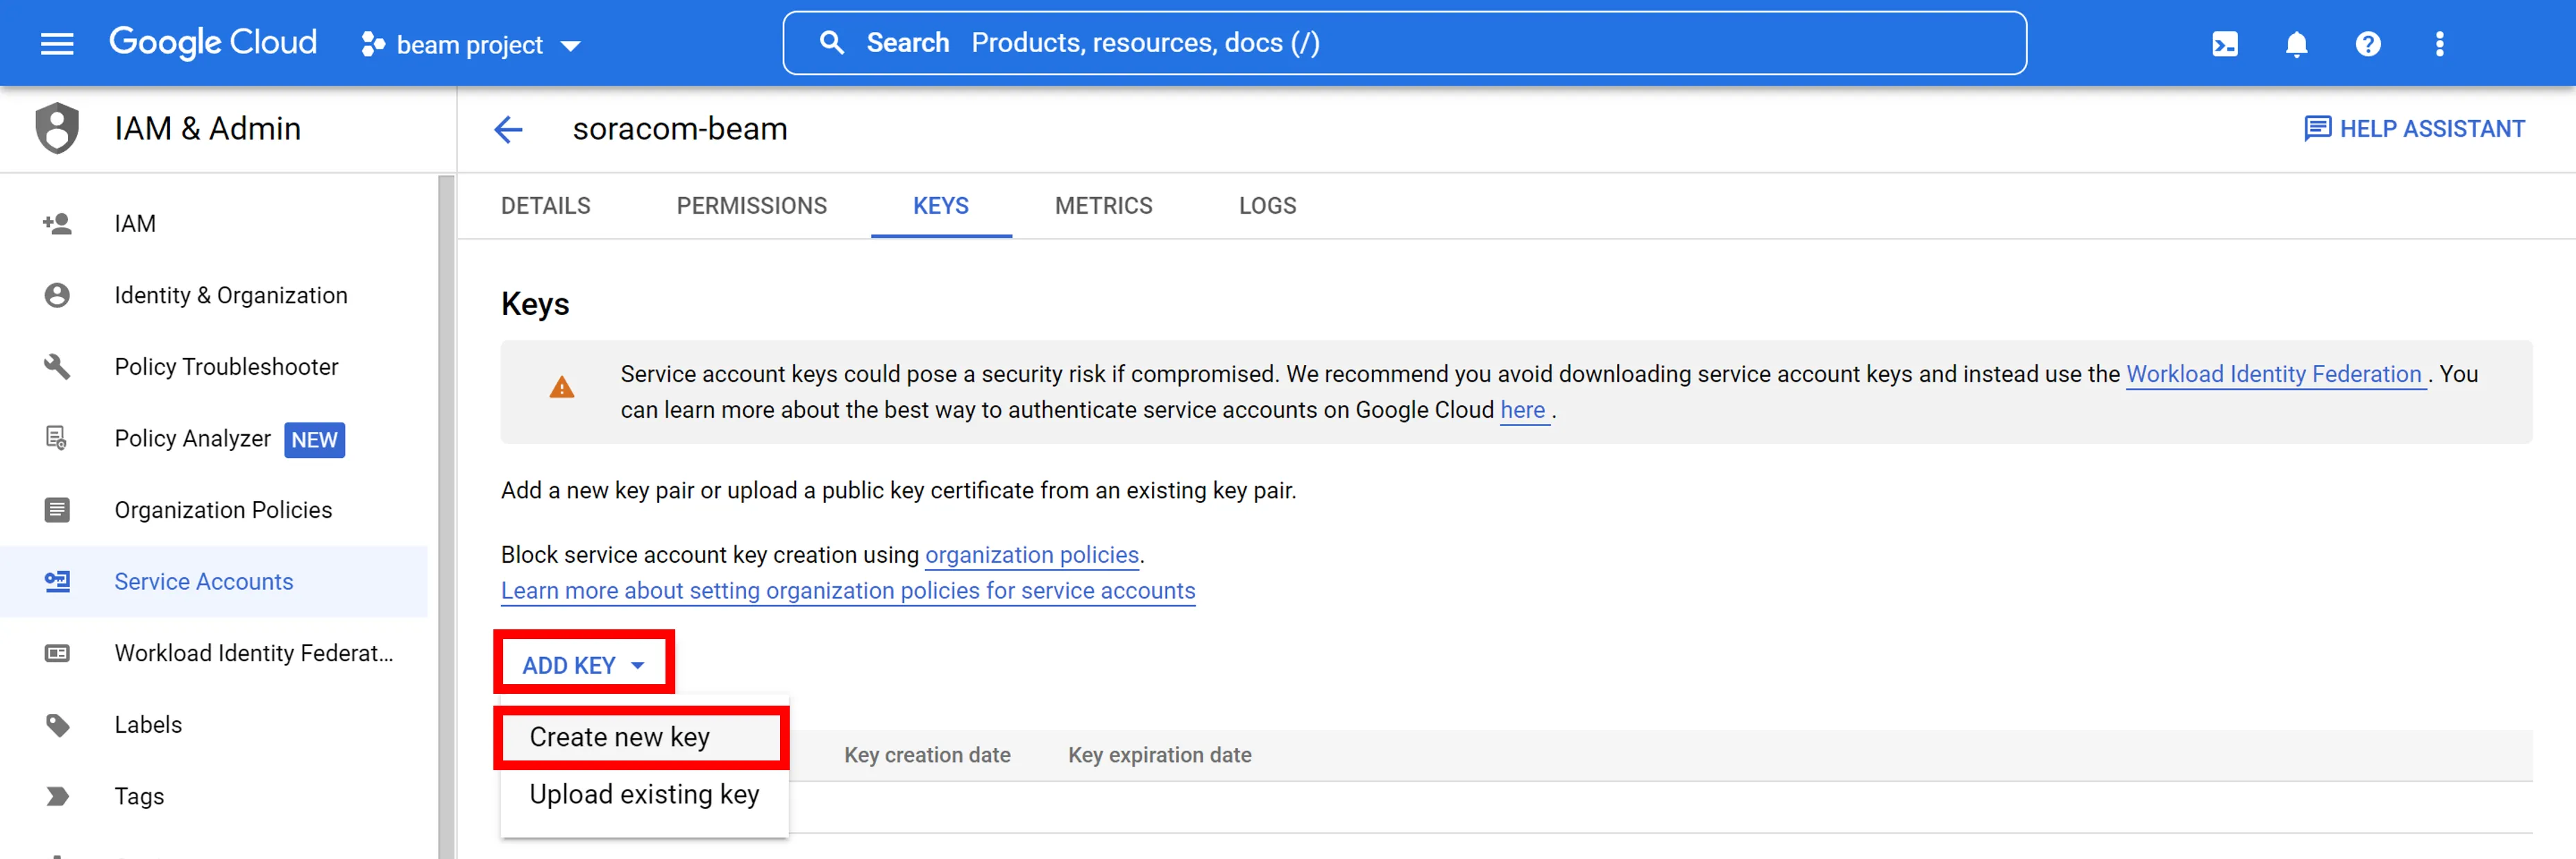
6. Click **ADD KEY** > **Create new key**.
7. Click **JSON** > **CREATE**.
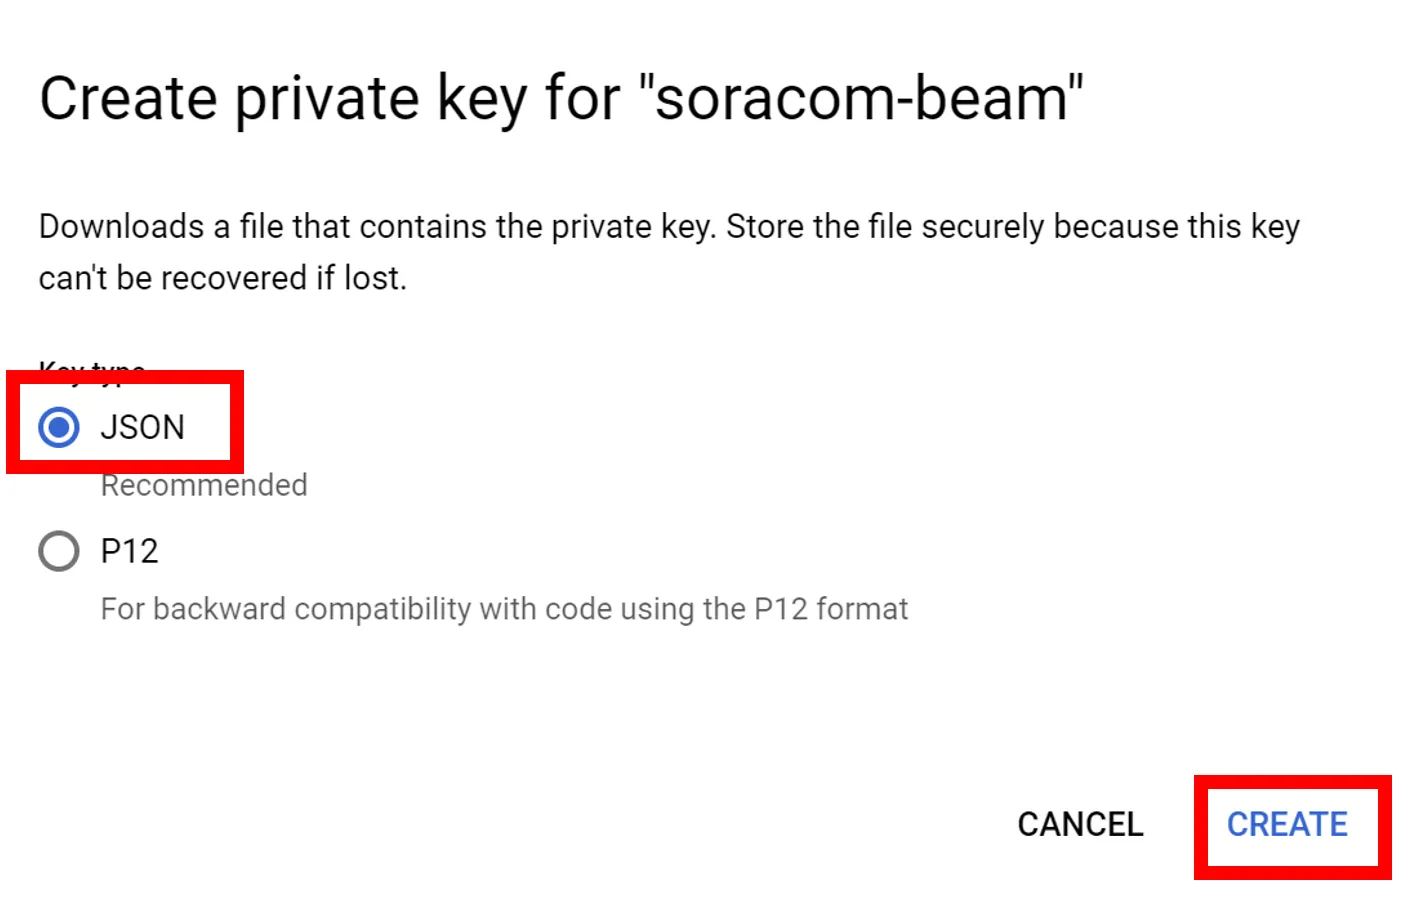
A JSON file will be downloaded. The contents of this JSON file will be registered in the Soracom User Console. Do not lose it.
8. Click **Register**.
## Step 3: Configure Soracom Beam
Configure Beam to publish data to Google Cloud Pub/Sub from devices that are using IoT SIMs.
### Register a Google Service Account (JSON) in the Credential Set
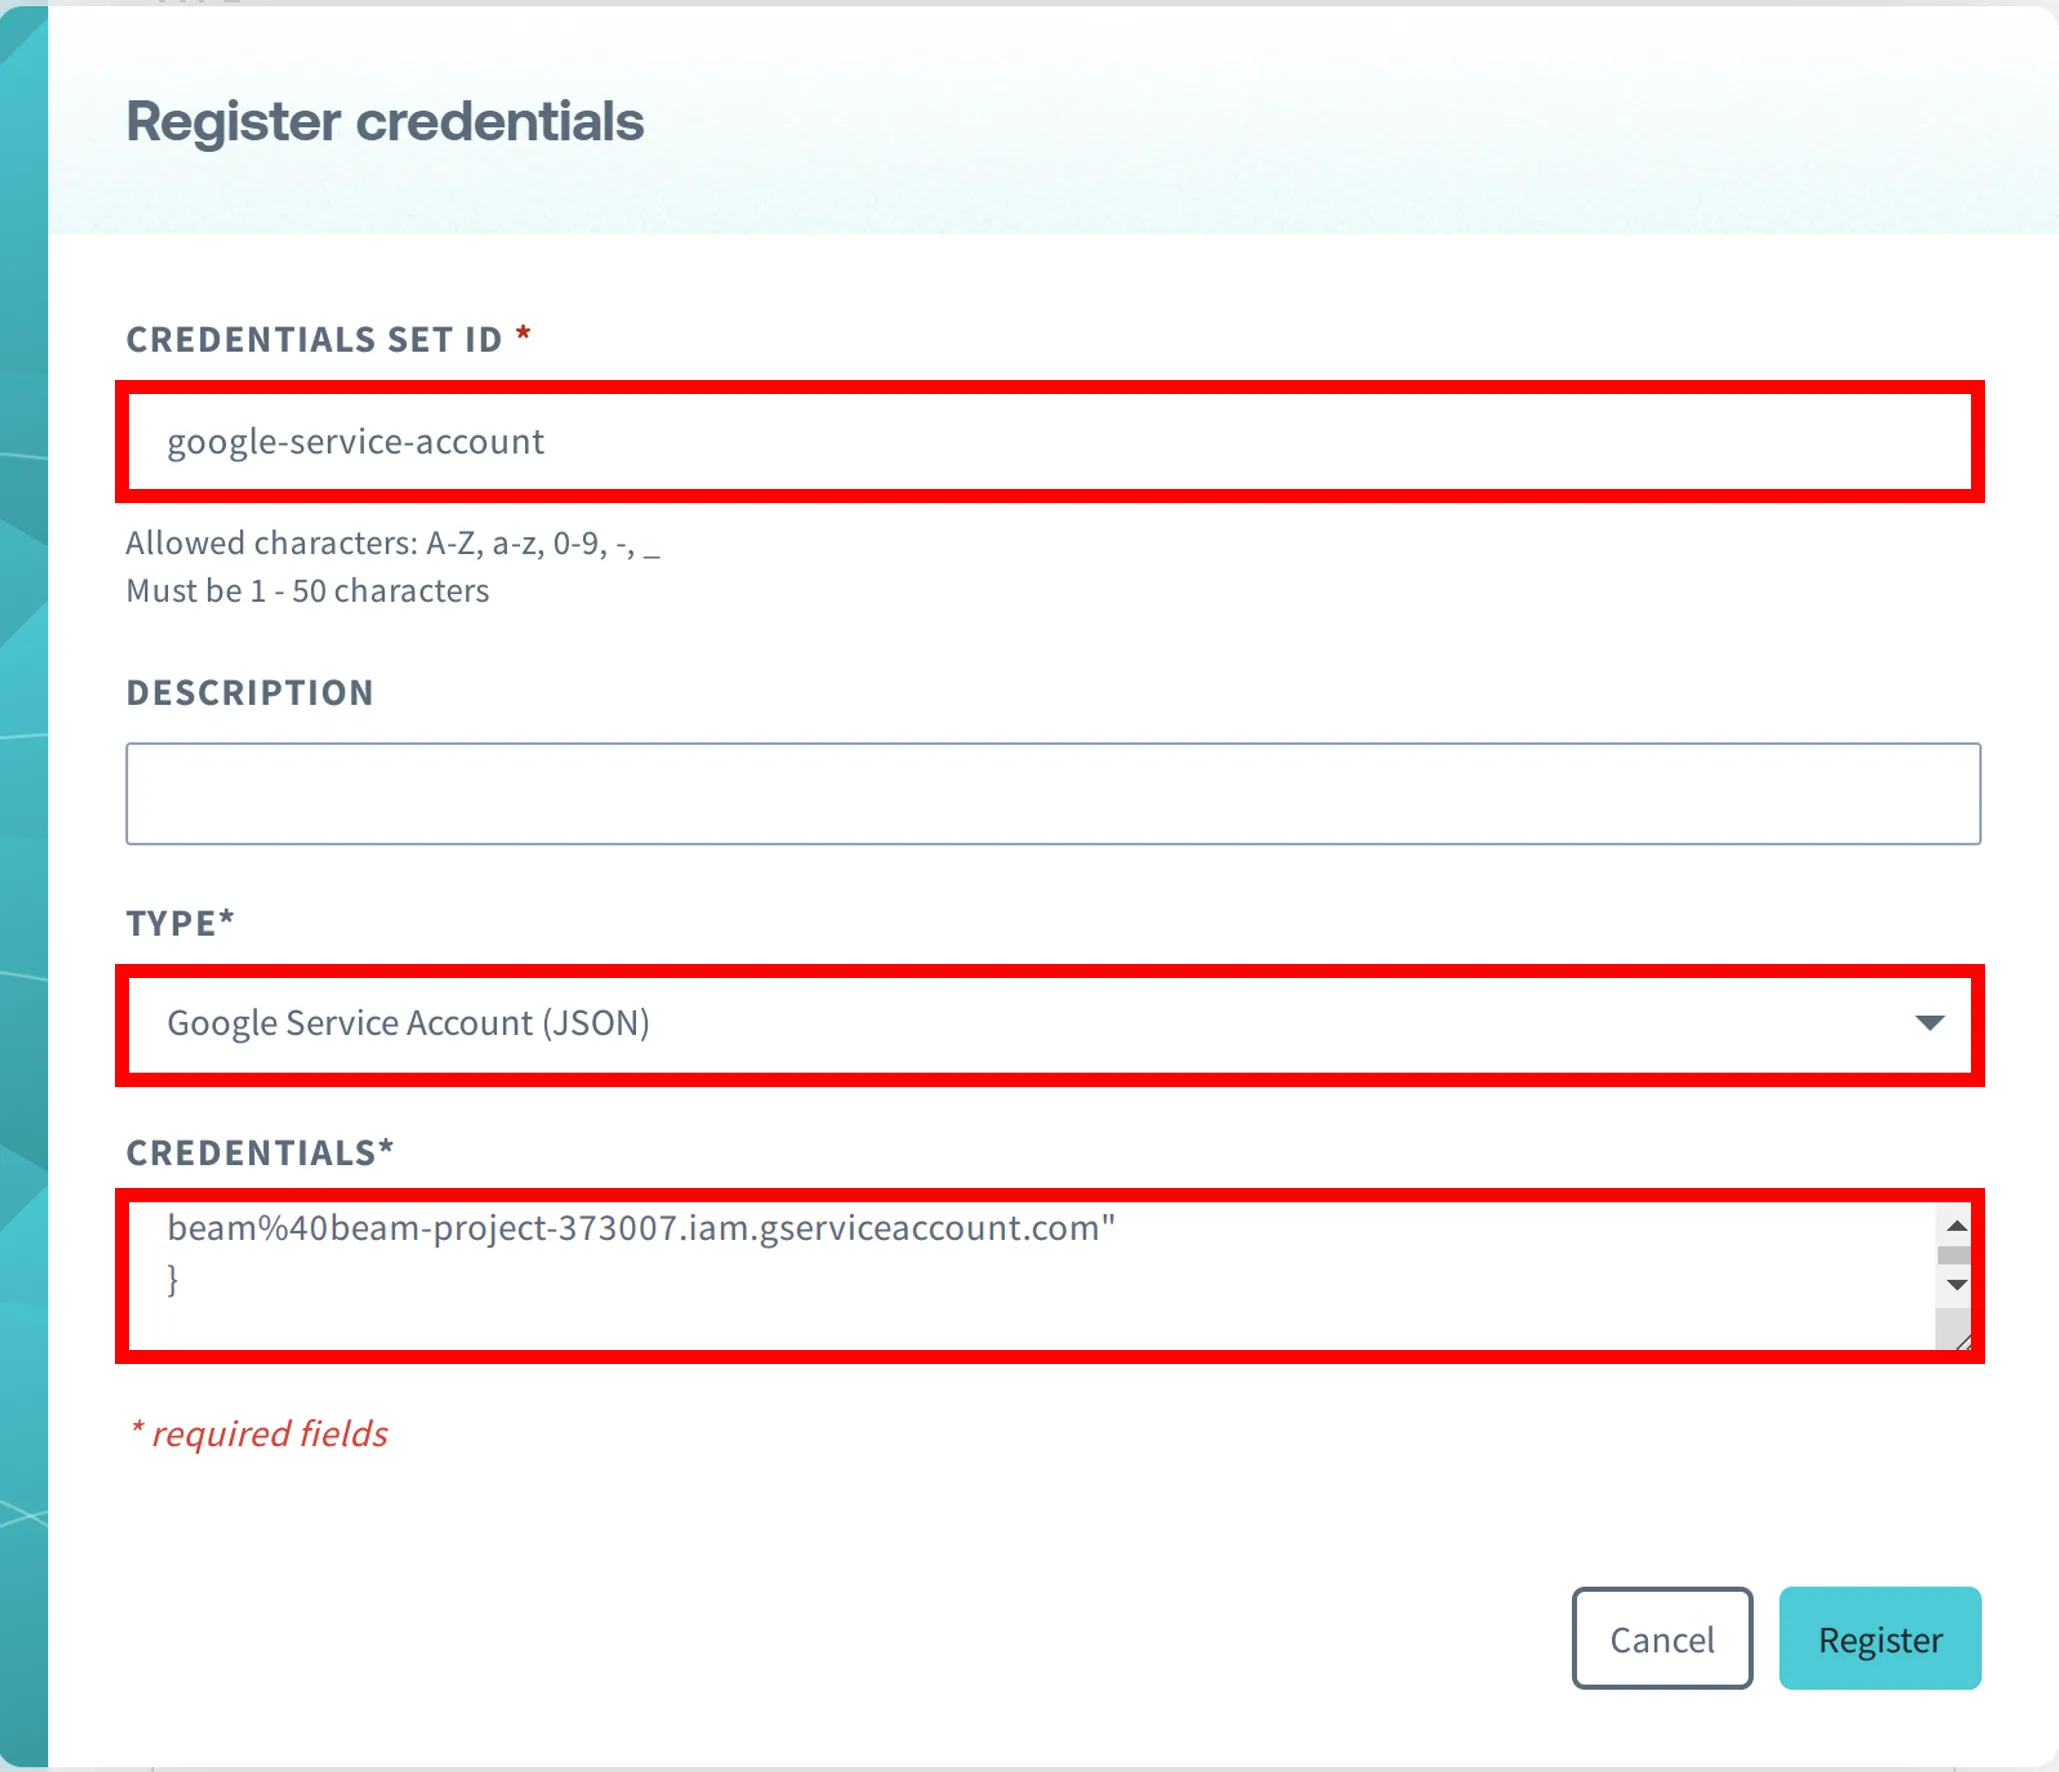
Register the JSON listed in the JSON file downloaded in step 2 in the Soracom User Console's credential Set. For details on how to register the credential sets, see [Credential Sets](https://docs.soracom.io/en/services/authentication/credential-sets#creating-a-credential-set).
The credential set is registered as follows
| Item | Description |
| - | - |
| CREDENTIAL SET ID | Enter any name to identify the credential set. Example: `google-service-account` |
| TYPE | Select "Google Service Account (JSON)". |
| CREDENTIALS | Enter the contents of the JSON file downloaded in [Step 2: Create a service account to be used with Beam](https://docs.soracom.io/en/services/beam/google-pub-sub/#step-2-create-a-service-account-to-be-used-with-beam). |
### Configuring HTTP Entry Points for Beam
> [!NOTE]
>
> Beam is a configuration of a Soracom IoT SIM group. This section describes only operations to change group settings. For more information on how groups work and how to create a group, see [Group Management Overview](https://docs.soracom.io/en/services/groups) and [Basic Usage](https://docs.soracom.io/en/services/groups/usage).
1. On the SIM Group page, open SORACOM Beam.
See [Group Settings](https://docs.soracom.io/en/services/groups/settings) for more information on configuring the SIM group.
2. Click on **+ Add Configuration** > **HTTP entry point**.
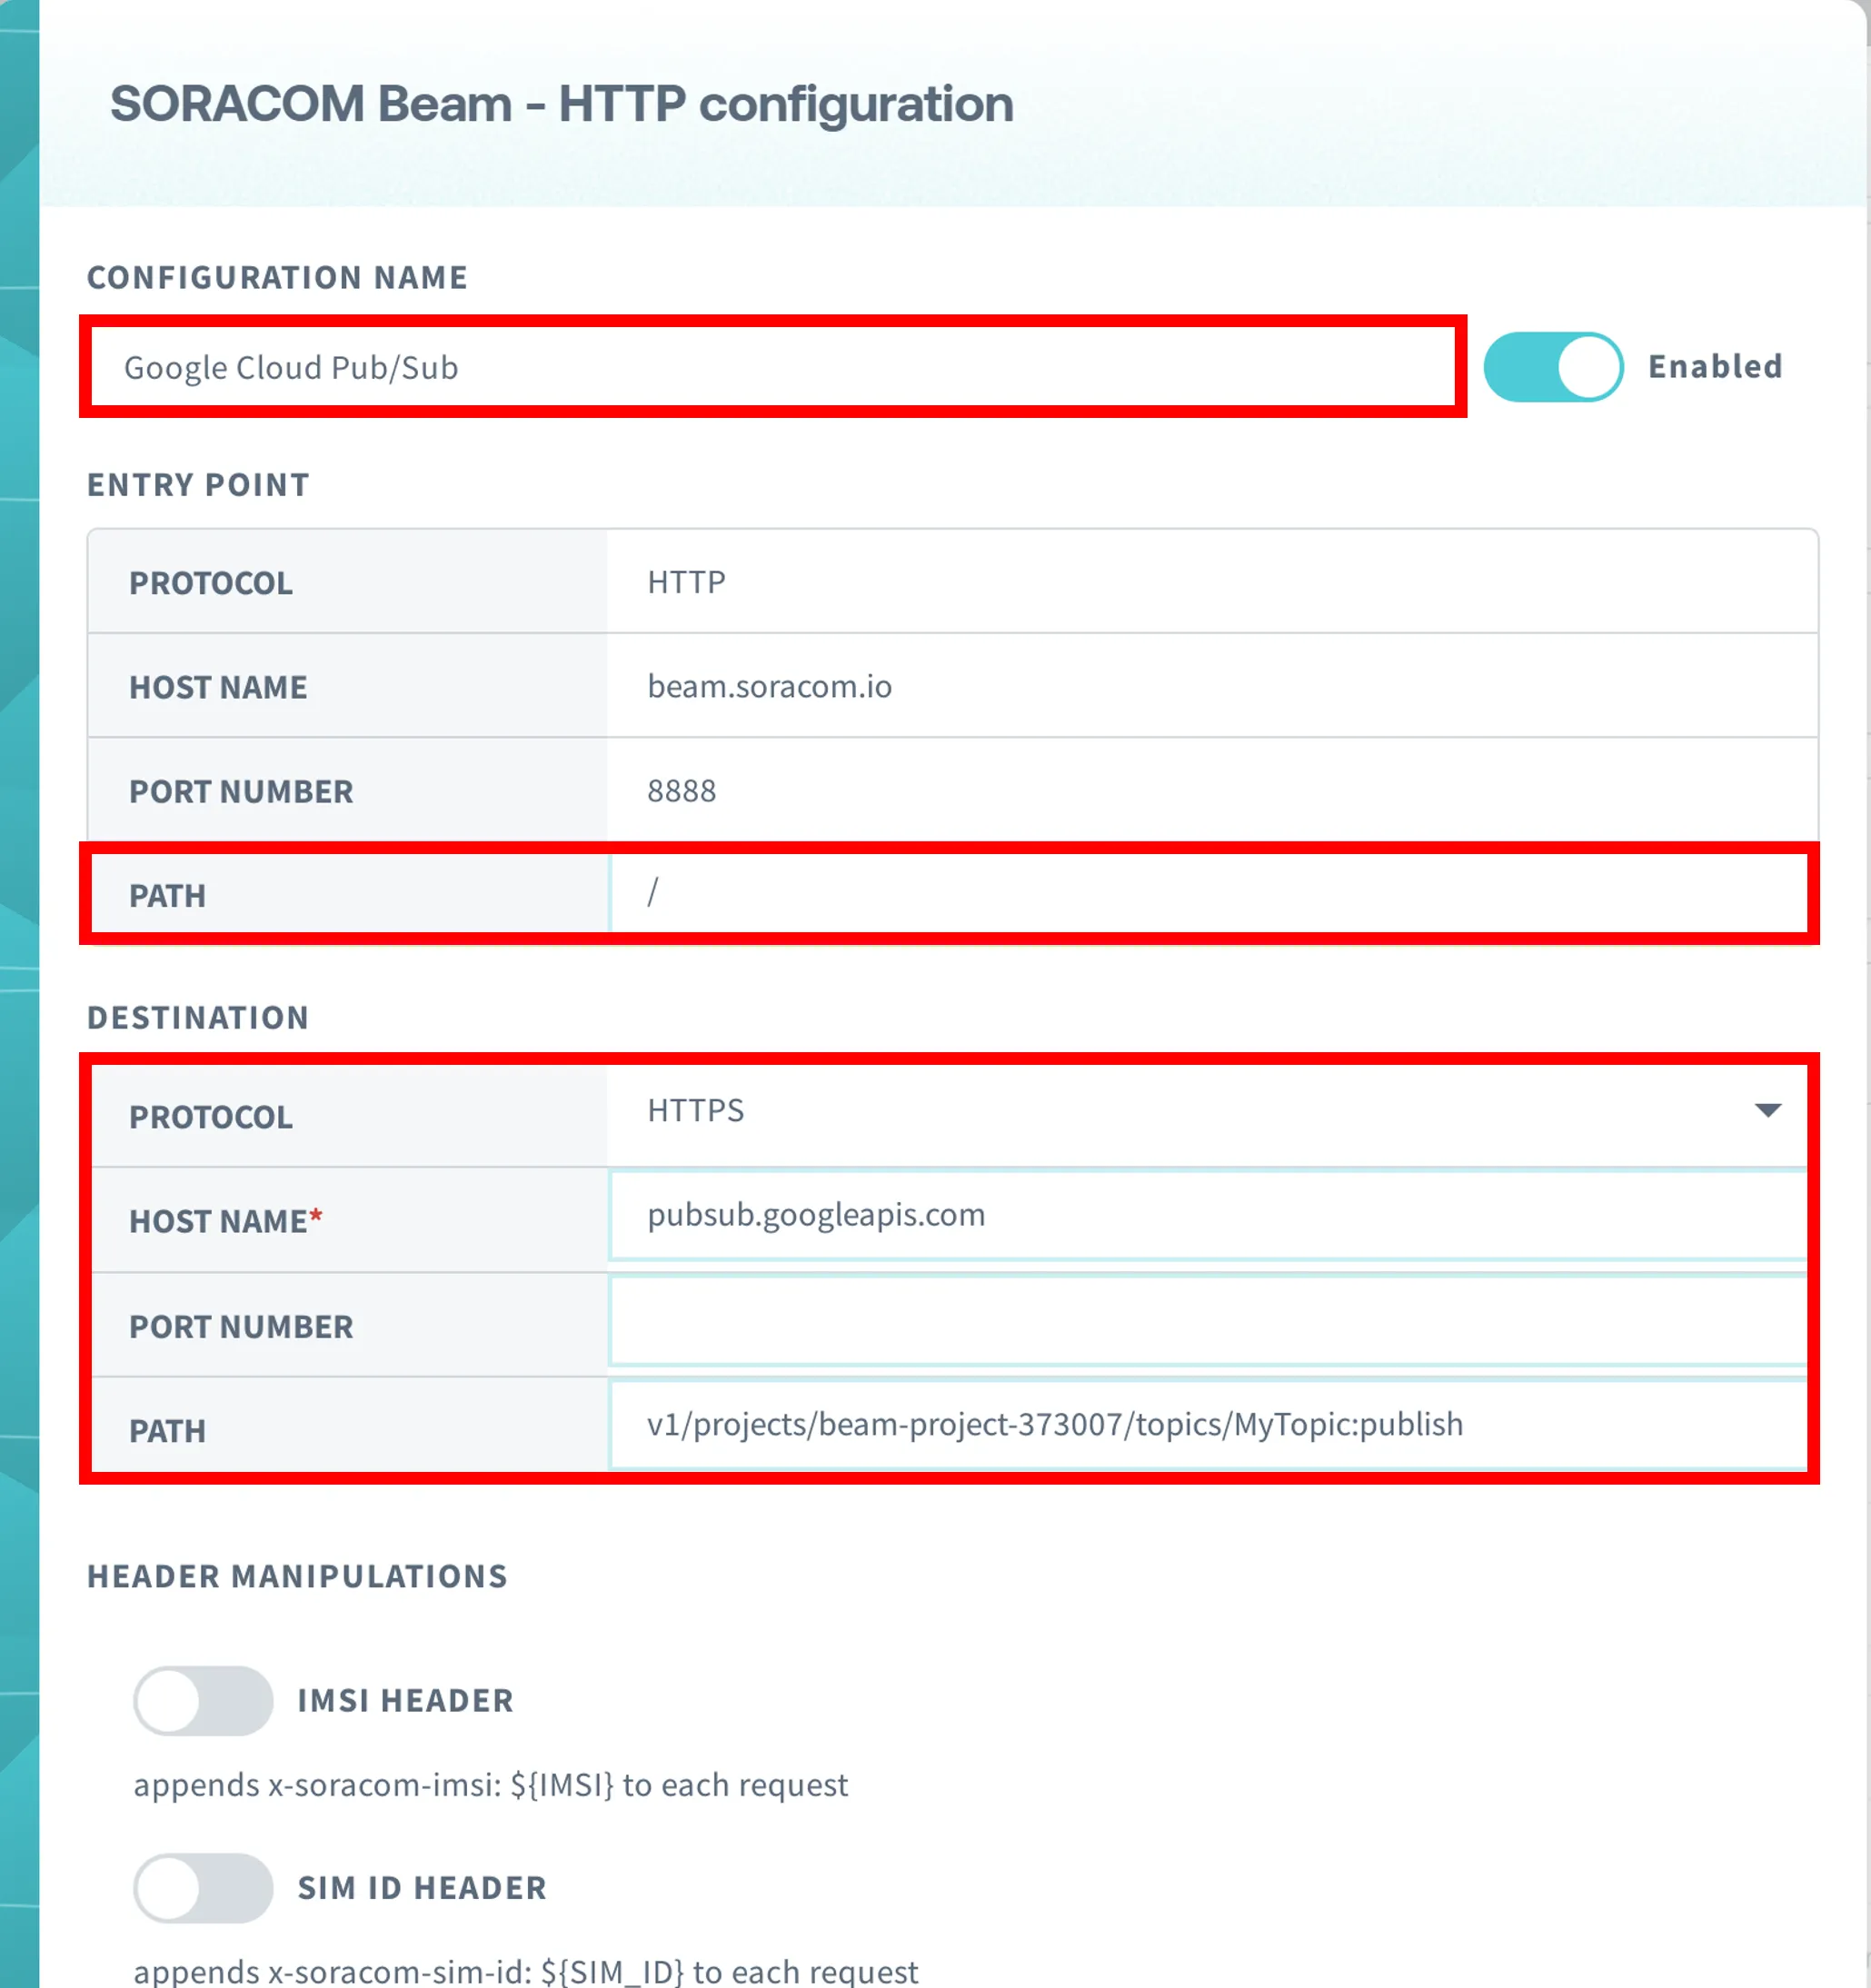
The "SORACOM Beam - HTTP configuration" pop-up will appear.
3. Set up as follows:
|
Item |
Description |
| - | - |
| **CONFIGURATION NAME** | Enter any configuration name (e.g. `Google Cloud Pub/Sub`). |
| **ENTRY POINT** > **PATH** | Set `/`. |
| **DESTINATION** > **PROTOCOL** | Select "HTTPS". |
| **DESTINATION** > **HOST NAME** | Set `pubsub.googleapis.com`. |
| **DESTINATION** > **PORT NUMBER** | Leave blank. |
| **DESTINATION** > **PATH** | Enter `v1/` followed by ${topic\_name} and then `:publish` (e.g. `v1/projects/beam-project-373007/topics/MyTopic:publish`). |
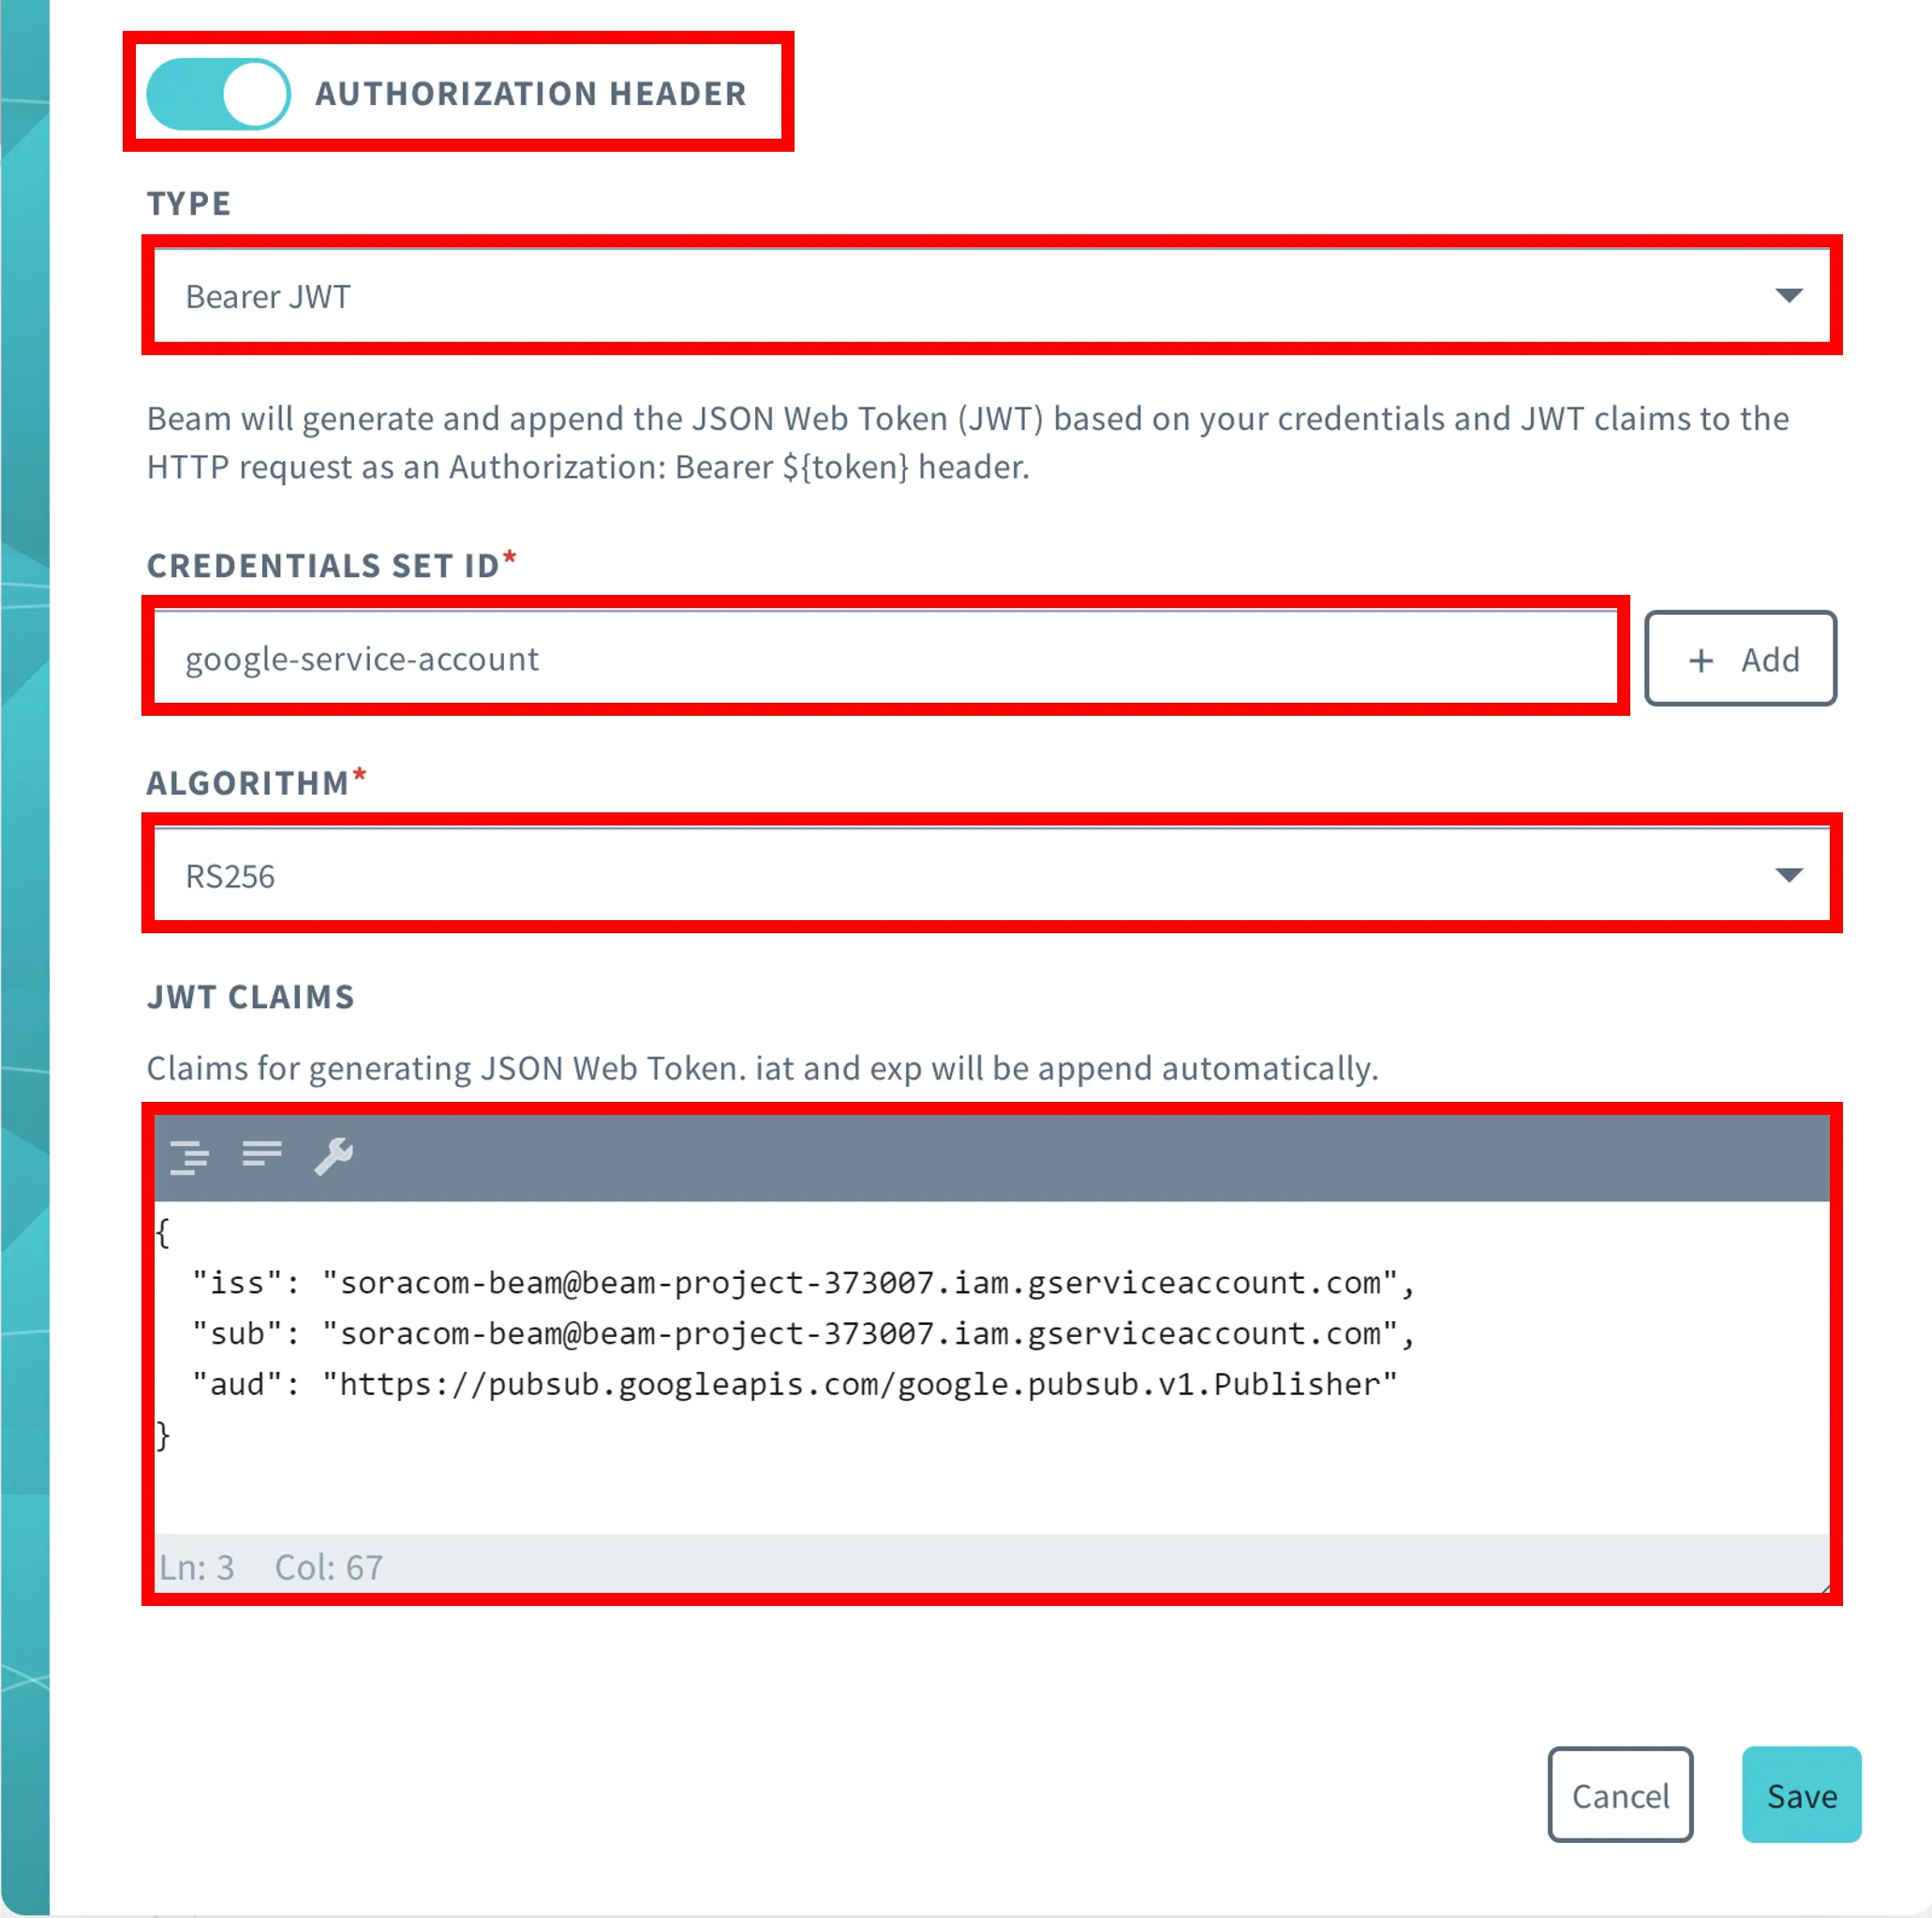
| **HEADER MANIPULATIONS** > **AUTHORIZATION HEADER** | Turn on and set as follows:
- **TYPE**: select "Bearer JWT".
- **CREDENTIALS SET ID**: Select the Google Service Account (JSON) credentials registered in [Register a Google Service Account (JSON) in the Credential Set](https://docs.soracom.io/en/services/beam/google-pub-sub/#register-a-google-service-account-json-in-the-credential-set).
- **JWT CLAIMS**: Enter the information used to generate the JSON Web Token in JSON format.
- `iss`: Set ${service\_account\_mail\_address}.
- `sub`: Set ${service\_account\_mail\_address}.
- `aud`: Set `https://pubsub.googleapis.com/google.pubsub.v1.Publisher`.
Example:
`{ "iss": "soracom-beam@long-stack-371107.iam.gserviceaccount.com", "sub": "soracom-beam@long-stack-371107.iam.gserviceaccount.com", "aud": "https://pubsub.googleapis.com/google.pubsub.v1.Publisher" }`
The `iat` and `exp` are generated automatically when the device accesses Beam. |
> [!WARNING]
>
> For more information on the HTTP entry point settings, see [HTTP Entry Point](https://docs.soracom.io/en/services/beam/http).
4. Click **Register**.
5. Add your IoT SIM to the group you created. If you need help, see [Basic Usage - Adding a Device to a Group](https://docs.soracom.io/en/services/groups/usage#adding-a-device-to-a-group).
Beam configuration for your IoT SIM is complete.
> [!WARNING]
>
> For more information on the forwarding path and the scope of JWT CLAIMS, see [Method: projects.topics.publish](https://cloud.google.com/pubsub/docs/reference/rest/v1/projects.topics/publish) in Google Cloud document.
> [!WARNING]
>
> In this example, the HTTP entry point is used, but the AUTHORIZATION header can also be used for Website entry point.
## Step 4: Send Data to Google Cloud Pub/Sub Using HTTP Entry Points
Send data to Google Cloud Pub/Sub using Beam's HTTP entry point.
1. Execute the following commands on the device that is connected to the Soracom platform.
Command Example:
```bash
curl -v -X POST http://beam.soracom.io:8888/ \
-H "Content-Type: application/json" \
-d '{
"messages": [
{
"data": "SGVsbG8gR29vZ2xlIENsb3VkIFB1Yi9TdWIh"
}
]
}'
```
> [!WARNING]
>
> For more information on request bodies, see [Method: projects.topics.publish](https://cloud.google.com/pubsub/docs/reference/rest/v1/projects.topics/publish) in Google Cloud document.\
> For example, data is the Base64-encoded data to be sent. `SGVsbG8gR29vZ2xlIENsb3VkIFB1Yi9TdWIh` in the above example command is Base64 encoded data for `Hello Google Cloud Pub/Sub!`
Continue to check the published data in the Google Cloud Console.
2. Go to [Google Cloud Console](https://console.cloud.google.com/project?hl=ja) and click navigation menu > **MORE PRODUCTS**.

3. Click **Pub/Sub**.

4. Select the project you created and

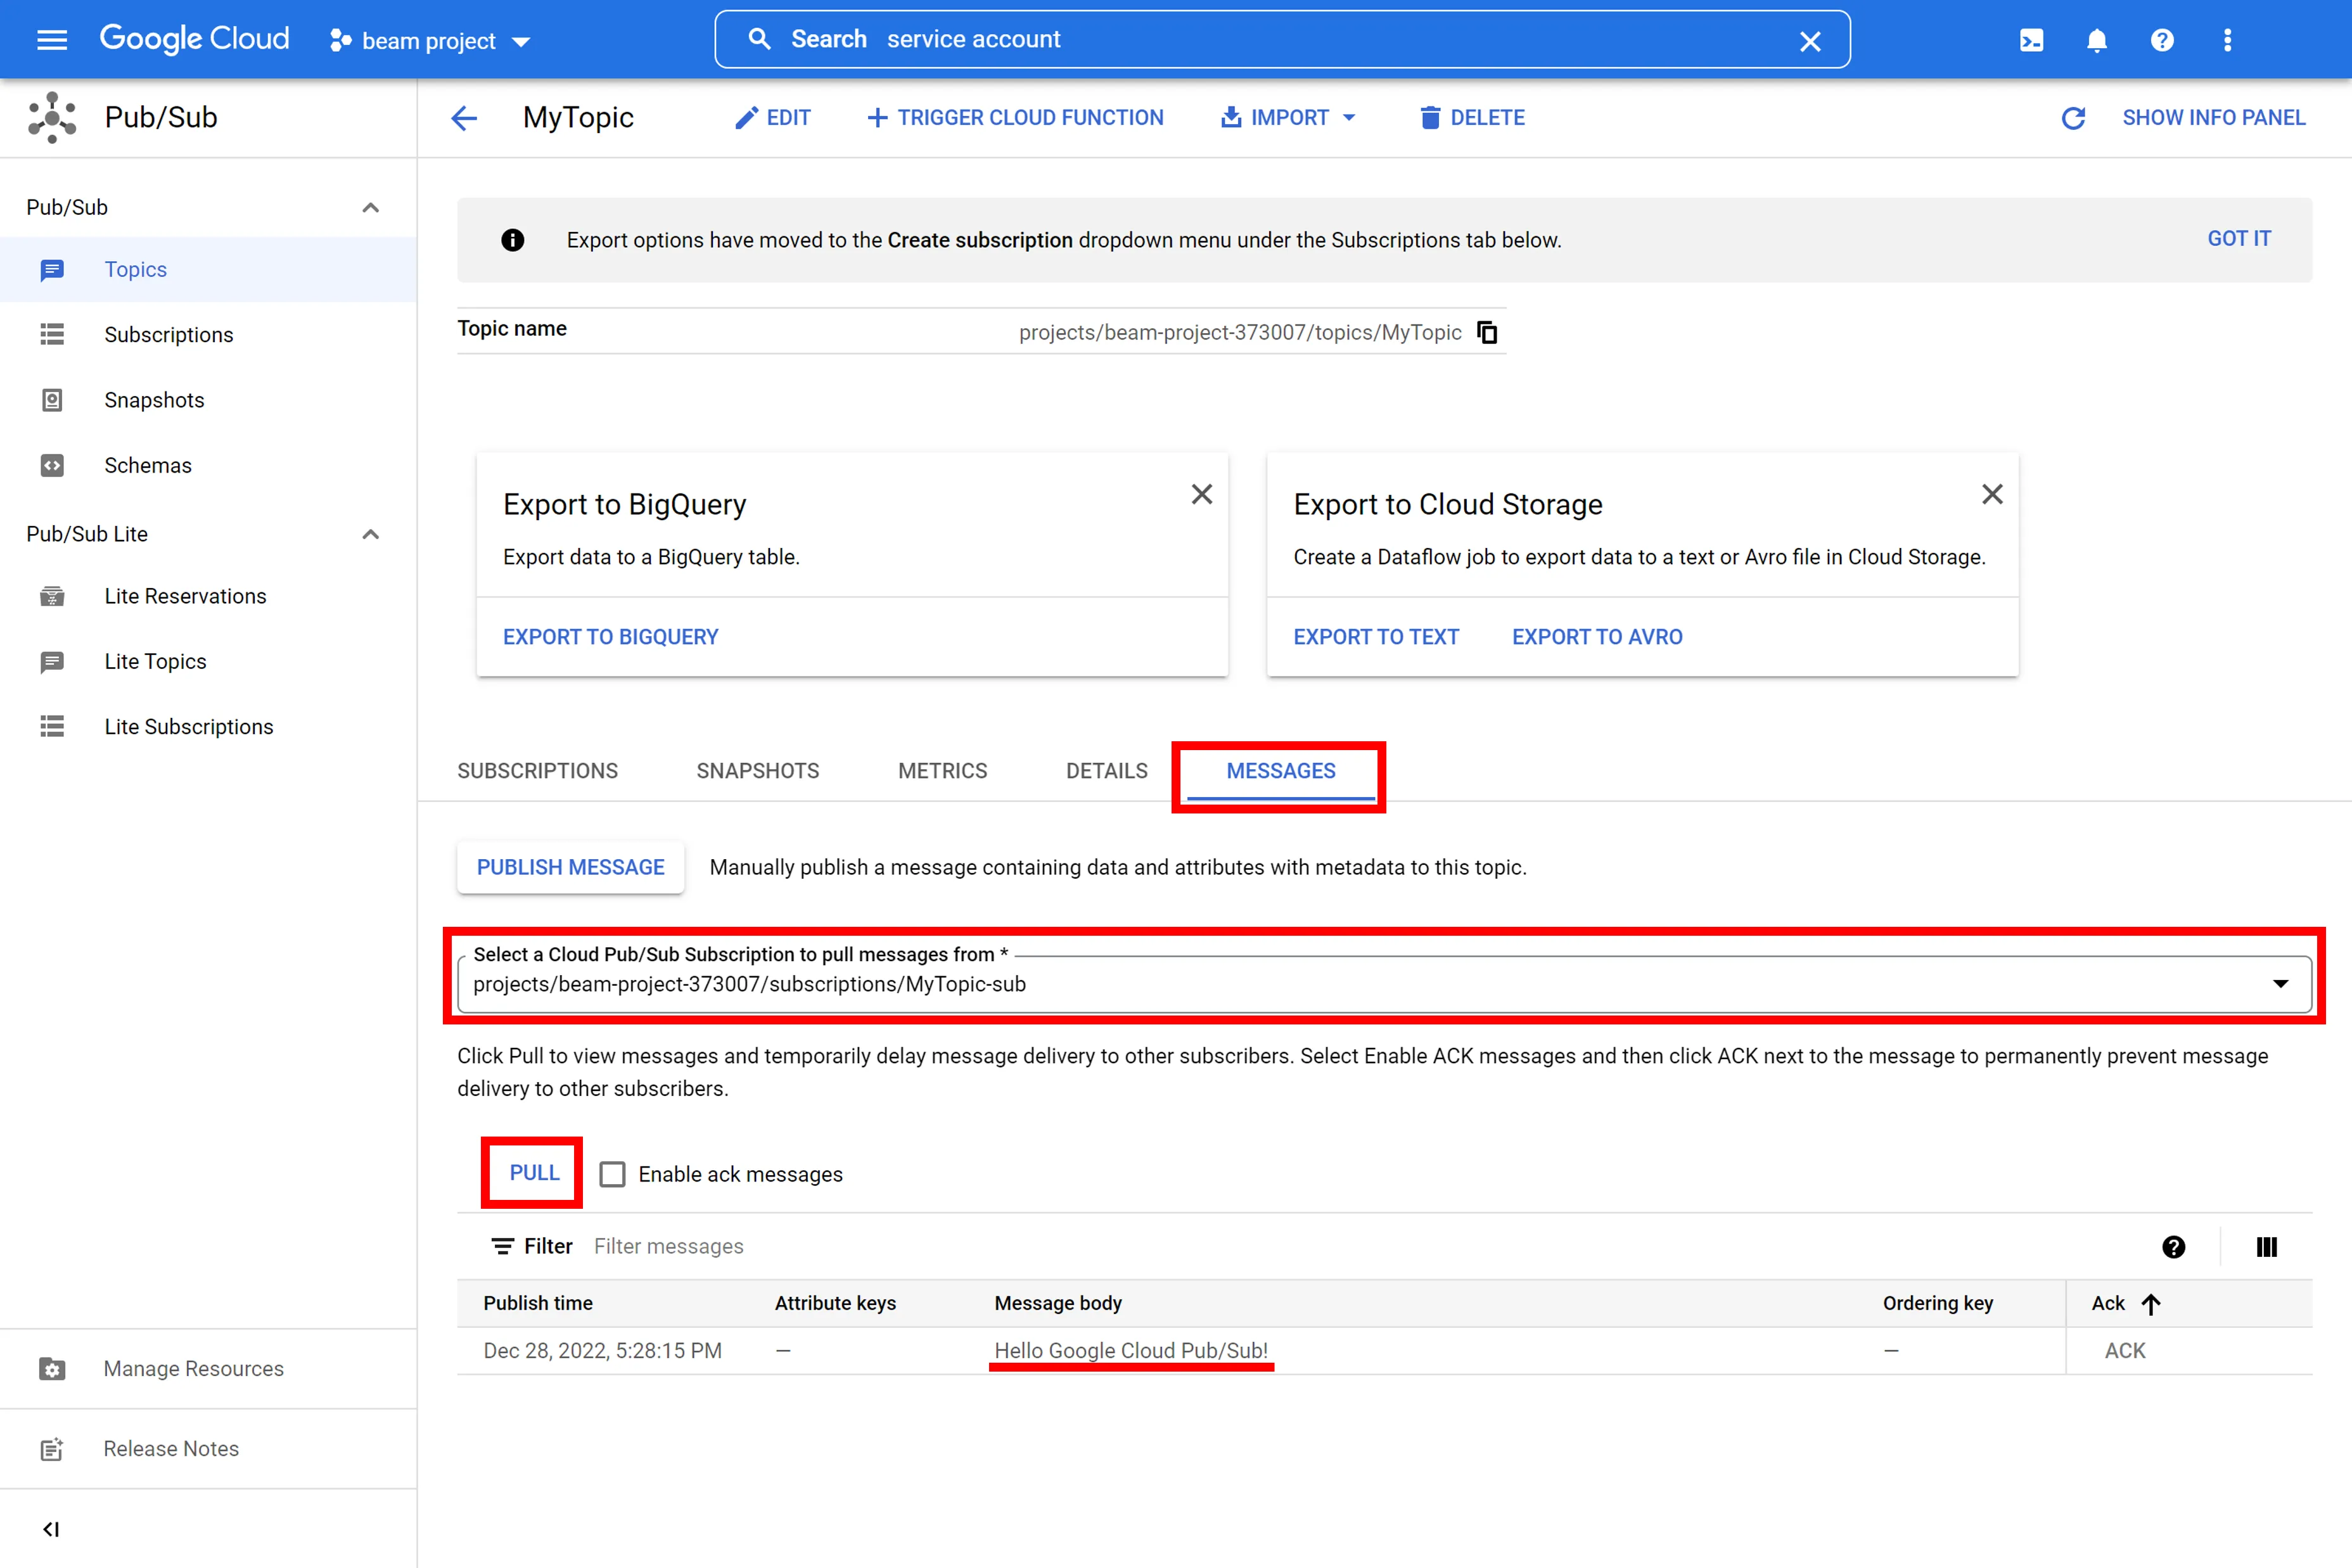
5. Click **MESSAGES**, select the Pub/Sub subscription in **Select a Cloud Pub/Sub Subscription to pull messages from**, and click **PULL**. The published data will be displayed as follows.
> [!WARNING]
>
> You can also check the published data by executing the following command in Cloud Shell. `MyTopic-sub` is the name of the Pub/Sub subscription you created in [Create topics and Pub/Sub subscriptions](https://docs.soracom.io/en/services/beam/google-pub-sub/#create-topics-and-pubsub-subscriptions).
>
> ```bash
> while [ 1 ] ; do gcloud pubsub subscriptions pull --auto-ack MyTopic-sub ; sleep 1 ; done
> ```
>
> You will see the following output:
>
> ```text
> Listed 0 items.
> Listed 0 items.
> Listed 0 items.
> Listed 0 items.
> DATA: Hello Google Cloud Pub/Sub!
> MESSAGE_ID: 6528460184608992
> ORDERING_KEY:
> ATTRIBUTES:
> DELIVERY_ATTEMPT:
> Listed 0 items.
> Listed 0 items.
> ```
### If You Cannot Confirm Your Message
If an error occurs at the Beam entry point, an error log is logged to Soracom.