# Using Beam to Call AWS Lambda
Process device data using AWS Lambda.
Using Beam's HTTP entry points offers the following advantages
- There is no need to install credentials to access AWS Lambda functions on the device.
- On the device, you can access AWS Lambda functions simply by sending a request to the Beam entry point as follows
```bash
curl -X POST http://beam.soracom.io:8888/lambda-with-signature-v4 \
-H "Content-Type: application/json" \
-d '{
"key": "value"
}'
```
You will receive the response as follows.
```json
{
"message": "Hello from Lambda!",
"body": {
"key": "value"
}
}
```
- Multiple HTTP entry points can be configured in a single group setting.
> [!NOTE]
>
> When sending data to an AWS Lambda function via an HTTP entry point, the maximum amount of data that can be transferred is 6 MiB.
> [!NOTE]
>
> If configured as described in this document the AWS Lambda functions that you associate with Beam will only be accessible with Beam and cannot be accessed directly.
This page describes the steps to create a Lambda function and security configurations that allow Beam to call the function, configure your Soracom account to enable Beam to call the functions, and run a short test to confirm that your setup is working correctly.
## Step 1: Configure AWS Lambda
Create an AWS Lambda function to be called from Beam.
1. Access the [AWS Lambda "Create function"](https://ap-northeast-1.console.aws.amazon.com/lambda/home#/create/function) navigation pane.
2. Choose the region in the navigation bar. For more information, see the AWS document: [Choosing a Region](https://docs.aws.amazon.com/awsconsolehelpdocs/latest/gsg/select-region.html)
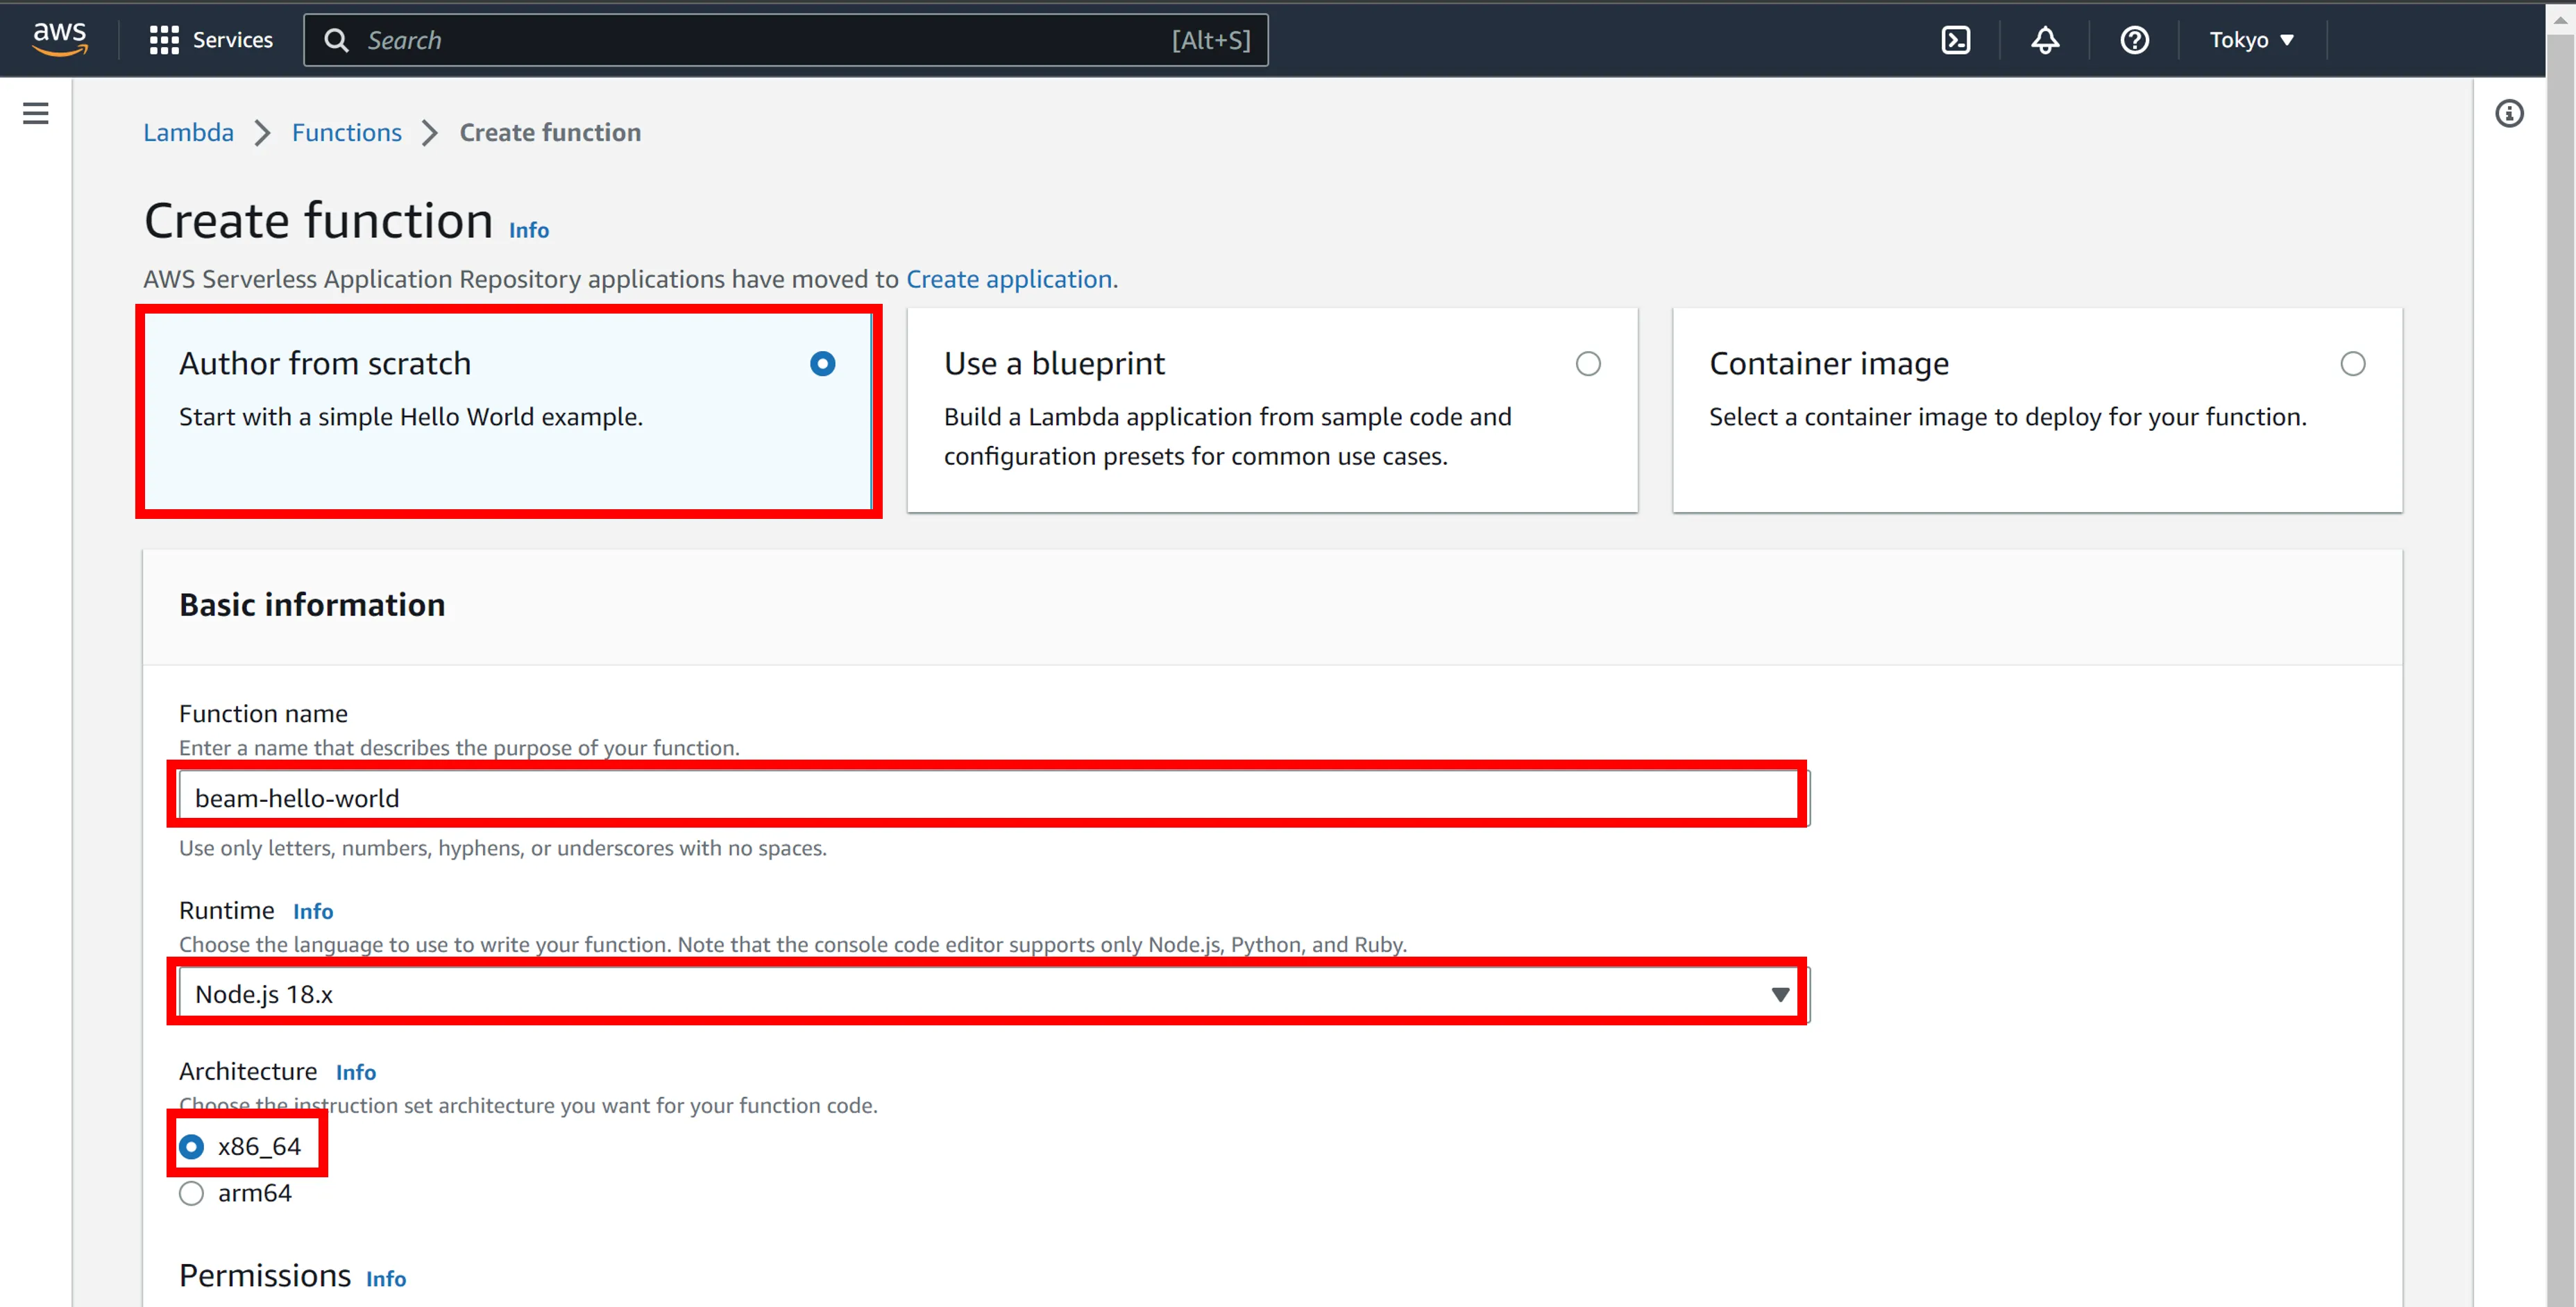
3. Click **Author from scratch** and set the following items
| Item | Description |
| - | - |
| Function name | Enter a function name. Example: `beam-hello-world` |
| Runtime | Select "Node.js xx.x". |
| Architecture | Select "x86\_64". |
> [!WARNING]
>
> Beam does not depend on the Lambda runtime. Any Lambda runtime Function can be used. We have suggested "Node.js xx.x" in this step to match the sample program provided in \[5].
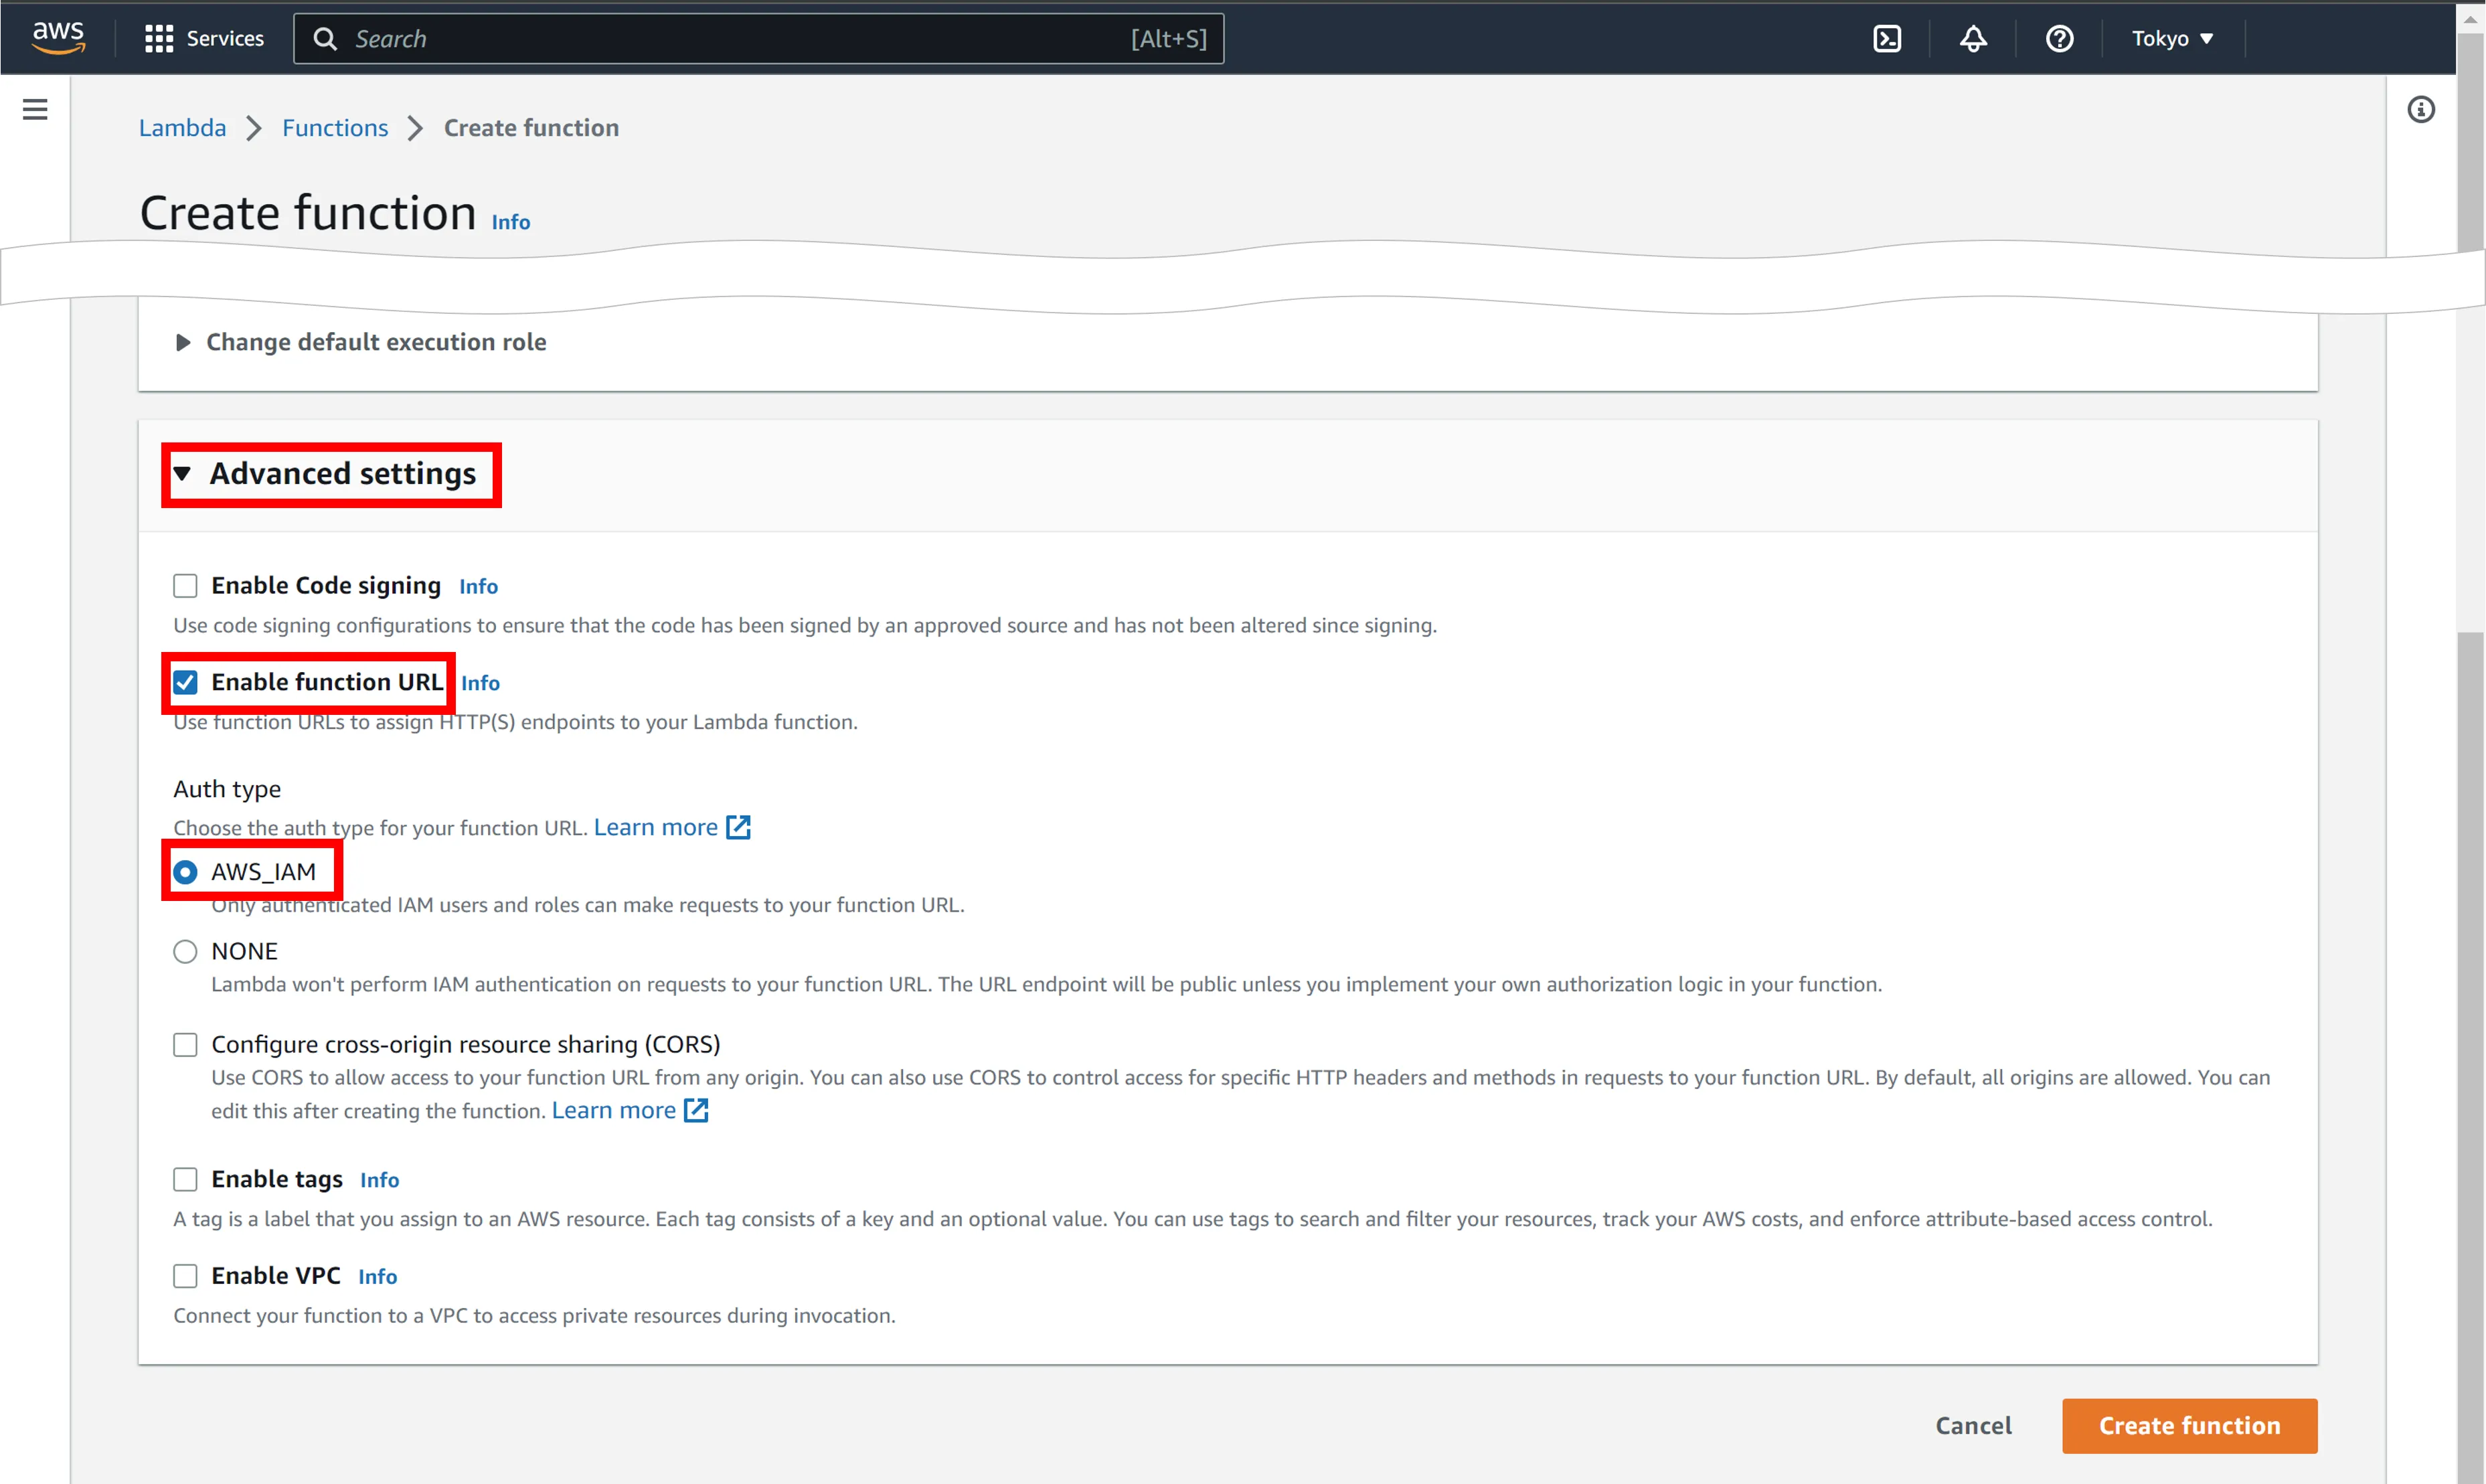
4. Click **Advanced settings**, check **Enable function URL**, and make sure **AWS\_IAM** is selected in **Auth type**.
5. Click **Create function**.
The Lambda function will be created.
6. Double-click "index.mjs" in the **Code source** and update the program as follows.
```javascript
export const handler = async(event) => {
const body = {
"message": "Hello from Lambda!",
"body": JSON.parse(event.body)
}
const response = {
statusCode: 200,
body: JSON.stringify(body),
};
return response;
};
```
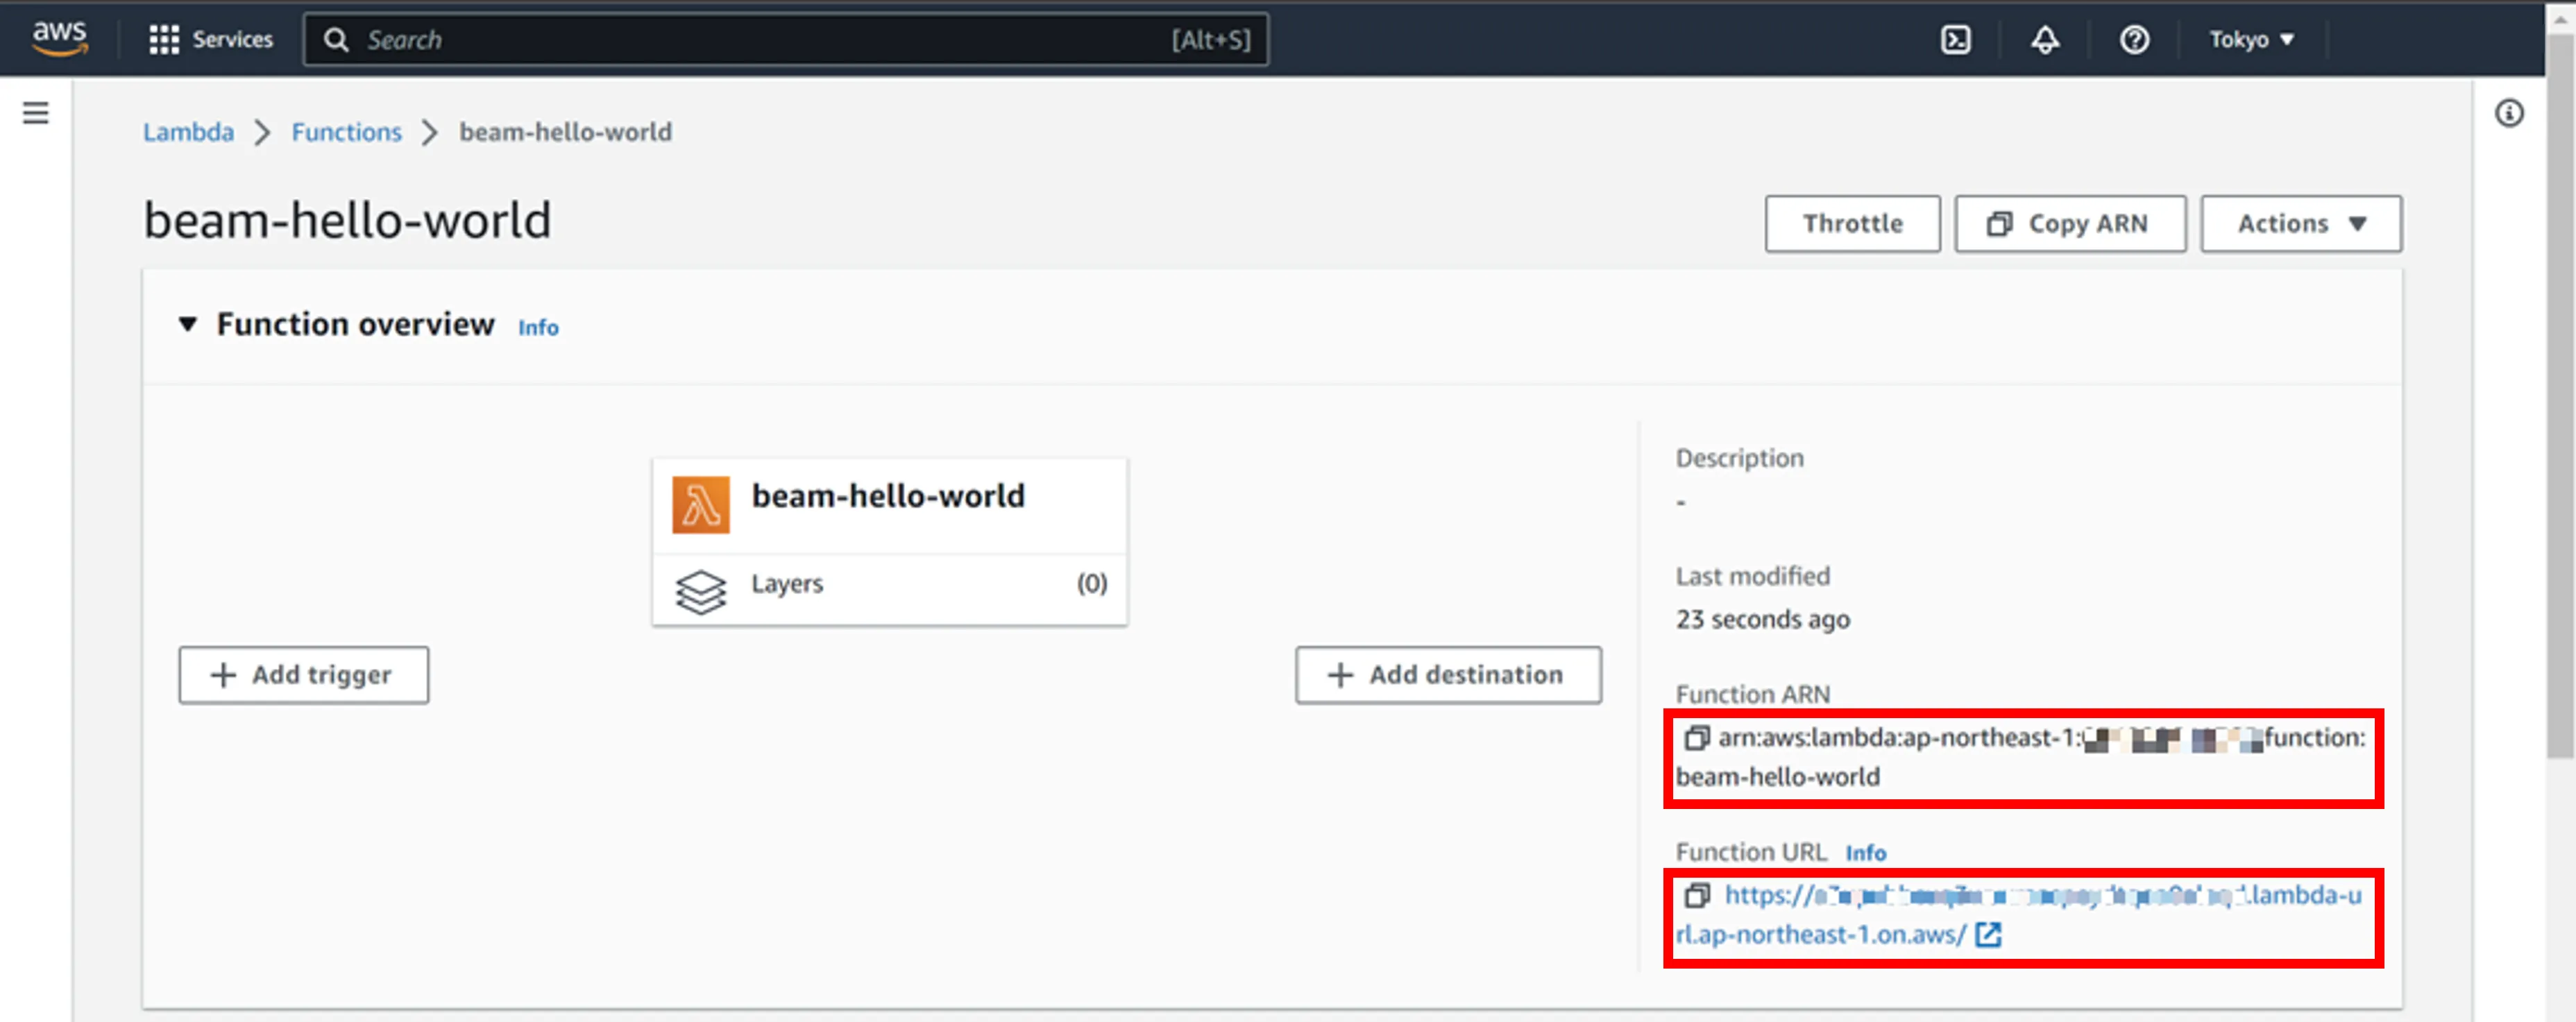
7. Copy the "Function ARN" and "Function URL" values shown in the **Function overview**.
The "Function ARN" will henceforth be denoted `${lambda_func_arn}`. Example: `arn:aws:lambda:ap-northeast-1:XXXXXXXXXXXXXX:function:beam-hello-world`
The "Function URL" will henceforth be denoted `${lambda_func_url}`. Example: `https://XXXXXXXXXXXXXXXXXXXXXXXXXXXXXXXX.lambda-url.ap-northeast-1.on.aws/`
## Step 2: Create an IAM Role and Assign It to Soracom's AWS Account
Allow our Soracom AWS account that runs Beam to execute the function created in [Step 1](https://docs.soracom.io/en/services/beam/aws-lambda/#step-1-configure-aws-lambda). Create an AWS IAM role to allow execution of the function and assign it to Soracom's AWS account.
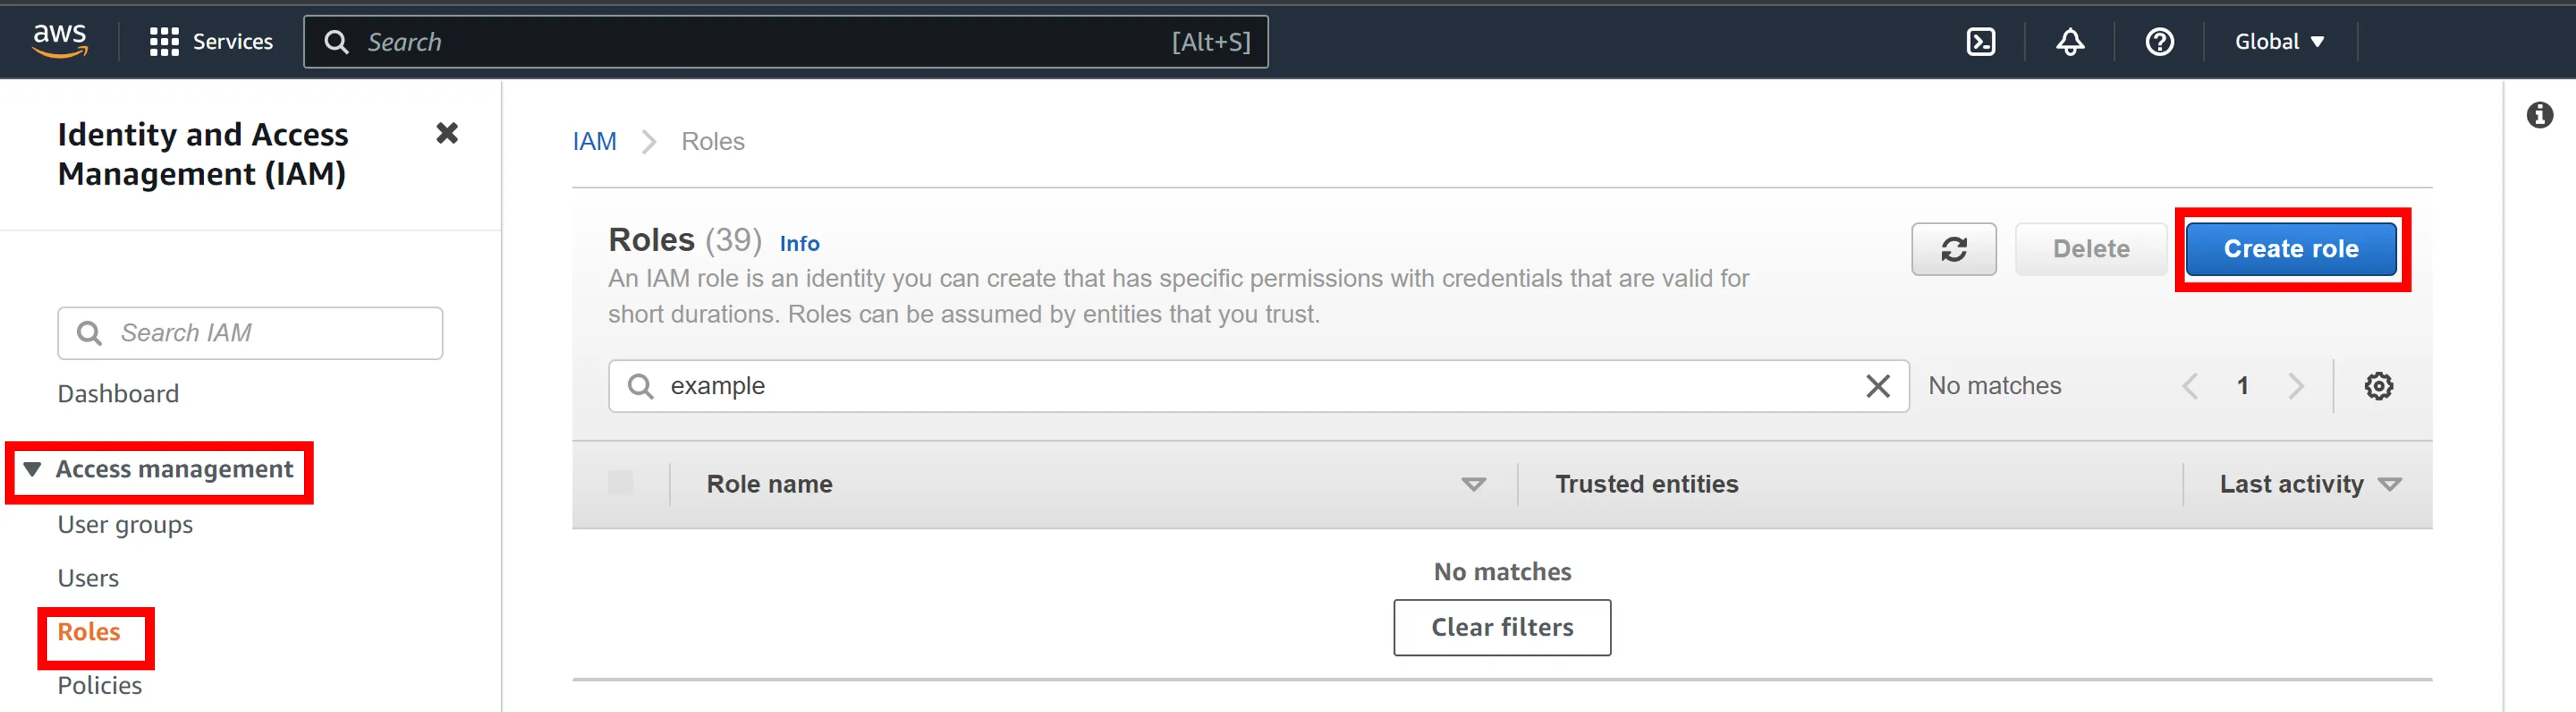
1. Go to the [IAM Management console](https://console.aws.amazon.com/iam/), click on **Access management** > **Roles** > **Create role**.
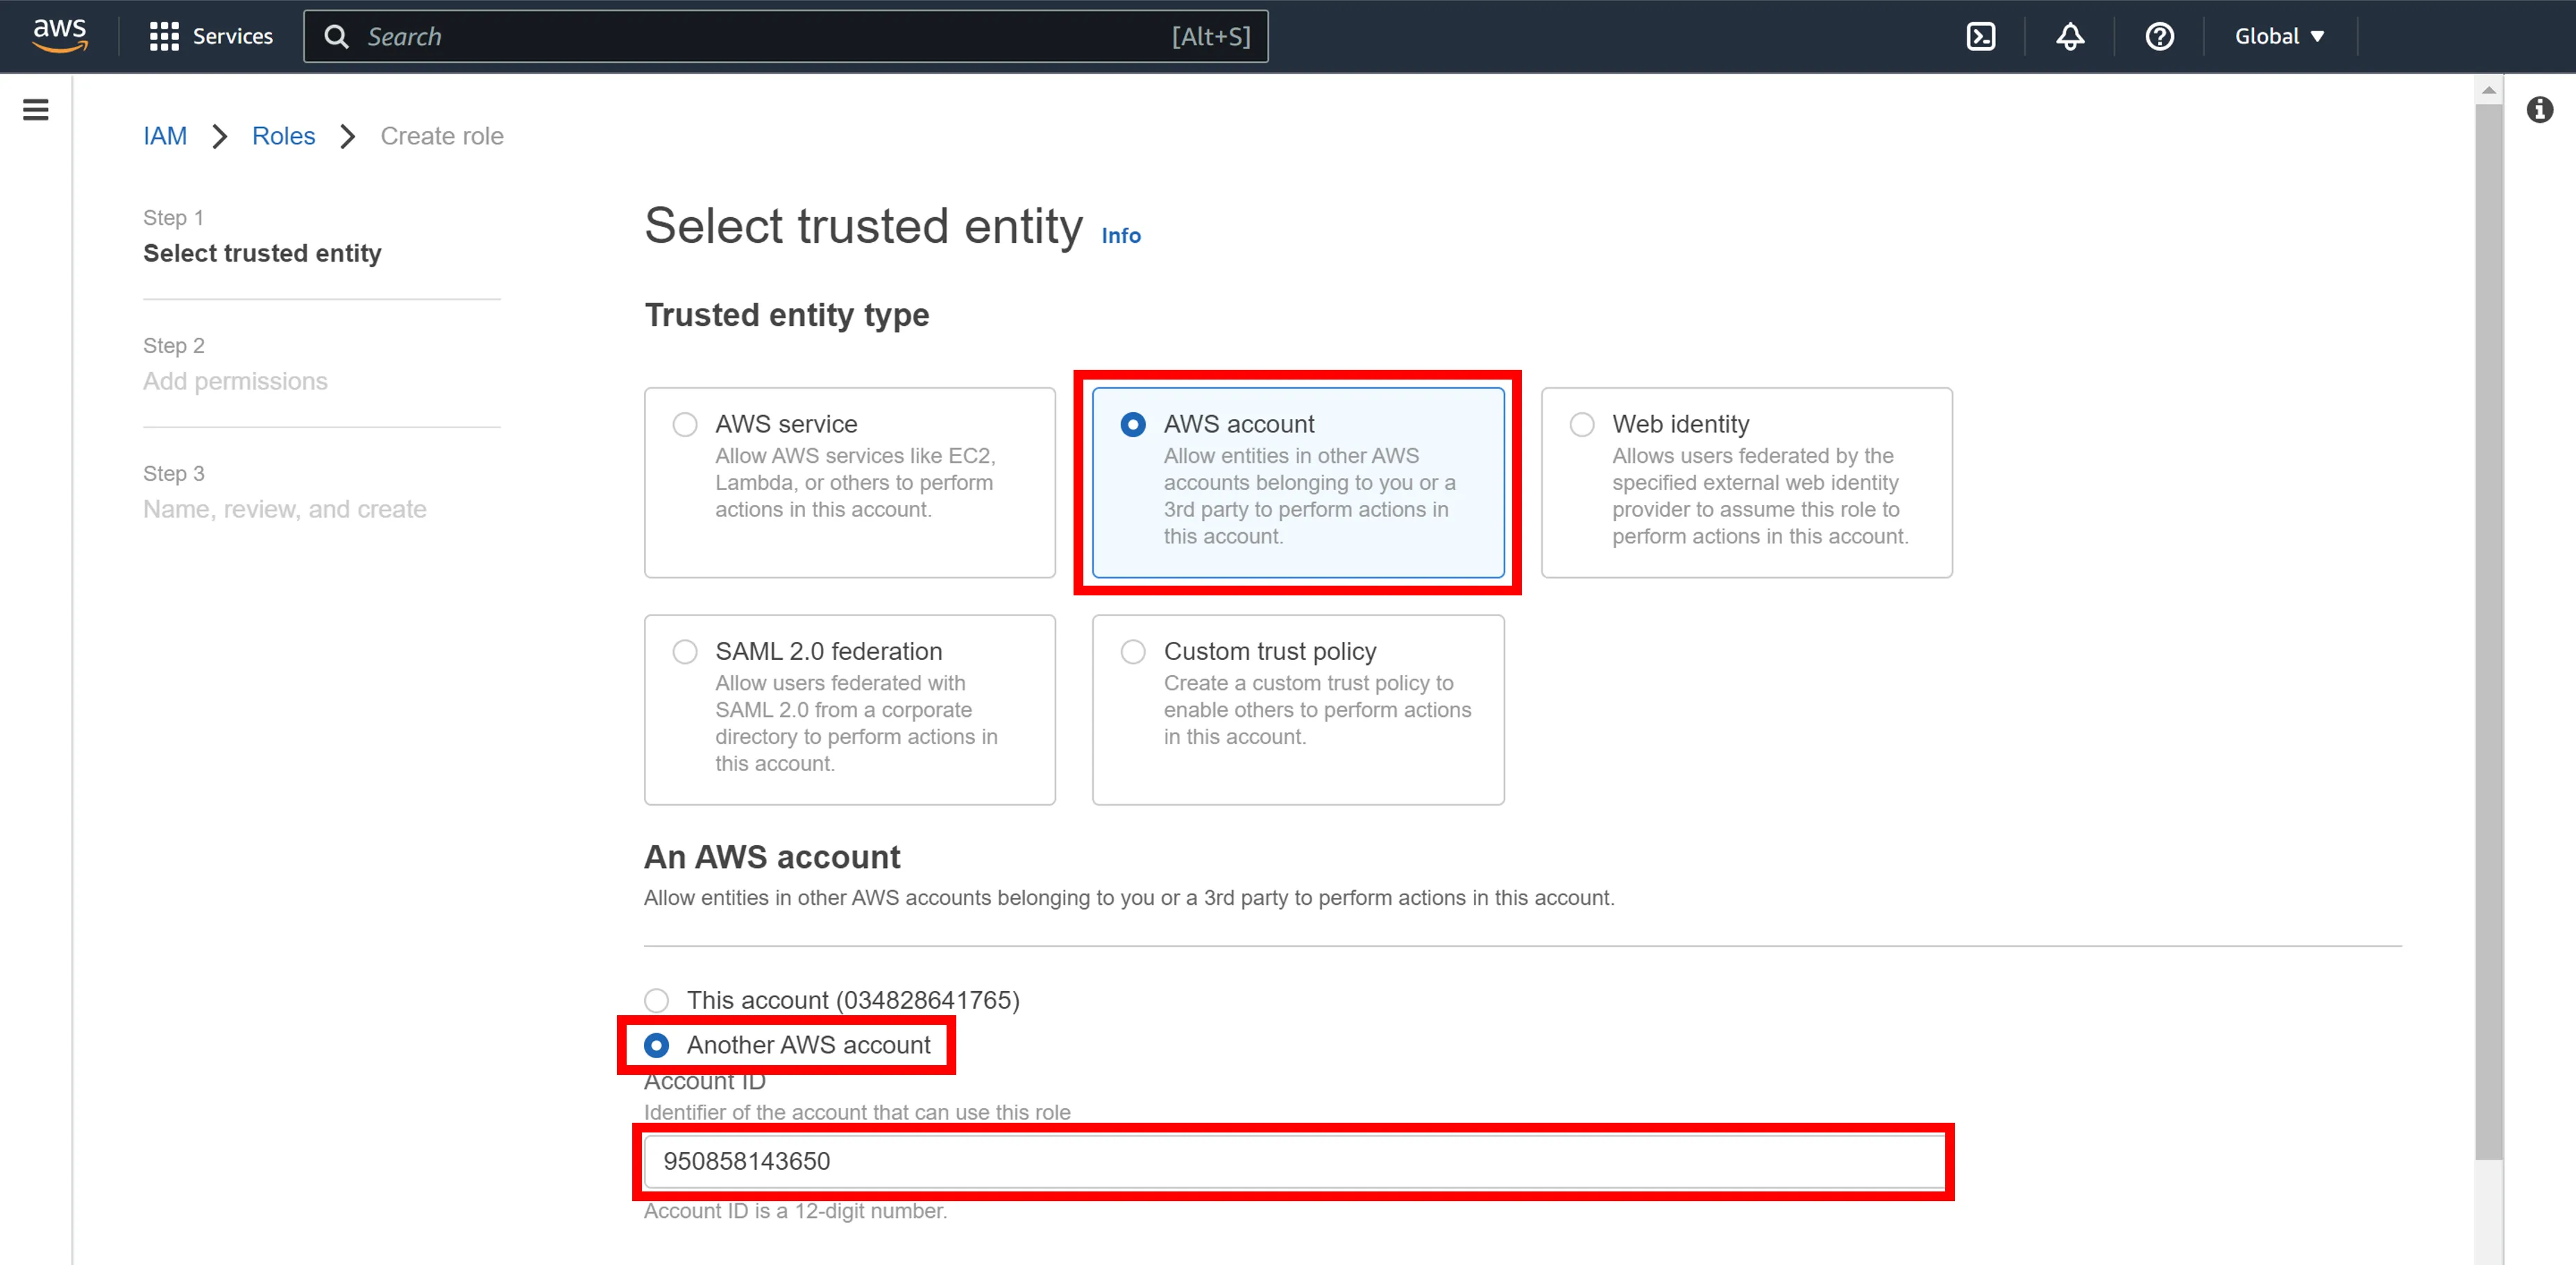
2. Click **AWS account** > **Another AWS account**, and enter Soracom's AWS account ID in **Account ID** field.
If you're working in Japan these use our Japanese Soracom AWS account ID, otherwise use our global account ID.
- Global Coverage: `950858143650`
- Japan Coverage: `762707677580`
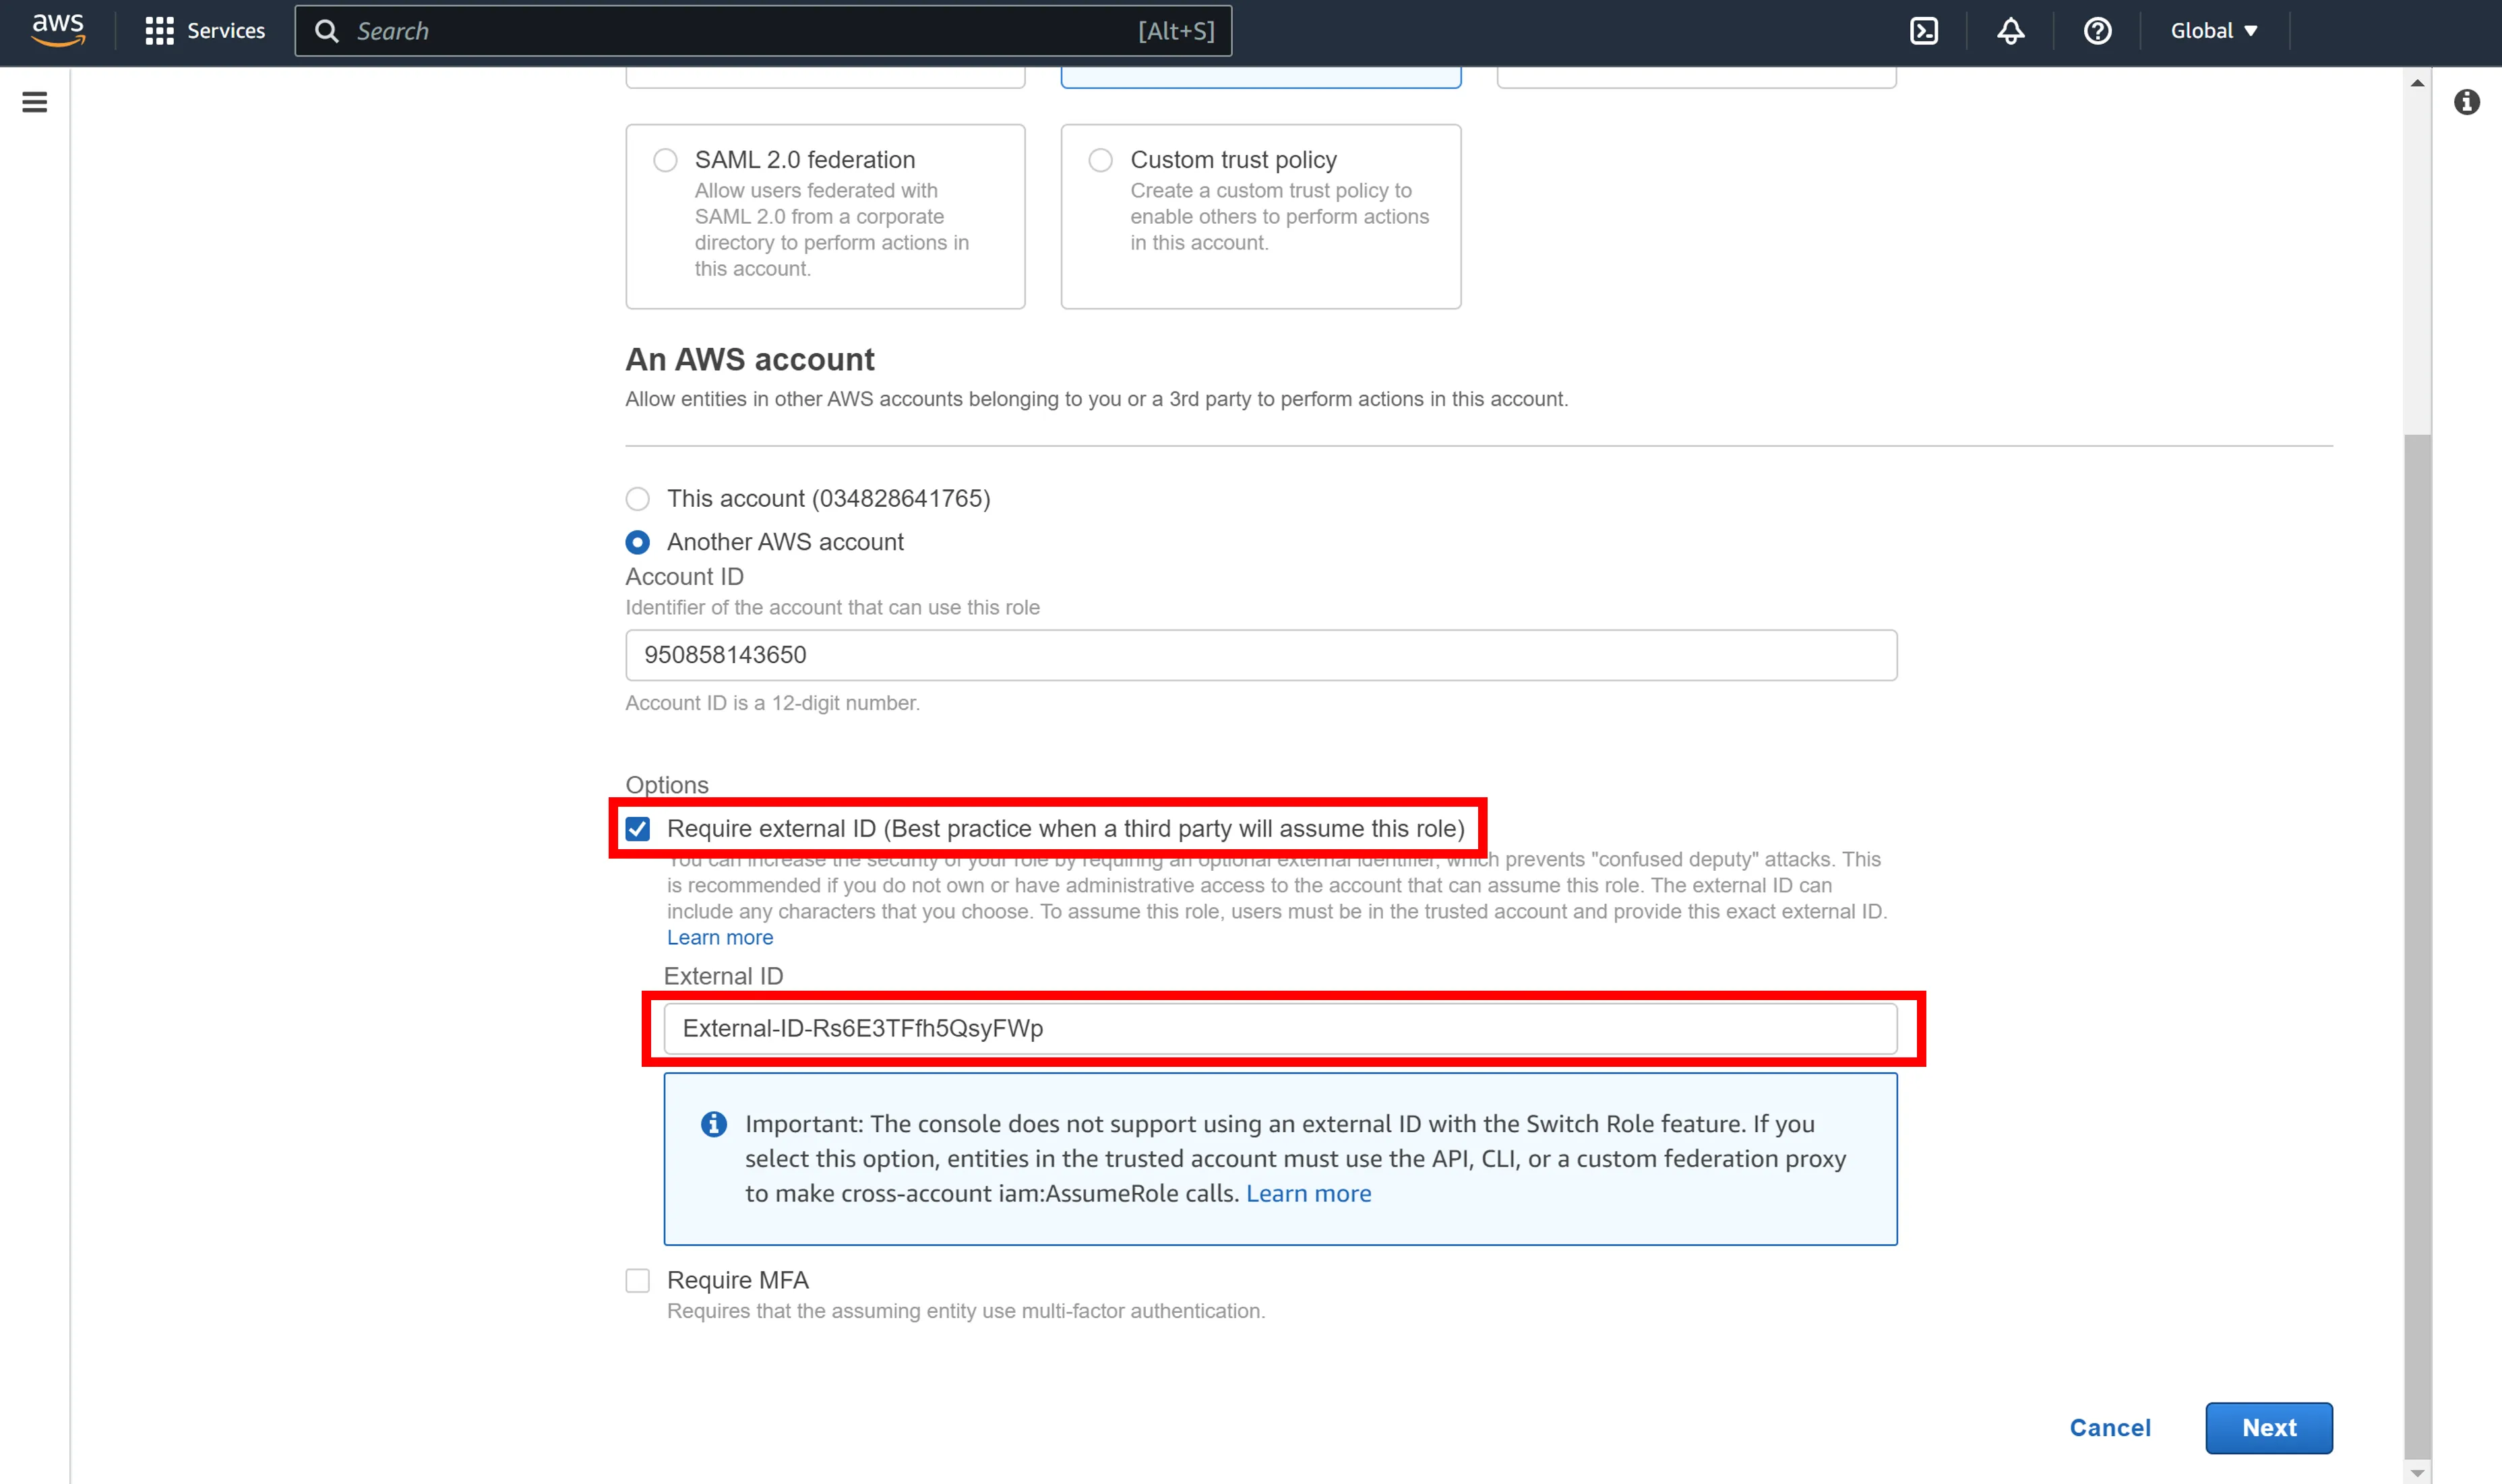
3. Check the **Require external ID** checkbox and enter any string for the **external ID** field.
The string entered for the external ID will henceforth be denoted `${external_id}`. Example: `External-ID-N4gqVwJMp7ZTVEgY`
> [!WARNING]
>
> For more information on external IDs, see the AWS document: [How to use an external ID when granting access to your AWS resources to a third party](https://docs.aws.amazon.com/IAM/latest/UserGuide/id_roles_create_for-user_externalid.html).
4. Click **Register**.
You will see the "Add permissions" navigation pane.
5. Click **Create policy**.
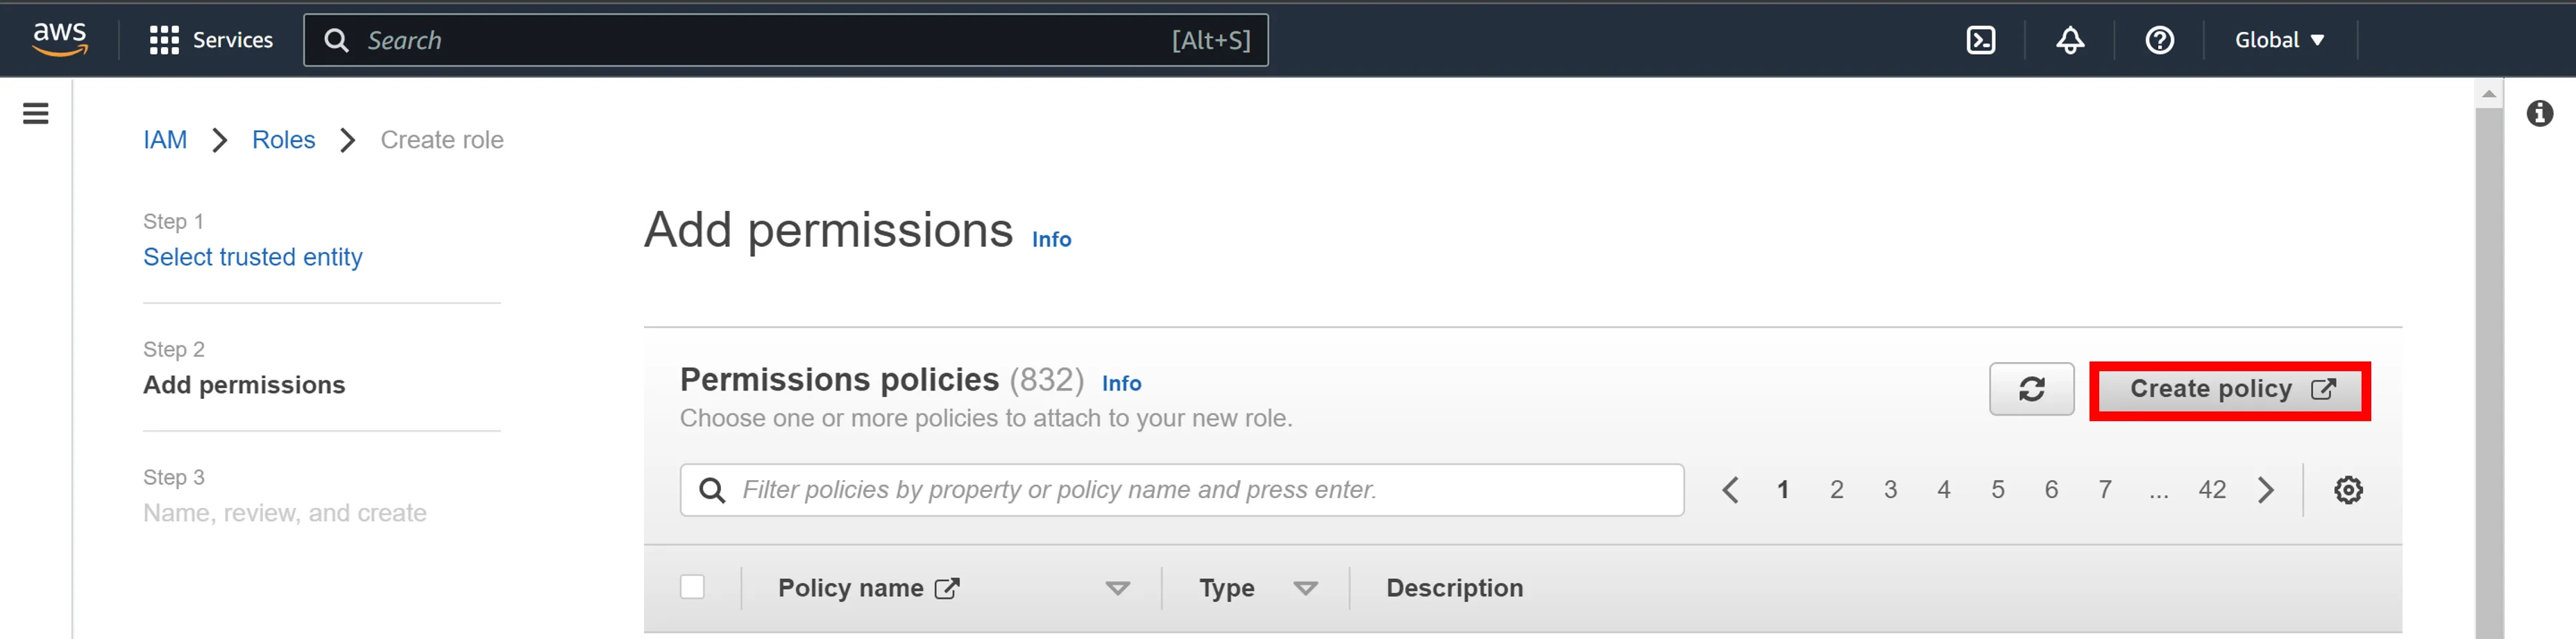
In a new window or tab, you will see the "Create policy" navigation pane.
> [!NOTE]
>
> Create a policy on the "Create Policy" navigation pane. When you completed the "Create Policy" navigation pane, come back to the "Add permissions" navigation pane where you see **Create policy** and continue with the creation of IAM roles. Do not close the original navigation pane.
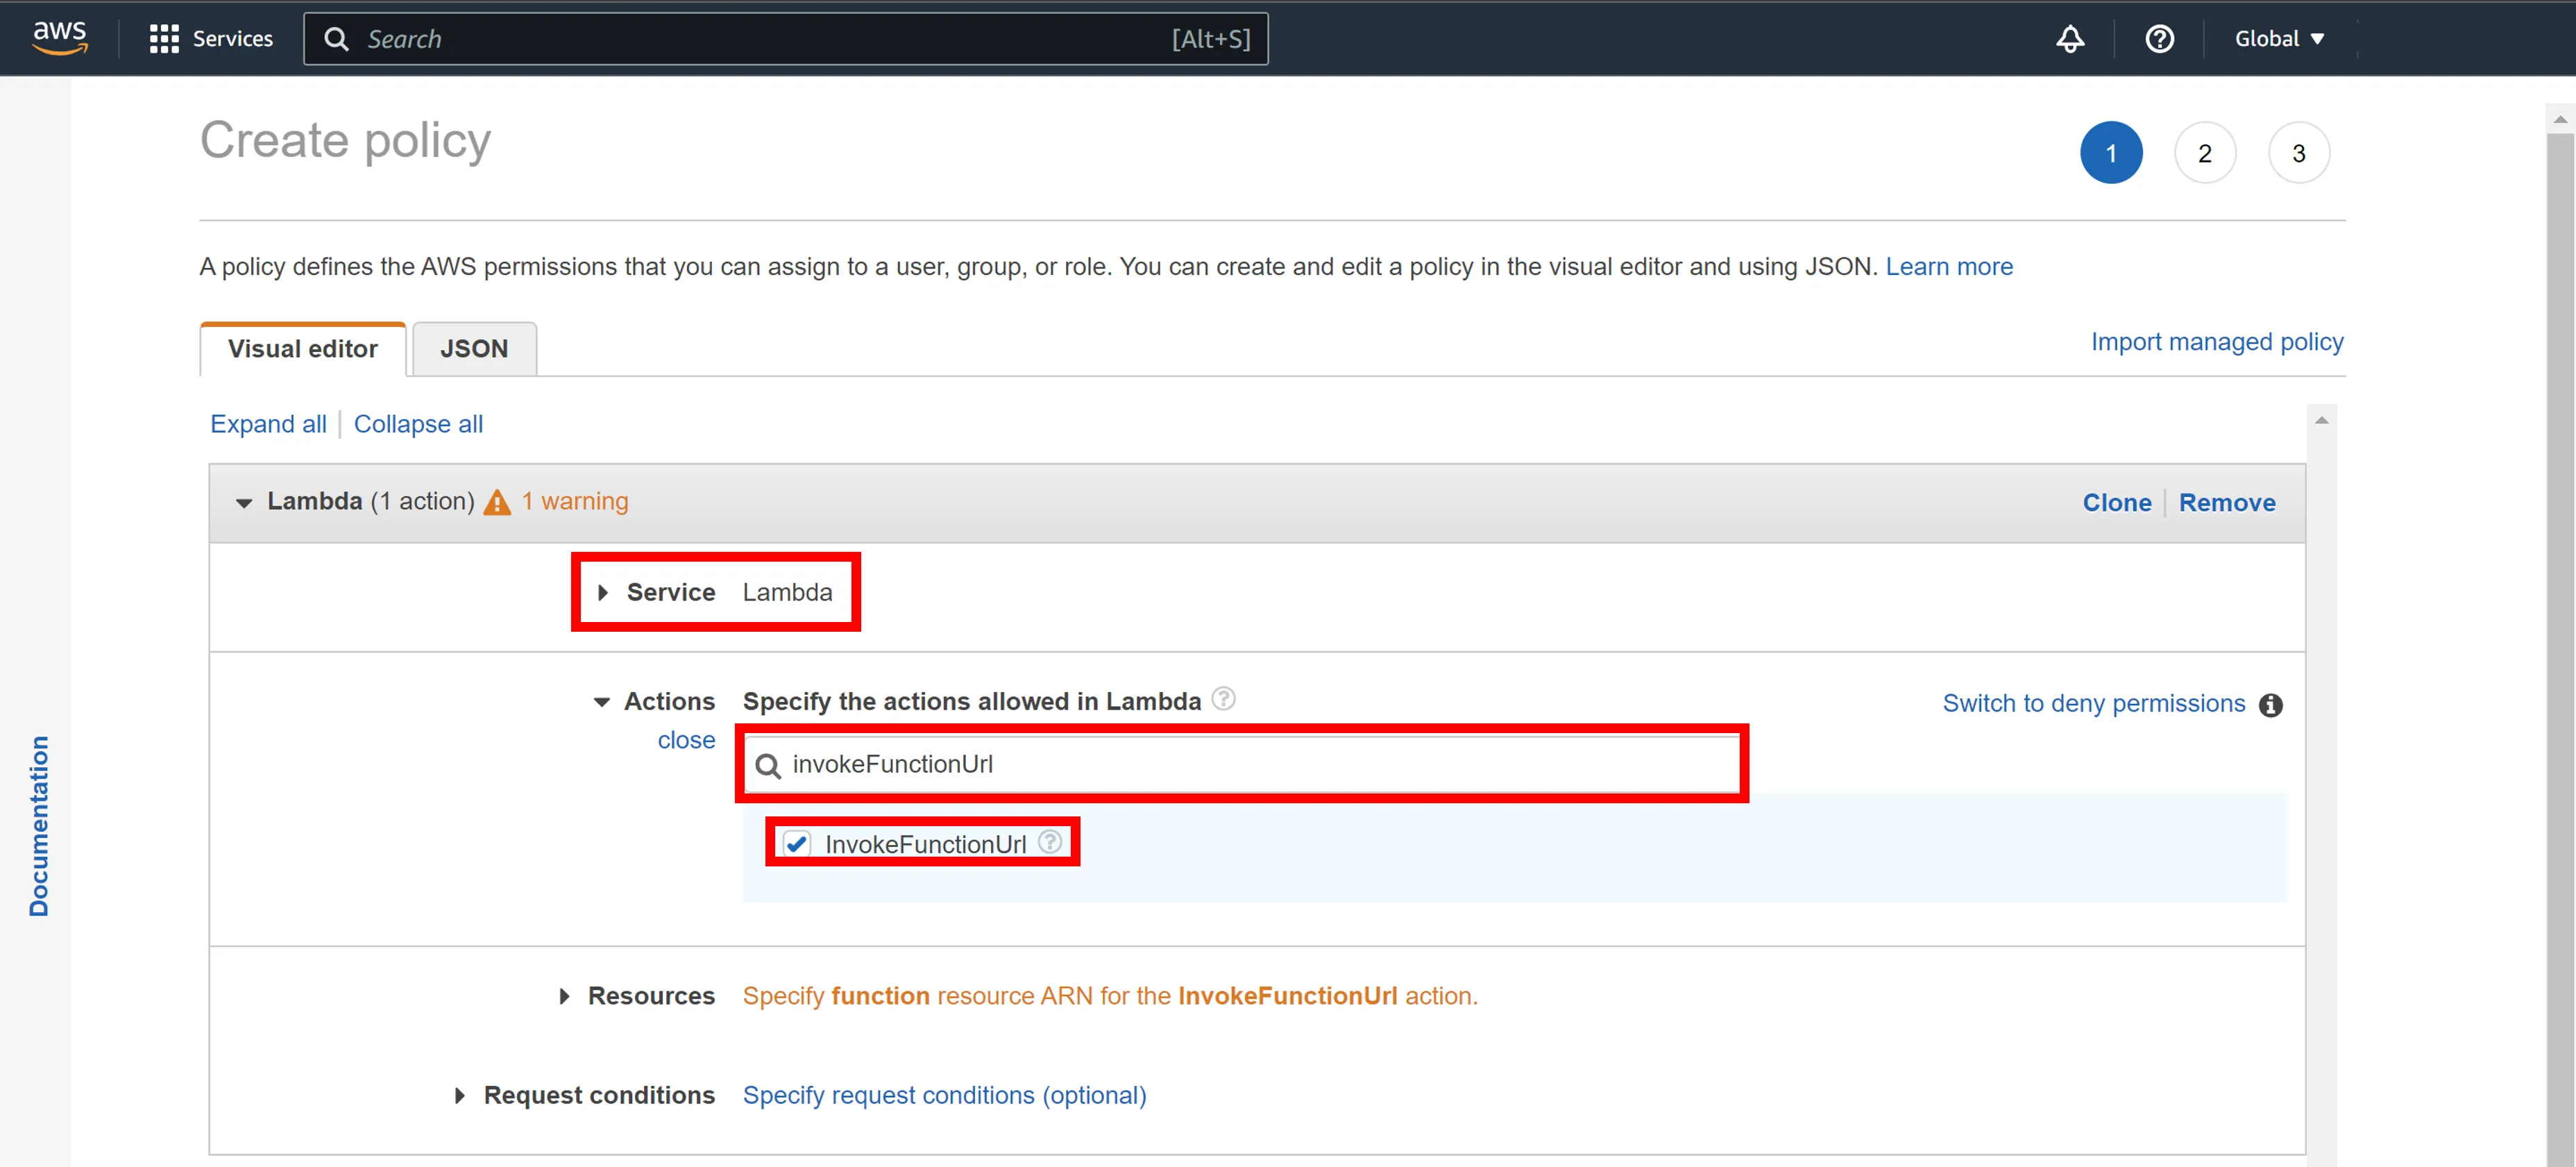
6. Configure the policy to allow your function to be called via its URL
| Item | Description |
| - | - |
| Service | Click on **Choose a service**, then click on Lambda. |
| Actions | Find "InvokeFunctionUrl" in filter and check it. |
7. Click **Resources** > **Specific** > **Add ARN**.
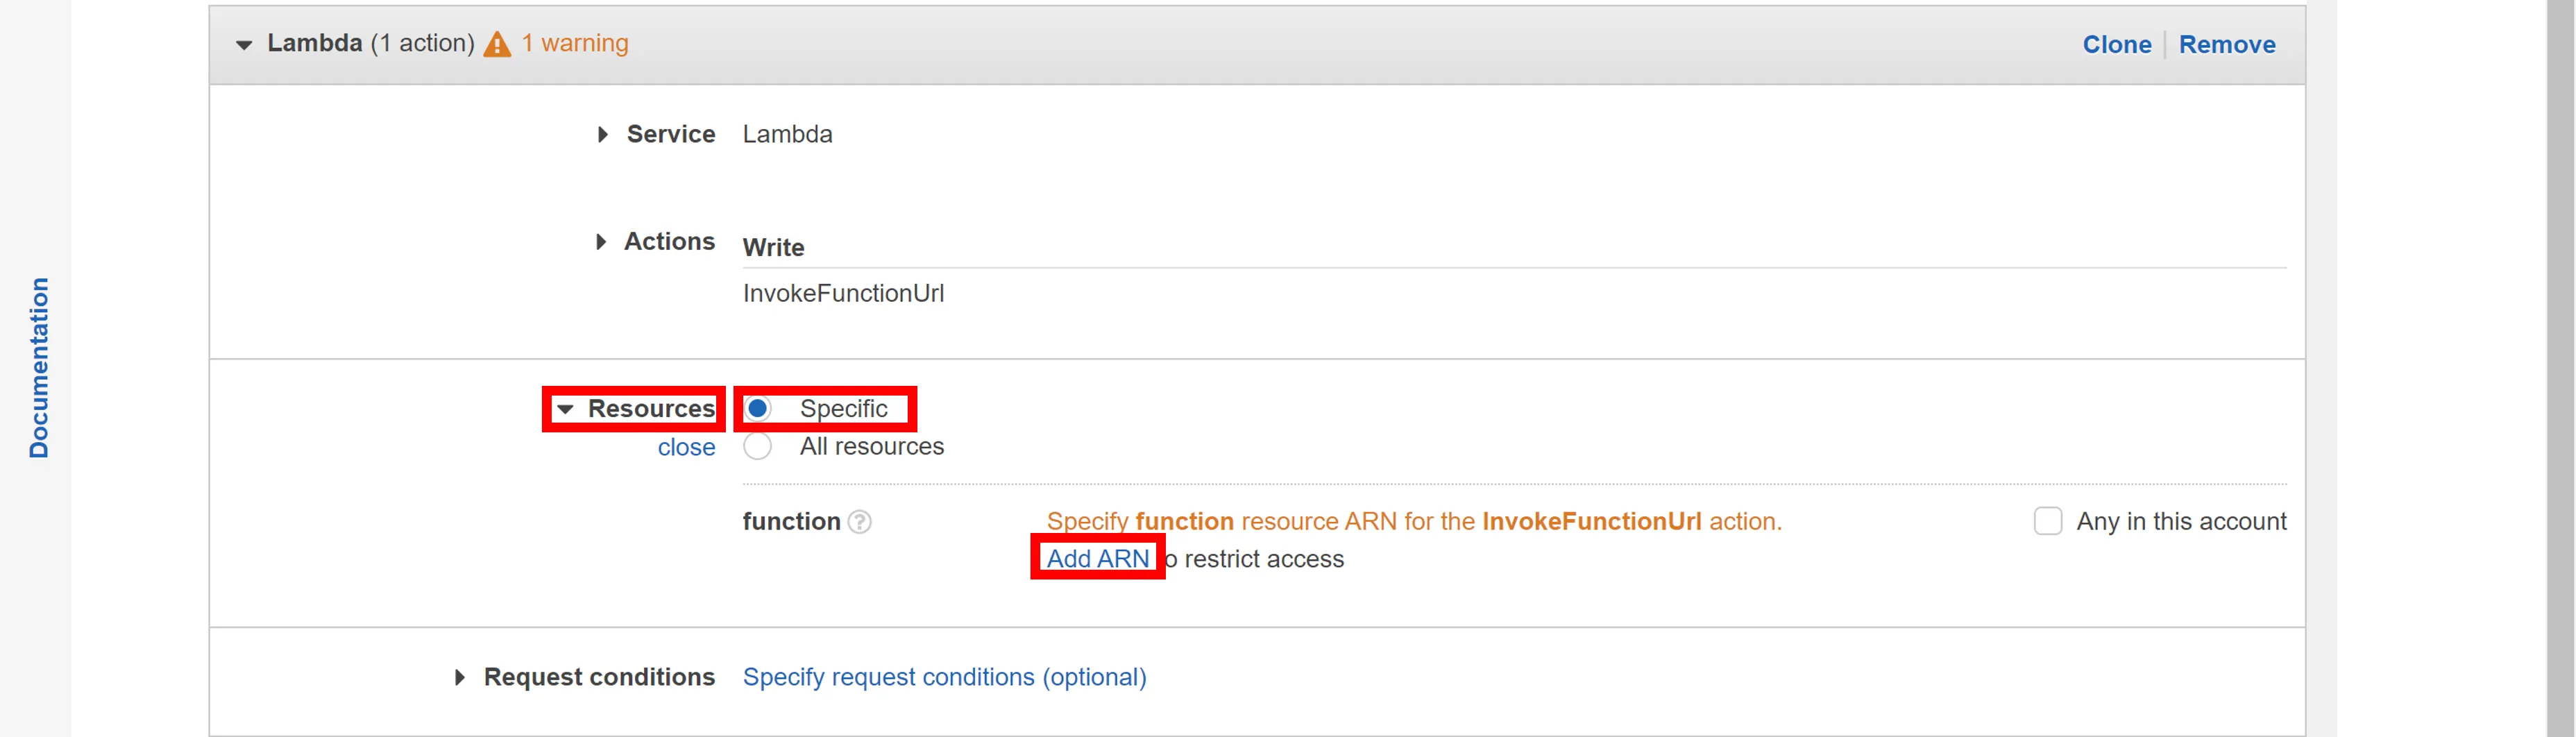
You will see the "Add ARN" navigation pane.
8. Enter `${lambda_func_arn}` of Lambda\_function, and click **Add**.
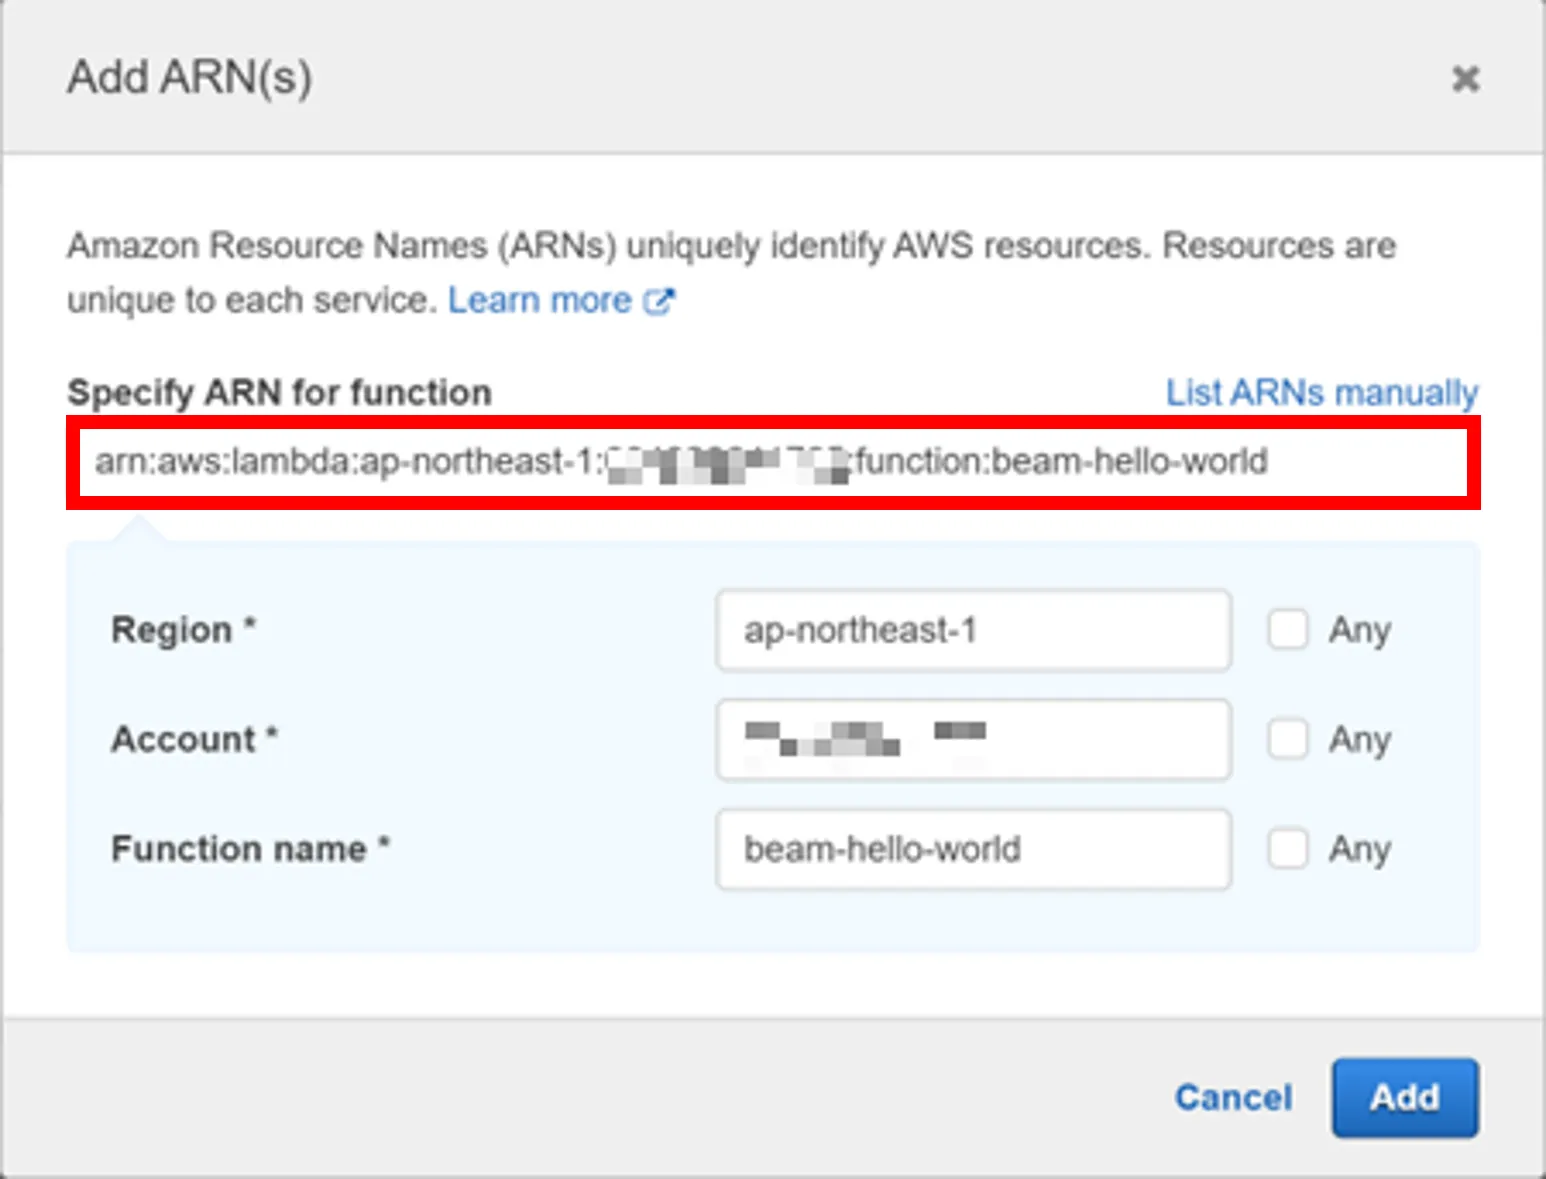
You will return to the "Create policy" navigation pane.
9. Click on **Next: Tags** > **Next: Review**.
10. Enter a name for the AWS IAM policy in **Name** field and click **Create policy**.
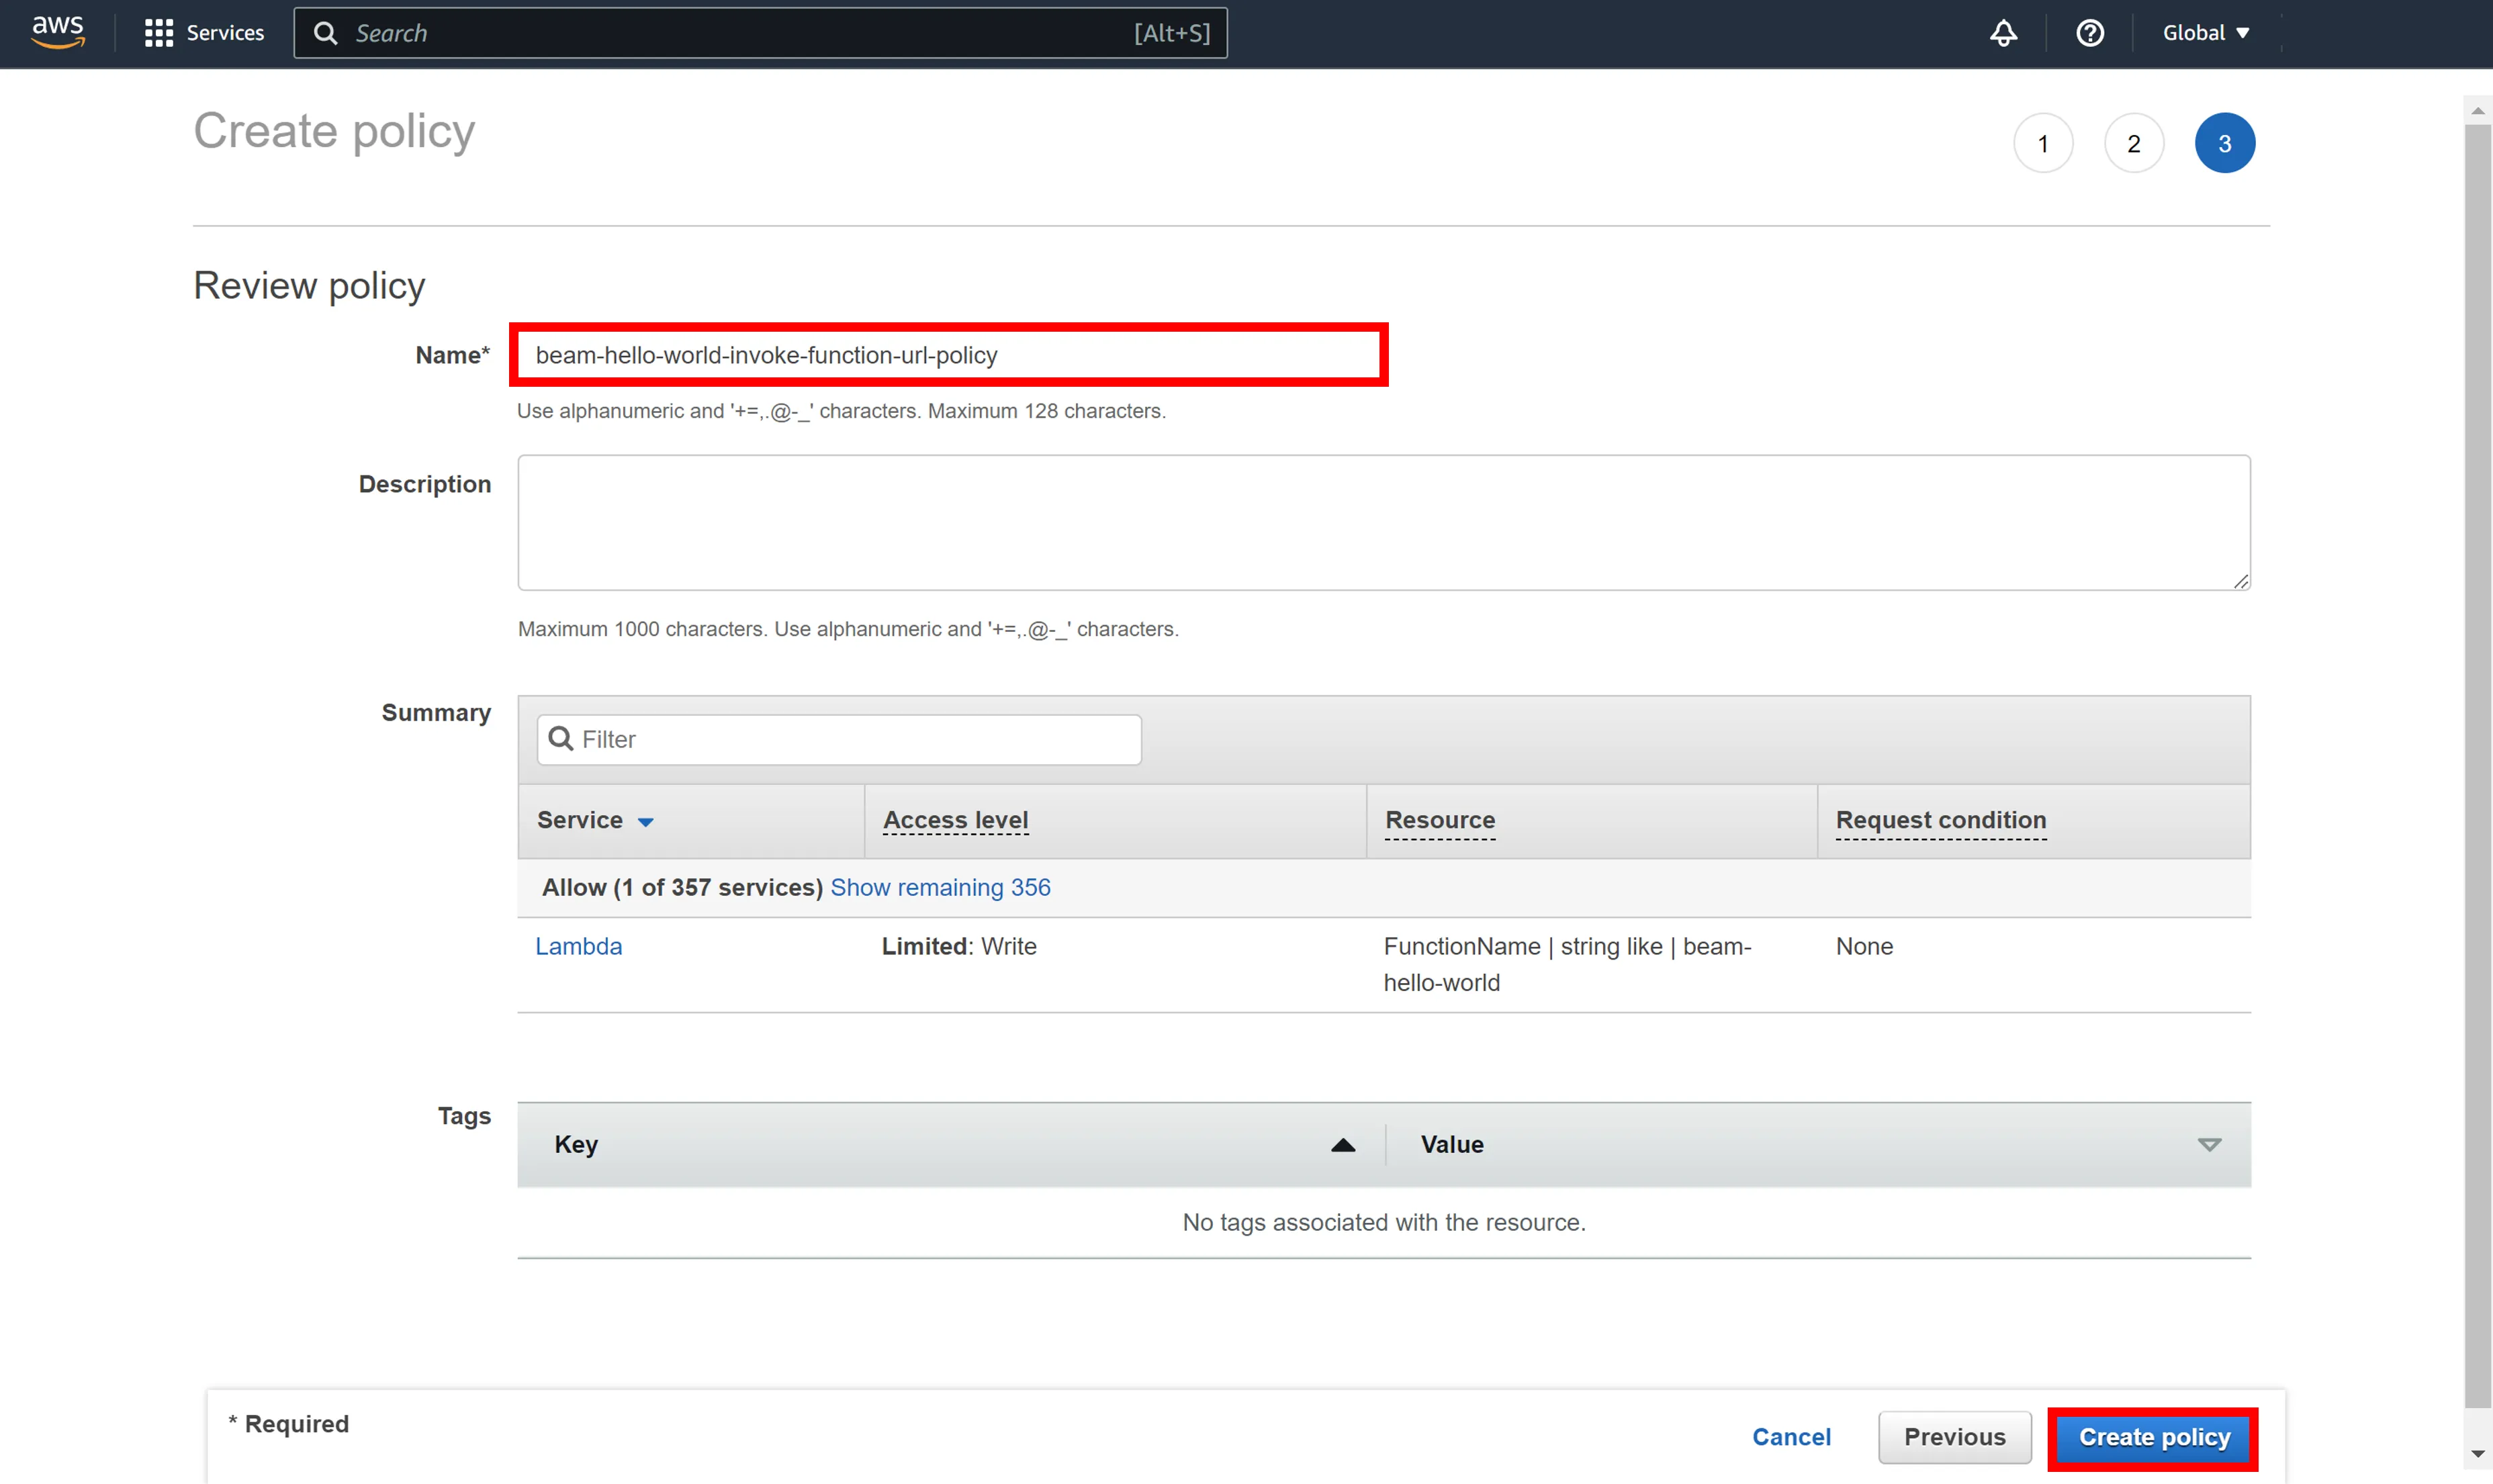
An AWS IAM policy will be created and you will see the policy detail page.
11. Close the window or tab in which the policy detail page is displayed to return to the "Add permissions" navigation pane.
12. Click the reload icon then find the AWS IAM policy created in \[10].
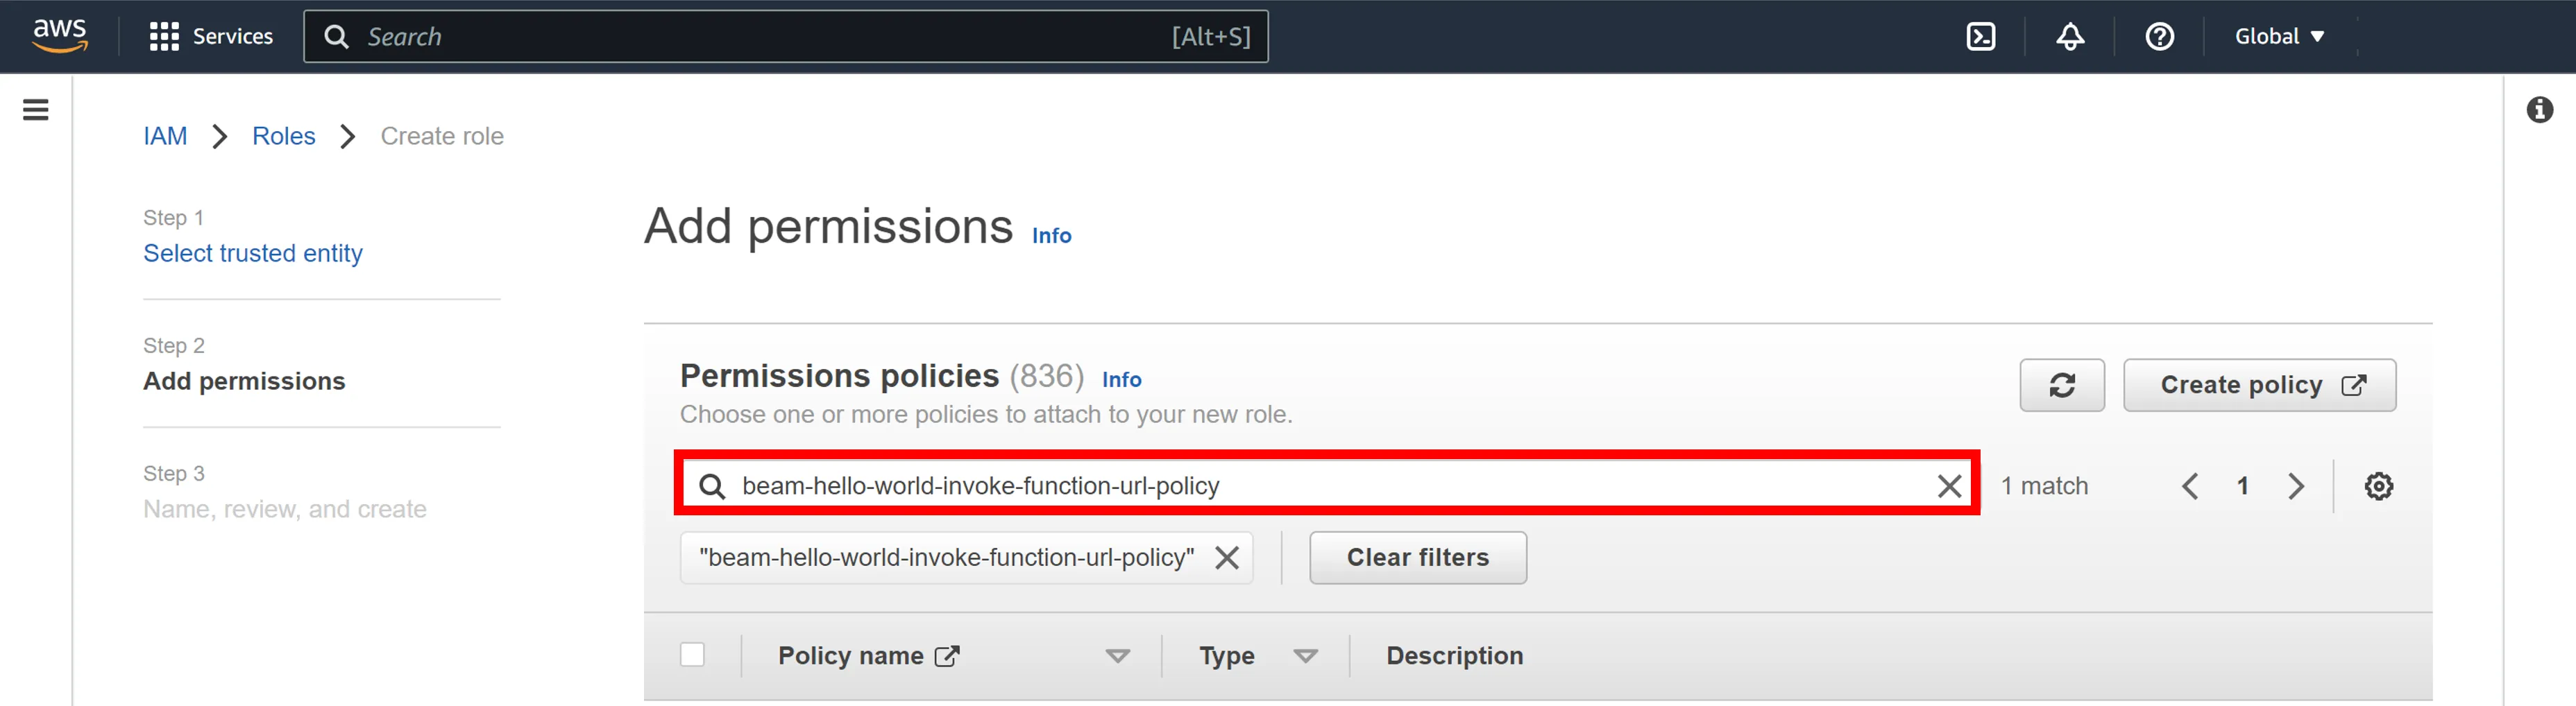
You will see the AWS IAM policy that has been created.
13. Select the AWS IAM policy you created and click **Next**.
14. Enter the IAM role name in the **Role name** field and click **Create role**.
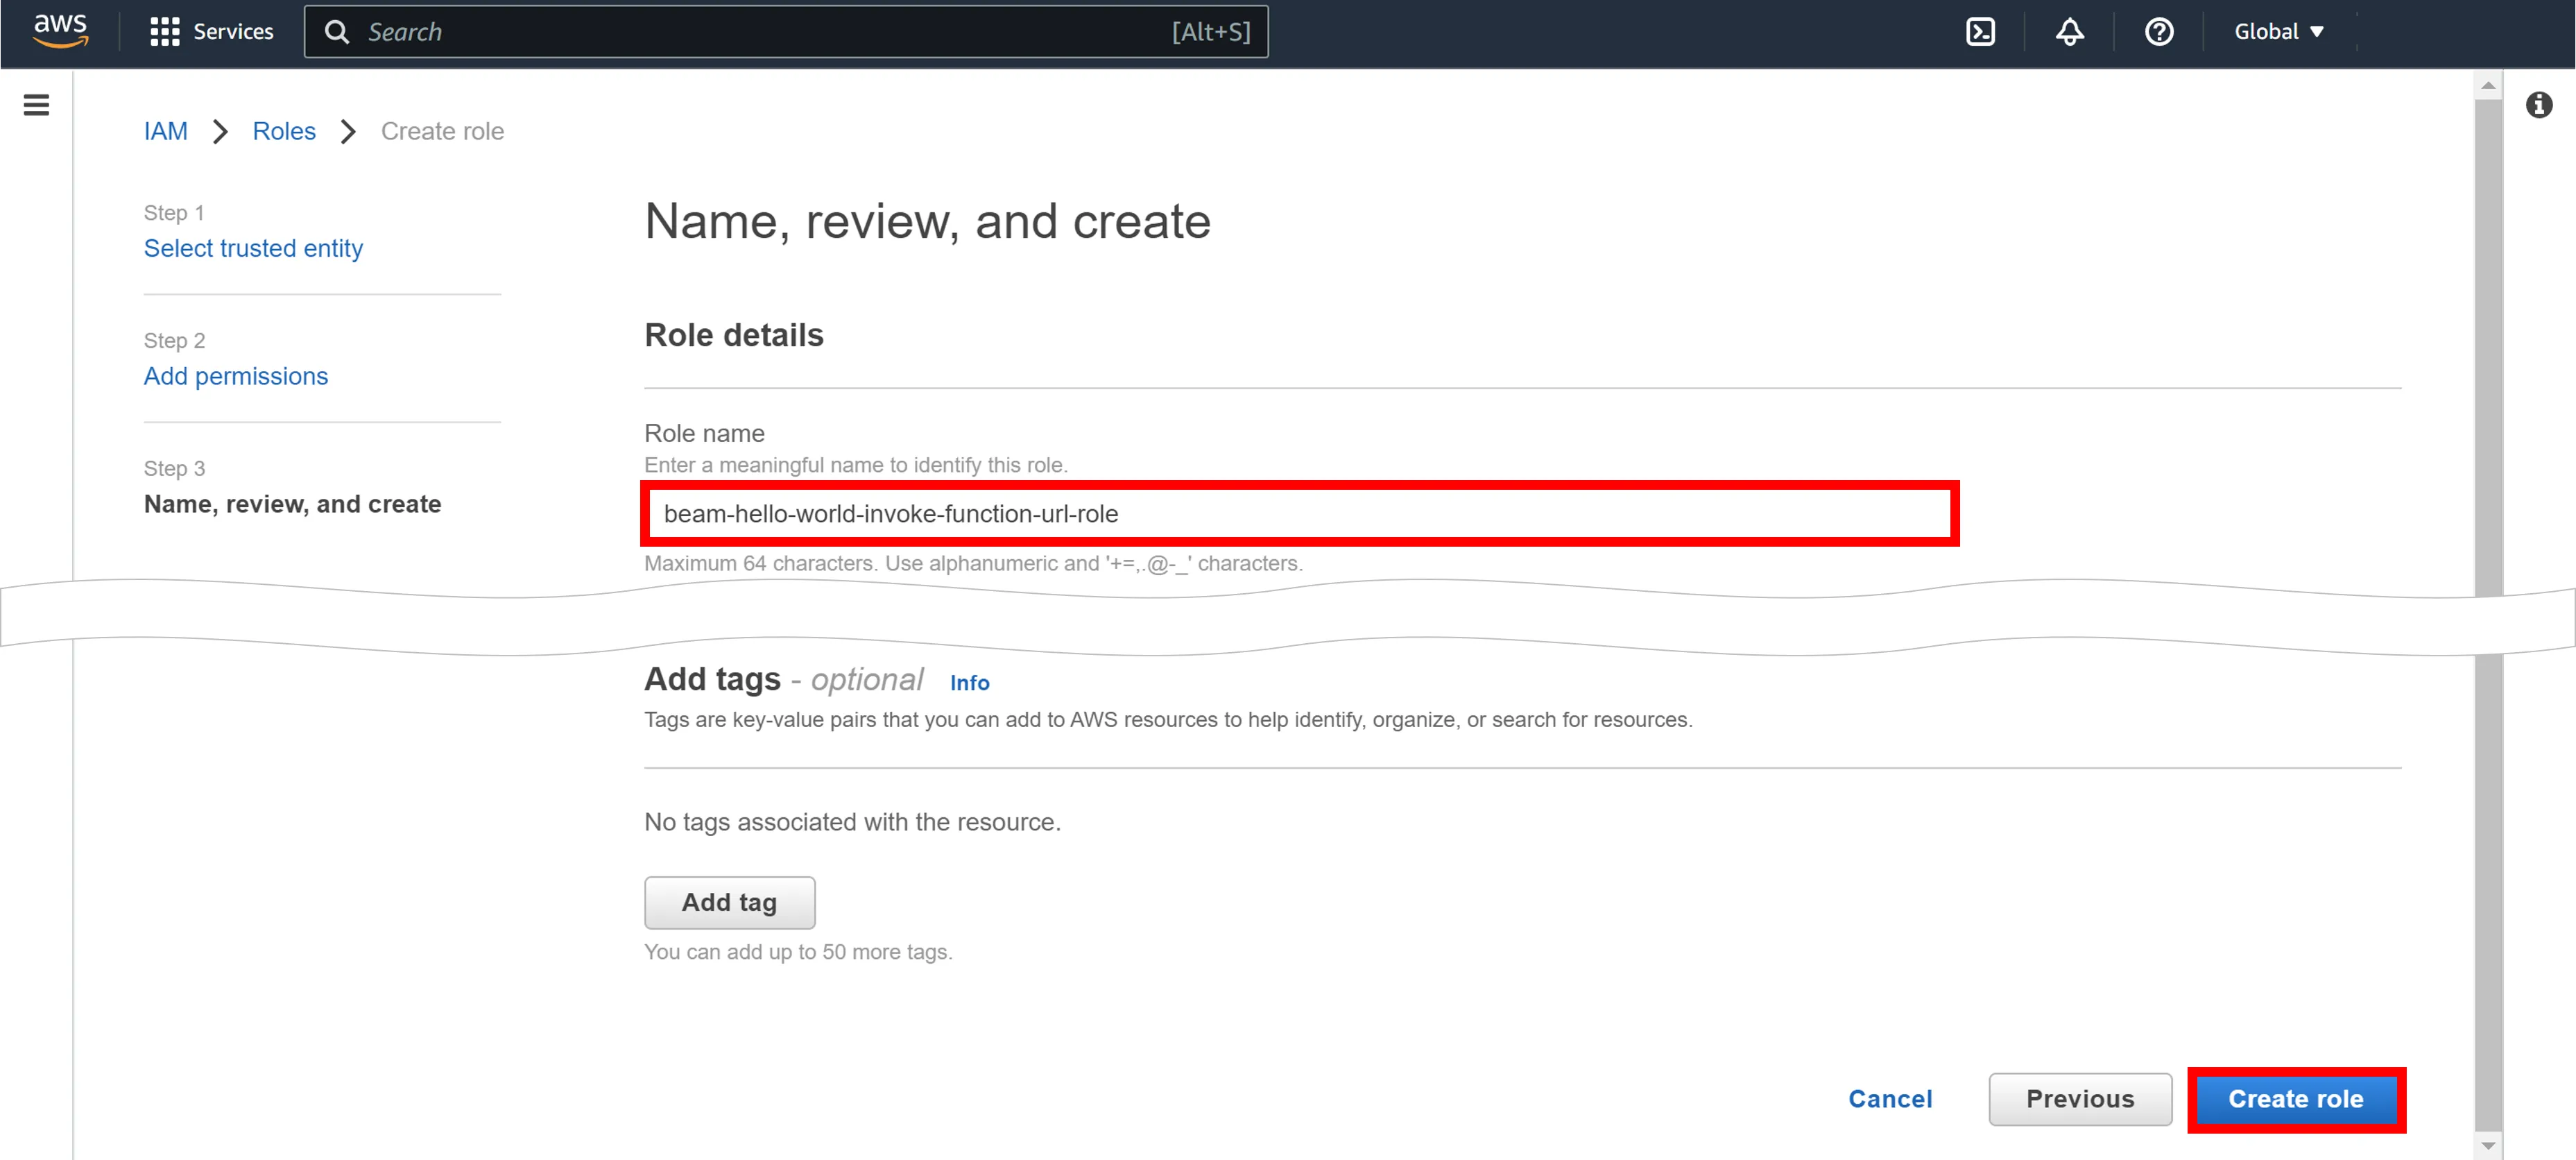
You will return to the Roles page.
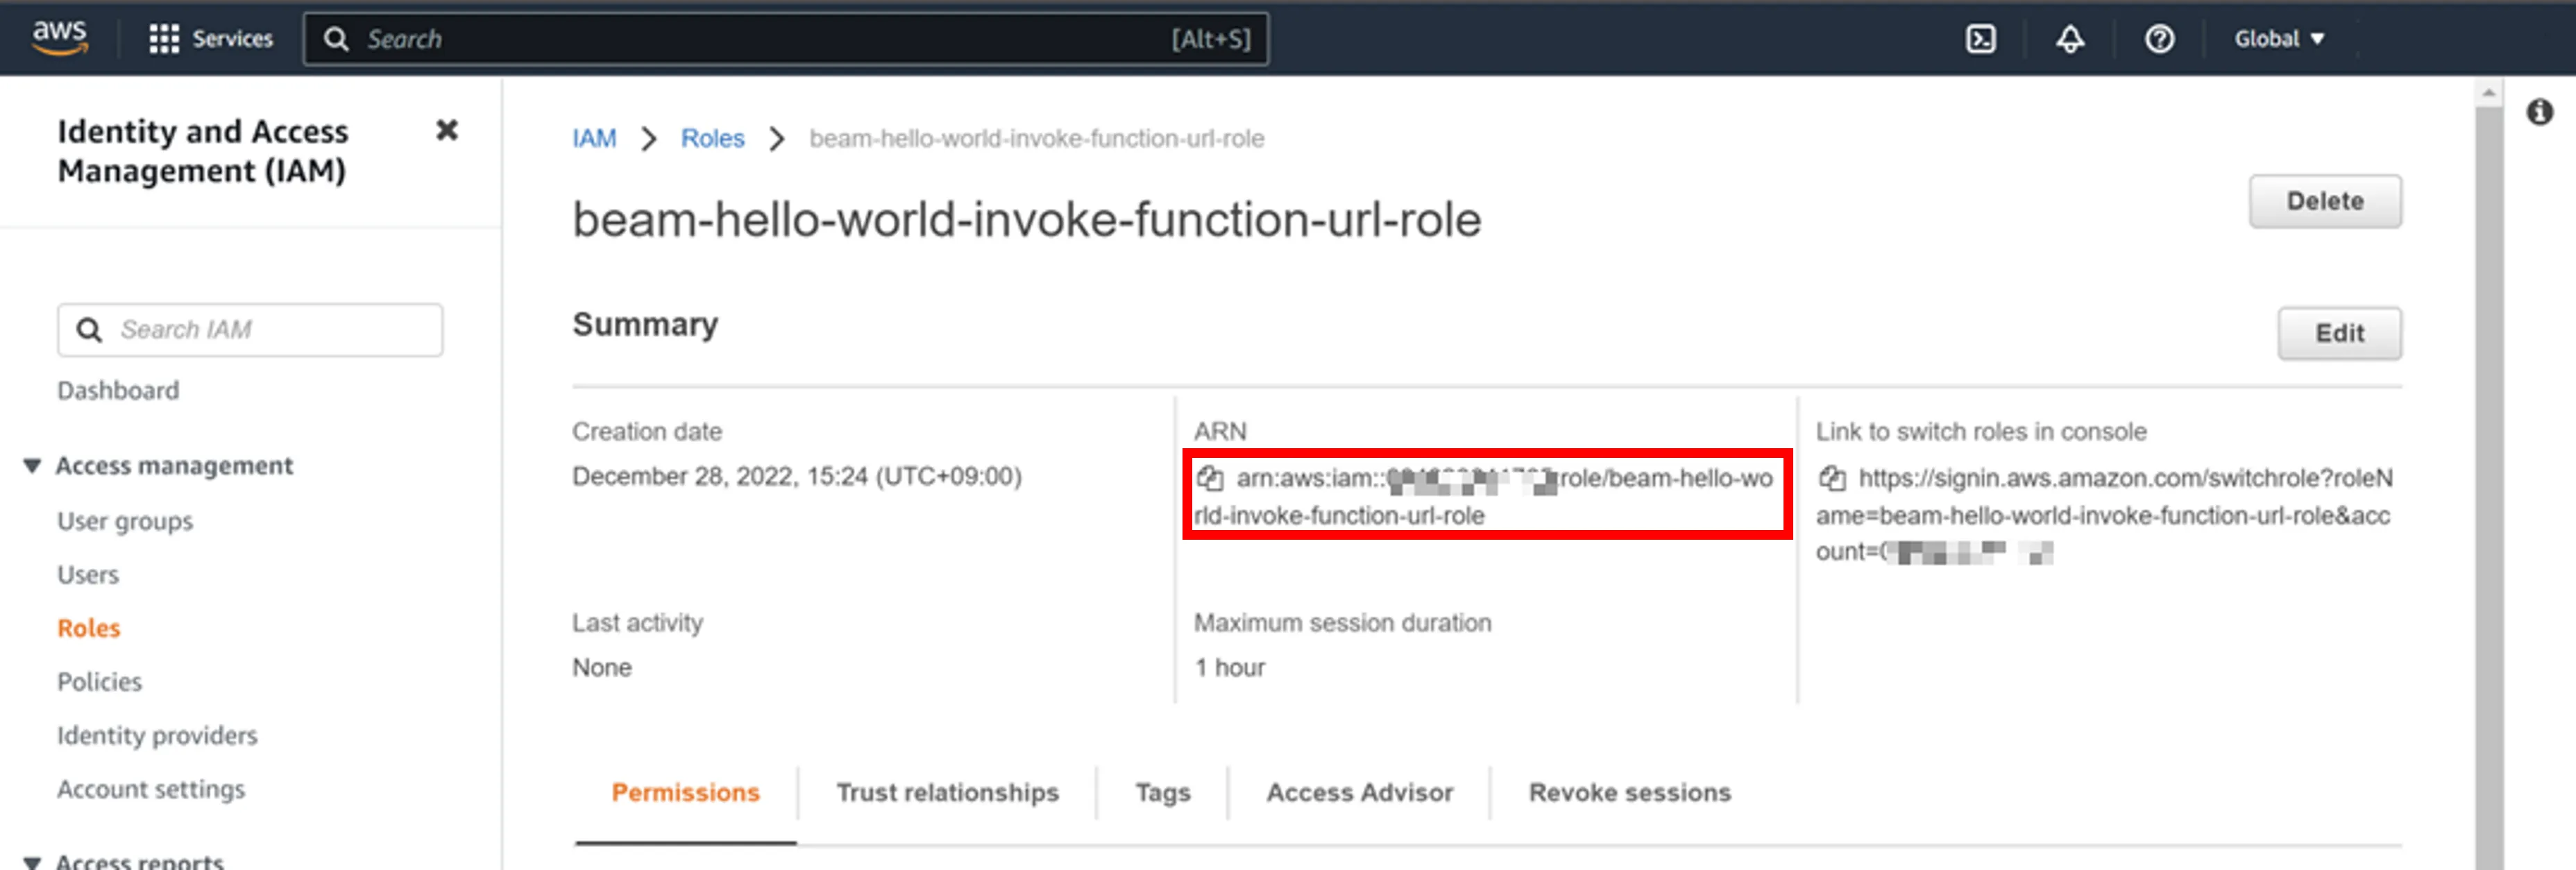
15. Click on the name of the IAM role you created. Note the ARN.
This ARN will henceforth be denoted `${iam_role_arn}`. Example: `arn:aws:iam::XXXXXXXXXXXXXX:role/beam-hello-world-invoke-function-url-role`
## Step 3: Set up Soracom Beam
Configure the User Console to call AWS Lambda functions from Beam when devices using an IoT SIM send data.
### Register AWS IAM Role Credentials in the Credential Set
In order to invoke AWS Lambda functions from Beam, credentials related to the IAM role should be registered in the credential set in the User Console. For details on how to register the credential sets, see [Credential Sets](https://docs.soracom.io/en/services/authentication/credential-sets#creating-a-credential-set).
The credential set is registered as follows
| Item | Description |
| - | - |
| CREDENTIAL SET ID | Enter any name to identify the credential set. Example: `AWS-IAM-role-credentials-invokeFunctionUrl` |
| TYPE | Select "AWS IAM Role credentials". |
| ROLE ARN | Enter `${iam_role_arn}`. Example: `rn:aws:iam::XXXXXXXXXXXXXX:role/beam-hello-world-invoke-function-url-role` |
| EXTERNAL ID | Enter `${external_id}`. Example: `External-ID-N4gqVwJMp7ZTVEgY` |
### Configuring Beam's HTTP Entry Point
> [!NOTE]
>
> Beam is a configuration of a Soracom IoT SIM group. This section describes only operations to change group settings. For more information on how groups work and how to create a group, see [Group Management Overview](https://docs.soracom.io/en/services/groups) and [Basic Usage](https://docs.soracom.io/en/services/groups/usage).
1. On the SIM Group page, open SORACOM Beam.
See [Group Settings](https://docs.soracom.io/en/services/groups/settings) for more information on configuring the SIM group.
2. Click on **+ Add Configuration** > **HTTP entry point**.
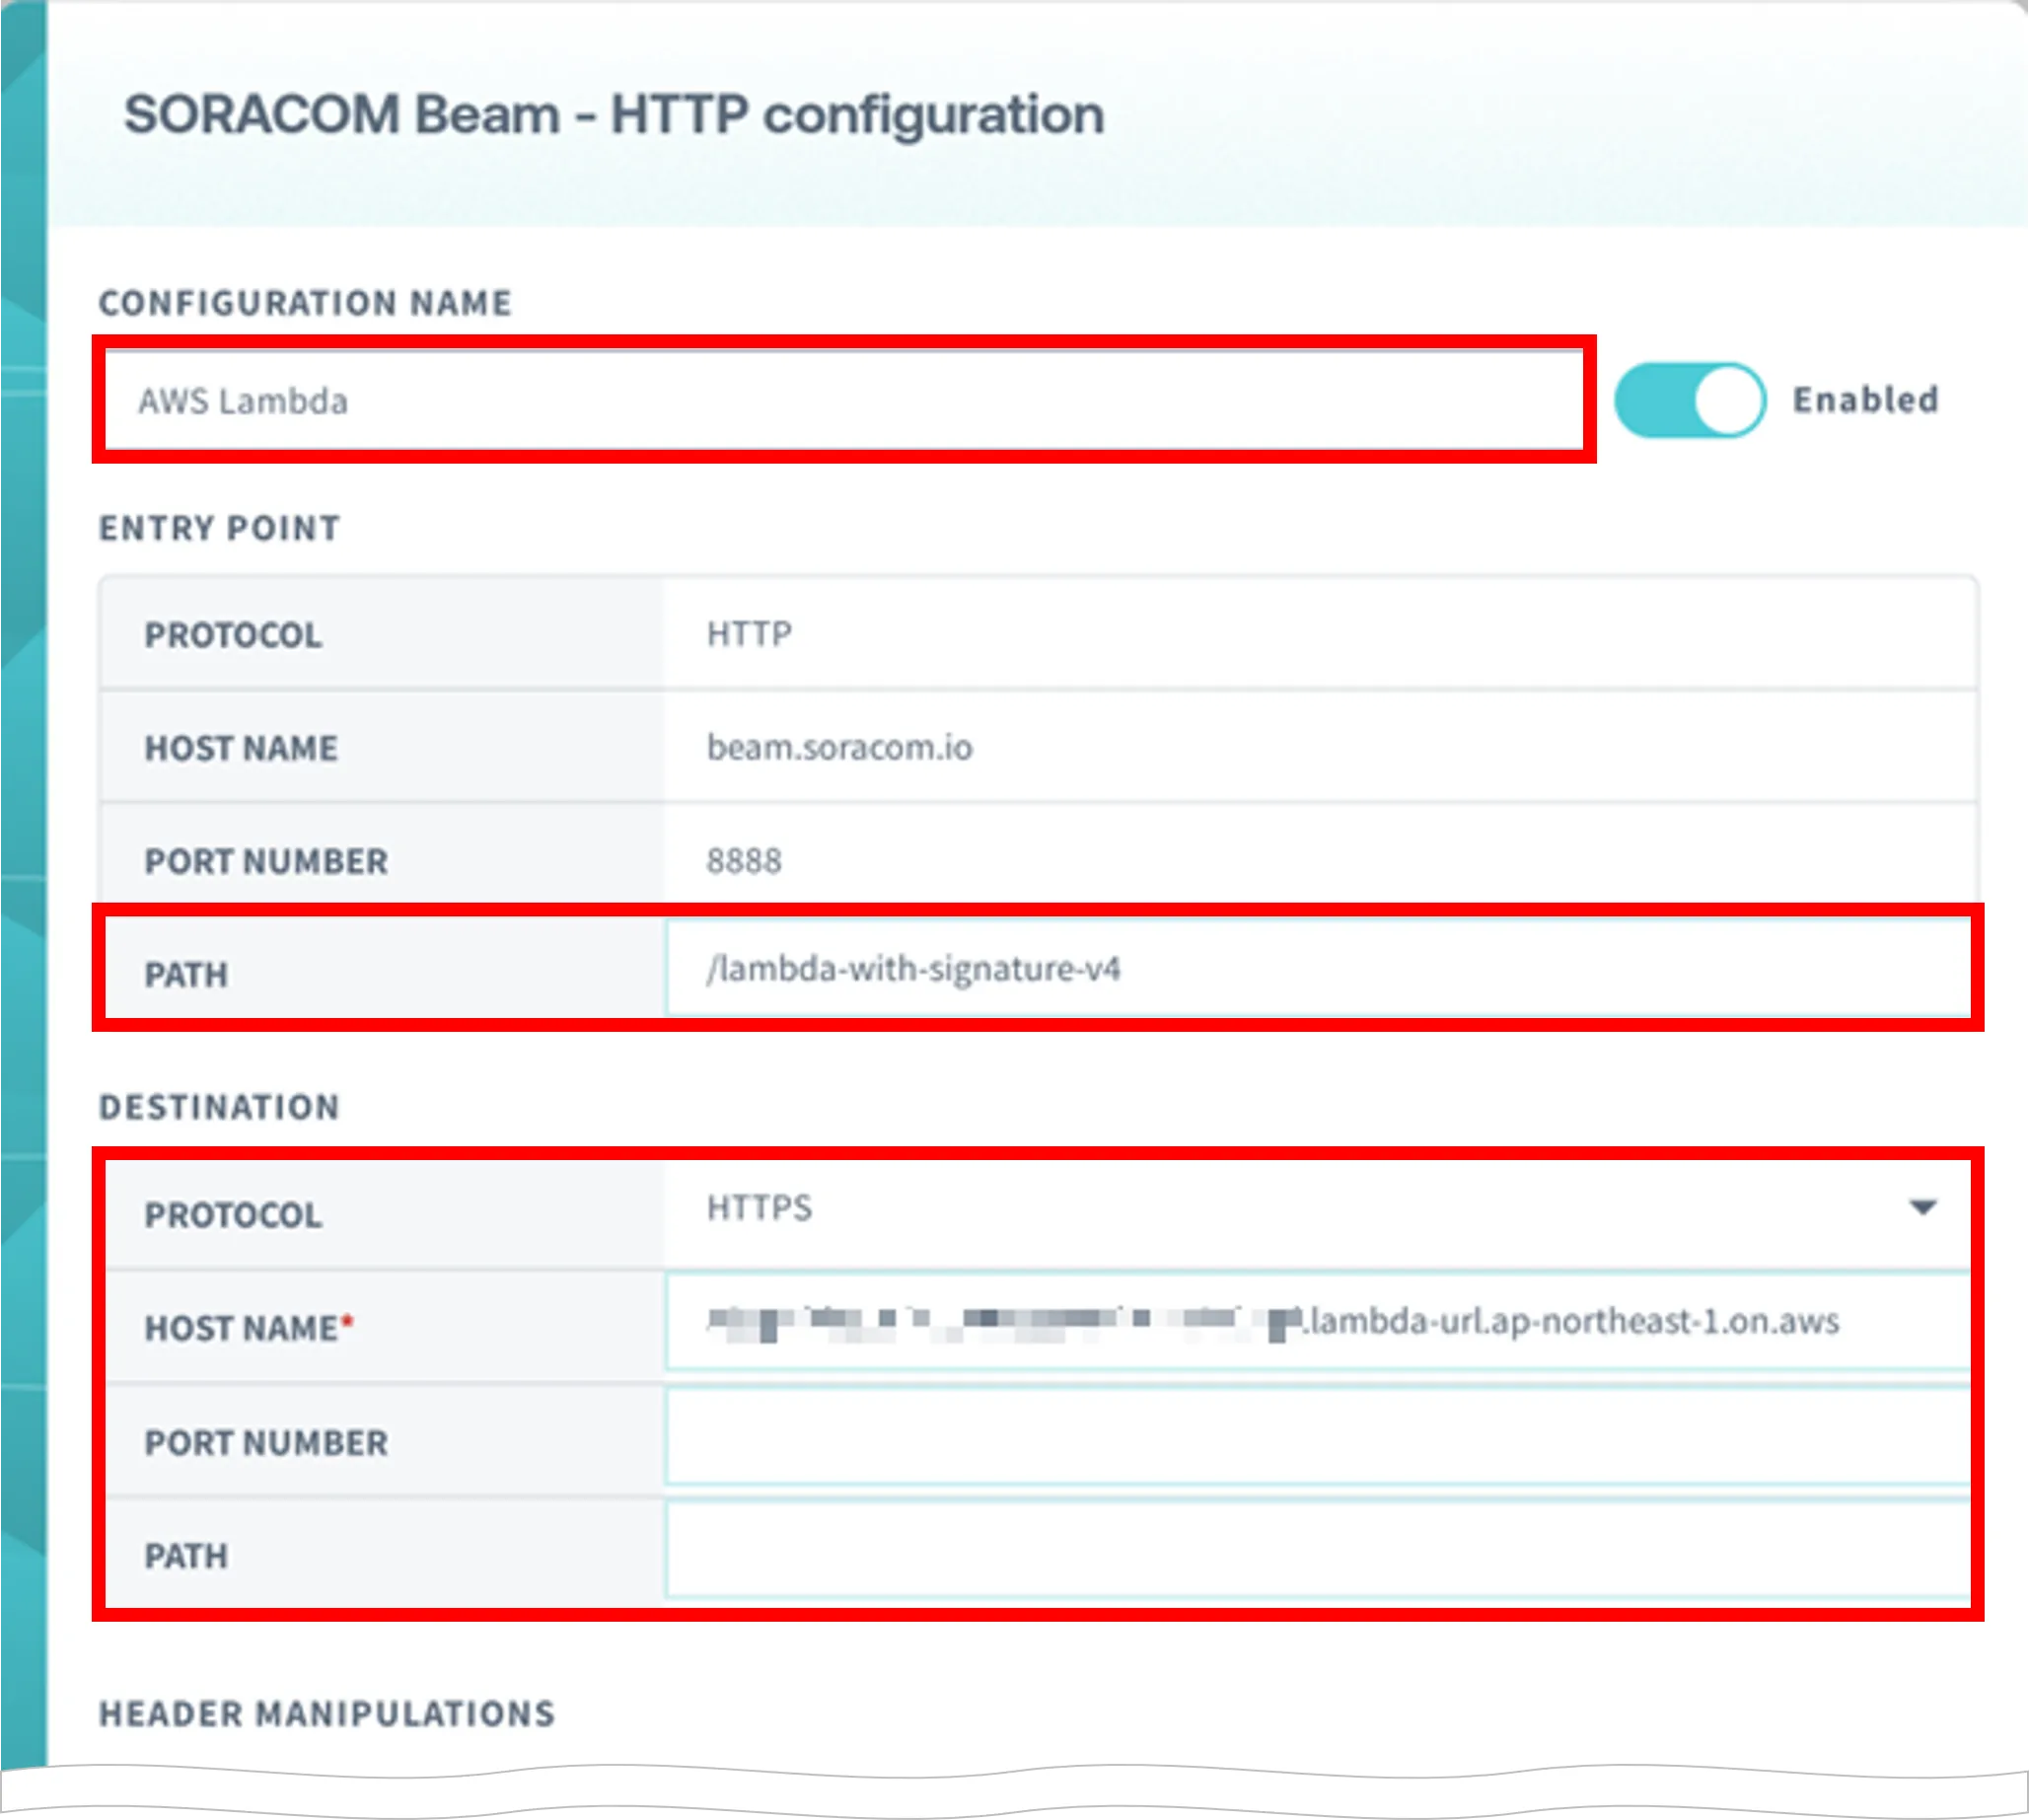
The "SORACOM Beam - HTTP configuration" pop-up will appear.
3. Set up as follows
|
Item |
Description |
| - | - |
| **CONFIGURATION NAME** | Enter any configuration name (e.g. `AWS Lambda`). |
| **ENTRY POINT** > **PATH** | Set the path as you like (e.g. `/lambda-with-signature-v4`) |
| **DESTINATION** > **PROTOCOL** | Select "HTTPS" |
| **DESTINATION** > **HOST NAME** | Enter ${lambda\_func\_url} without the leading "https\://" and the trailing "/" (e.g. `XXXXXXXXXXXXXXXXXXXXXXXXXXXXXXXX.lambda-url.ap-northeast-1.on.aws`). |
| **DESTINATION** > **PORT NUMBER** | Leave blank. |
| **DESTINATION** > **PATH** | Leave blank. |
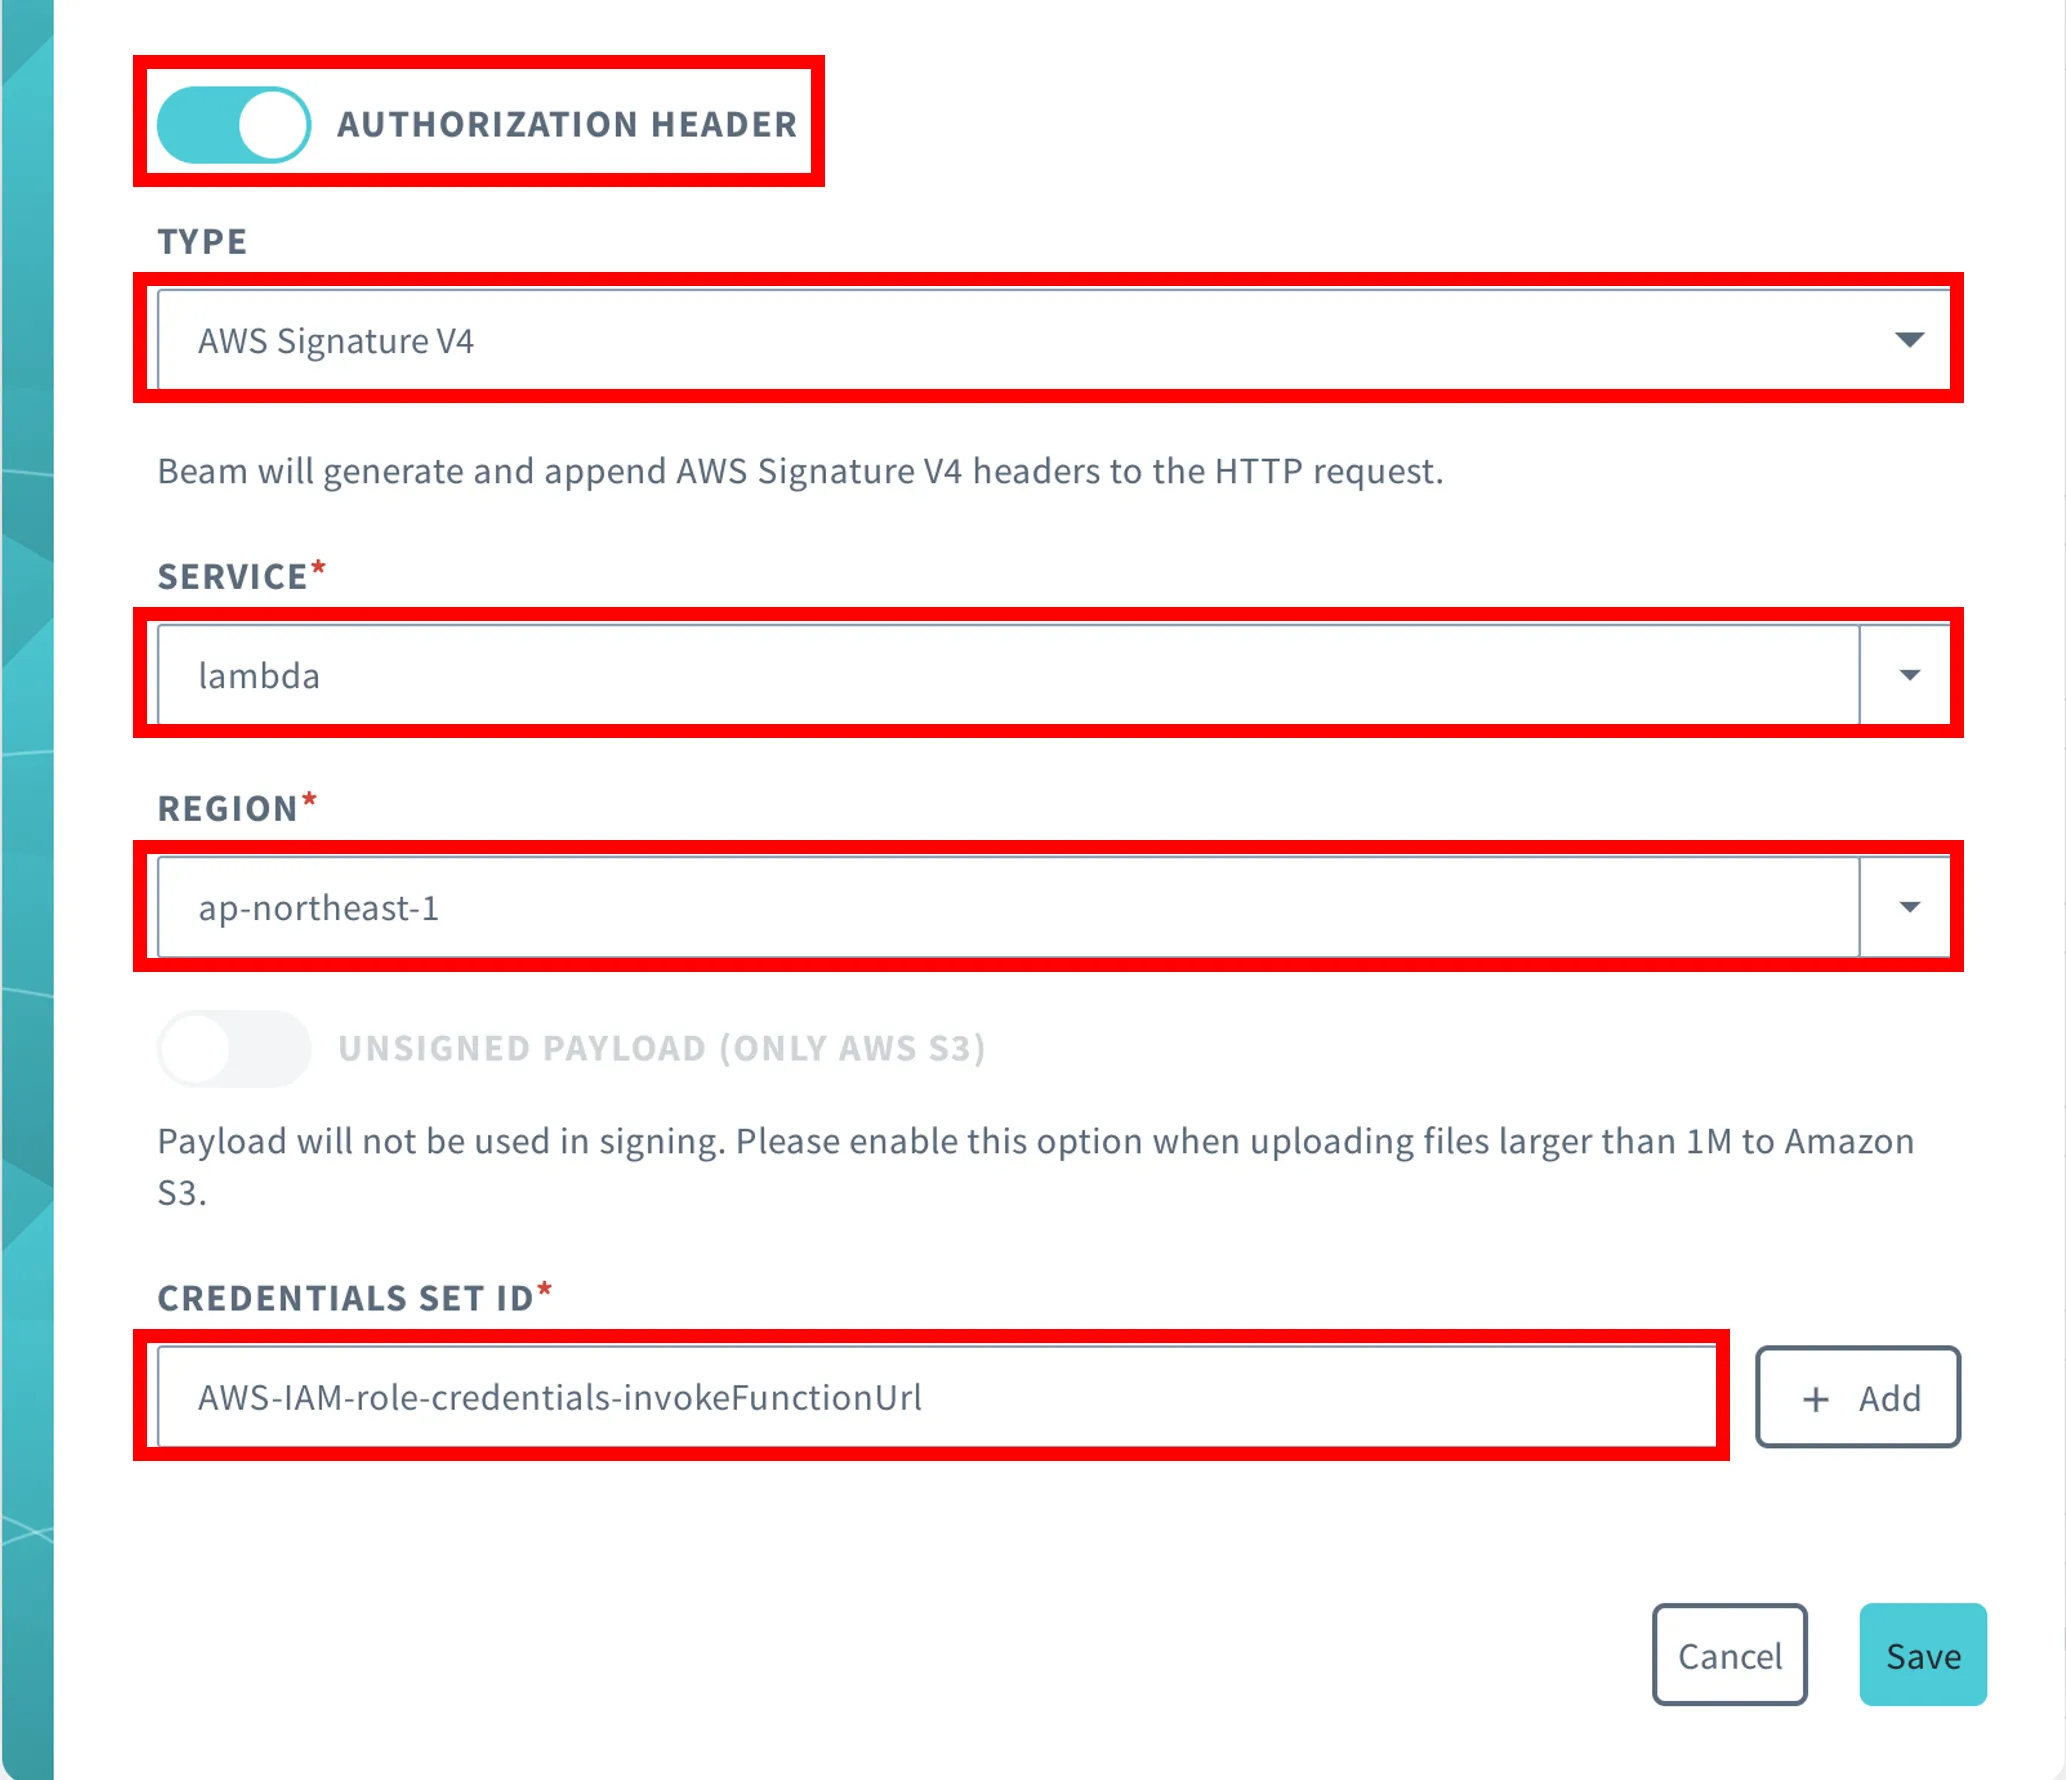
| **HEADER MANIPULATIONS** > **AUTHORIZATION HEADER** | Turn on and set as follows:
- **TYPE**: select "AWS Signature V4". **SERVICE**: Select "AWS Lambda". **REGION**: Select the region for the AWS Lambda. **CREDENTIALS SET ID**: Select the AWS IAM role credentials registered in [Register AWS IAM role credentials in the credential set](https://docs.soracom.io/en/services/beam/aws-lambda/#register-aws-iam-role-credentials-in-the-credential-set). |
> [!NOTE]
>
> Multiple entry points can be set for a single group configuration. The HTTP entry point is identified by the contents of **ENTRY POINT** > **PATH**. Changing the settings per HTTP entry point allows multiple entry points to be configured for a single group setting.
> [!WARNING]
>
> For more information on the HTTP entry point settings, see [HTTP Entry Point](https://docs.soracom.io/en/services/beam/http).
4. Click **Register**.
5. Add the IoT SIM to the group you created. If you need help, see [Basic Usage - Adding a Device to a Group](https://docs.soracom.io/en/services/groups/usage#adding-a-device-to-a-group).
Beam configuration for your IoT SIM is completed.
> [!WARNING]
>
> In this example, the HTTP entry point is used, but the AUTHORIZATION header can also be used for Website entry point.
## Step 4: Call the AWS Lambda Function Using the HTTP Entry Point
Call an AWS Lambda function using Beam's HTTP entry point.
Ensure the device is connected to the Soracom platform and execute the following commands.
```bash
curl -X POST http://beam.soracom.io:8888/lambda-with-signature-v4 \
-H "Content-Type: application/json" \
-d '{
"key": "value"
}'
```
You will see the following response from the code inside your Lambda function.
```bash
{"message":"Hello from Lambda!","body":{"key":"value"}}
```
> [!CAUTION]
>
> You can also to verify that the AWS Lambda function URL continues to be inaccessible directly. Execute the following commands on the device using your IoT SIM. (Replace the URL with your function URL.)
>
> ```bash
> curl -X POST https://XXXXXXXXXXXXXXXXXXXXXXXXXXXXXXXX.lambda-url.ap-northeast-1.on.aws/ \
> -H "Content-Type: application/json" \
> -d '{
> "key": "value"
> }'
> ```
>
> You will see the following response because this command calls the Lambda function instead of using Beam.
>
> ```bash
> {"Message":"Forbidden"}
> ```